Leaderboard


Popular Content
Showing content with the highest reputation on 02/10/19 in all areas
-
2 pointsMake sure the faces are flat and clean. Use the OEM gaskets. I used no goop of any kind. They are slippery, so I doubt anything would stick. I might consider Hylomar Blue if I were to use anything. Anything you use must be rated to resist fuel. Fuel dissolves most gasket goops. Many state not to use for fuel applications, and [before I knew better] I have seen them disappear from similar situations.2 points
-
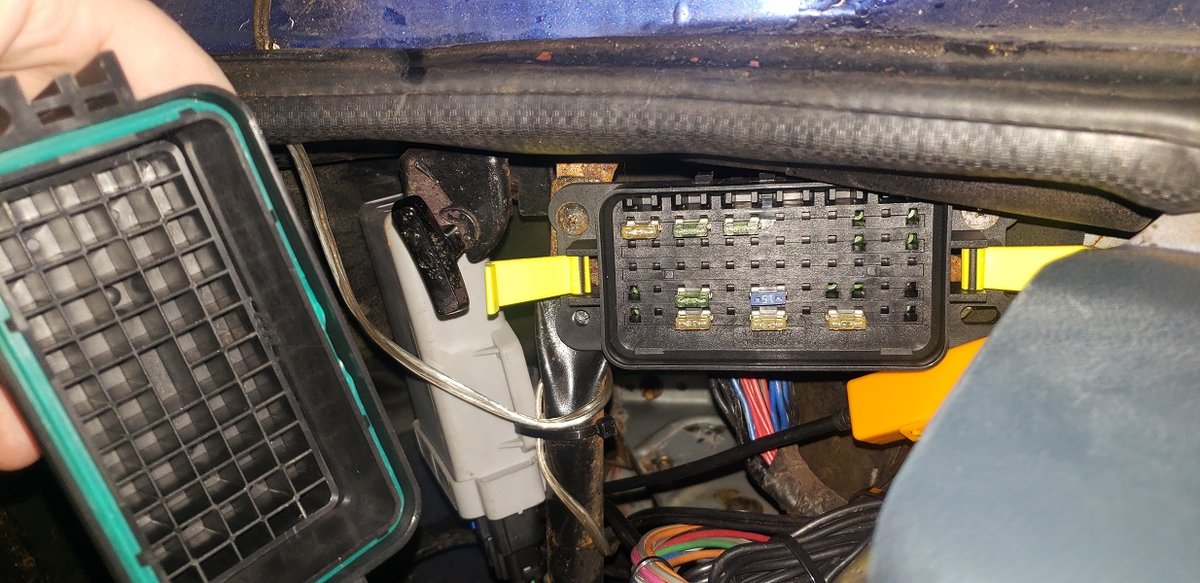
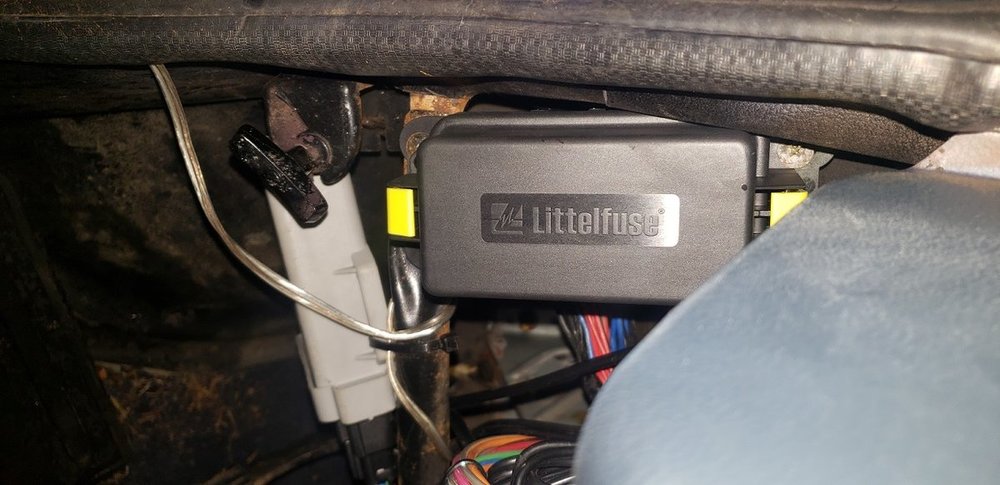
I have had to replace a few first gen fuse panels for customers, and wanted to let everyone know about this panel I found that is a perfect fit - the bolt holes line up with the factory glass fuse panel. You do need a weather-pack crimper for this panel. It accepts micro fuses. It is also fully water tight so no worries about windshield leaks destroying the panel. https://www.ebay.com/itm/HWB60-ALNG-Waterproof-Fuse-Relay-Panel-Kit-with-Terminals-12V-Universal/142641687058 Anyone local to my shop - I am offering this upgrade for $300 parts and labor. GD
 1 point
 -
1 point@YnotDIY I have used to cheapo blue paper gaskets in the past, and had no problems, just wipe the surfaces clean, torque to tightness feel by hand with a 1/4 ratchet. (i think it's only 12 ft/lbs but don't quote me on that) Then check the seal with spray...but i did replace with a set of beck arnley (or whatever the generic german brand is, Victor reinz?) black ones in a week so I never tested the cheapies long term. I like to keep my engine squeaky clean so i keep a can of brake cleaner lol! The thing about the cheap ones is that if you don't get them on evenly the first time, you might as well throw it in the trash. Just my experience. I don't see why a gasket sealer won't work. However, it's well documented on why oe quality is more critical in Subarus when it comes to gaskets, spark plugs and wires, etc...picky little turds, haha! Happy wrenching man! Oh one last thing, this was on an ej22, but I don't see why the same would not apply to an ea.1 point
-
1 point1 pointOnly thing I do after scraping off the old gasket is to wipe the mating surfaces with a white spirit like mentholated spirits. Then gasket on and bolt up to required torq specs. Cheers Bennie1 point1 pointtime to attack driver side inside rocker and floor ... rocker is pretty much complete in first pic.. getting it shaped and tacked in .. time to attack the floor section and nearly all finished for this area... starting messing around trying to see how the wrx interior will fit, doesn't look bad to me. bed is fully primed.. think I'm just going to do por-15 for right now then Bedliner later after wrx suspension is fitted. also dashboard and all hvac had been stripped out.. more updates, made a bunch of templates yesterday.. welded in the 2 side pieces for the support member near front driver wheel.. waiting for por15 to coat the inside walls and then weld the bottom piece on.. driver side floor all welded up. seam seal and por15 next and then onto the passenger side here is the driver side floor mostly stripped all the way down getting ready for por15 driver front floor section has been por15'd support member underneath driver floor has been built and inside por15'd patch piece for rear section of driver floor and the bed raptor lined it's gonna get another 2-4 coats nice and even after all the fab work is completed underneath for the wrx suspension got the motor and trans out today.. very easy compared to a wrx.. lol oh my.. look what we have here... I started tearing into the front end and figuring out how to make the wrx suspension fit.. So first things first... take all the brat stuff out ! next was mocking up the wrx member.. wrx member is way too wide! originally was going to weld the wrx member to brat frame rails but decided against that.. brat crossmember fits wrx arms and engine mounts with barely any modification (minor) now that brat member is bolted back in time to make the wrx stuff fit.. temporarily using brat top hats on sti struts untik i figure out the top hat mounting.. only one piece left before suspension is fully bolted in.. have to make custom bracket/mount.. some 17s with big snow tires for my lifted impreza... not fitting... lol and after all that realized the brat subframe doesnt droop nearly as low as wrx one so spacers will be made.. (nearly finished today) rear end is coming next spacers fitted in place.. little bit of mockup action.. time to make this brat bracket fit wrx control arm slowly getting there... next is fab up a tranny mount.. next updates coming Sunday.. the bracket will also be reinforced second mount point for control arm made and ready to be tacked in time to put the real deal and see how it fits.. It sure is tight.... stock rad still fits way too close for comfort tho.. Also tranny mount fabbed up today forgot take pics. of that. rear end coming soon! started to attack the wrx wiring harness today jeeeeezzzzz.... first day i had no diagrams really and i forgot to label everything when i took it out of the wrx delete pile from the first day. mostly just airbag wiring... then i downloaded some wiring diagrams... who can make sense of this?? hahaha piles getting bigger.. yikesss... i think im done... hopefully bout 2 or 3 5 gallon buckets of loom and tape... hopefully i dont need any of those... engine bay harness pretty much done.. poor wrx.. accidently broke the rear windhshield... ugh time to get cut into pieces... sorry.... took off work all last week to put in time on the brat... worked a solid 50 hrs i would say but progression is still really slow lol ok time to start working on fitting wrx interior... first up is dash support bar.. time to hack it up its in there... time to make the actual dashboard fit.. its in there but wayyy too wide for doors to close.. next is steering wheel... looks good enough to fool some idiots on the internet yayy the doors close now! barelyyyy.... next cut out the rusty spare tire well and make room for pedal assembly mounts and slave cylinder etc... next is fitting wrx tranny tunnel.. rough cut.. test fit... continued... all cleaned up ready to weld.. and heres a pic of us shortening the stub on the brat brake booster... (wrx one is nearly impossible to fit) got some more progress for those interested... first up ill show you how to make a wrx steering column fit a brat steering rack tranny tunnel getting burnt in place time to cut up rear end of wrx for strut towers crossmember and trailing arm mounting points towers braced and cut.. crossmember mounts cut out not much left .. temporary crossmember made up so we had somewhere to lift from while we figure out trailing arm mounts. initial crossmember mock up.. before we realized we would have to lower it 3" down to get correct suspension angles tranny crossmember mocked up rear crossmember in place after 3" dropdown dat fitment tho... lol thats just a fixed piece of metal holding wheel in place.. wont stay like that forever but i do like the way it looks lol will probably be around the final full droop height so nice to see matching wheels time to start cleaning and undercoating the areas that will be boxed in and never to be seen again pitch stop mount tacked in place.. Okay and there you guys have it, you are all caught up now on the progress! Next to do is fab up trailing arm mounts and cut out brat wheel wells to make room for wrx ones!1 point