89Ru
Members
-
Joined
-
Last visited
Everything posted by 89Ru
-
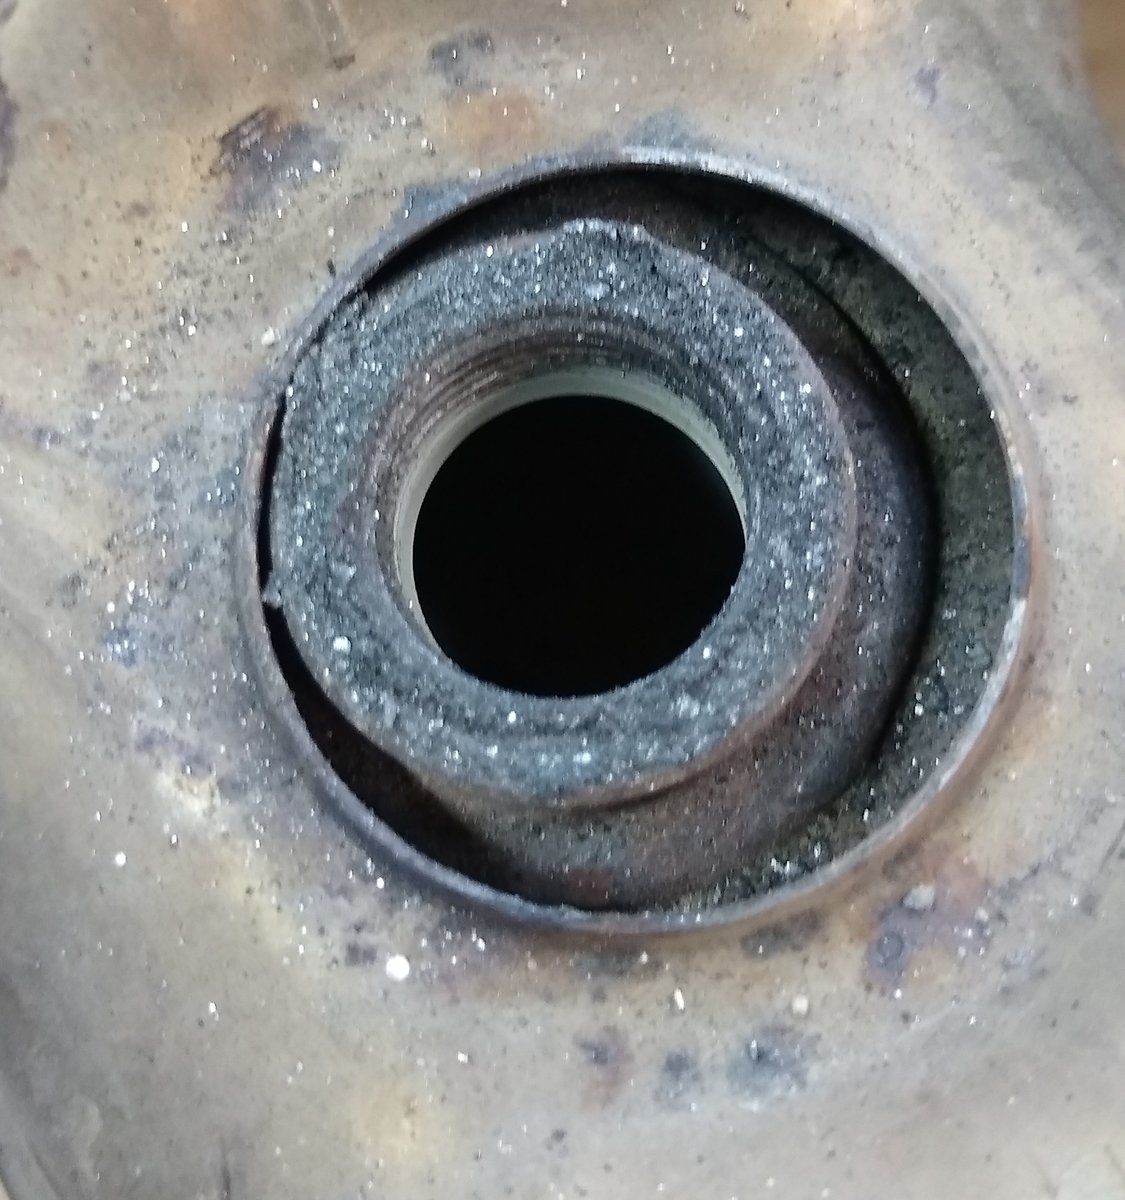
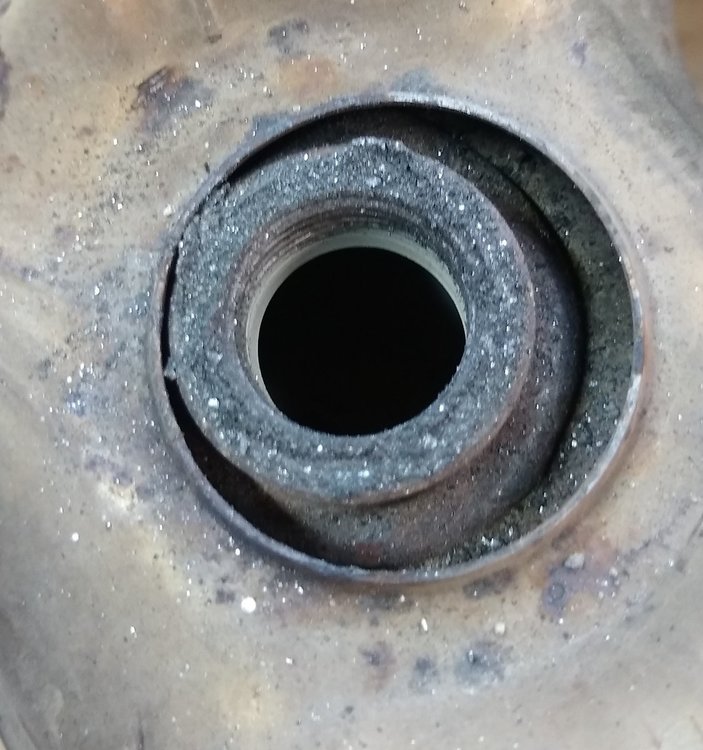
89Ru replied to 89Ru's topic in 1990 to Present Legacy, Impreza, Outback, Forester, Baja, WRX&WrxSTI, SVXI haven't reconnected. My thought is if the cat is crumbling then even if I clear the obstructions with compressed air and solvent, it might leave me stranded in Iowa in the near future. Below is a picture of some ferrous, i.e. magnetic, crud that I found at the upstream oxygen sensor. If this stuff is coming from outside the exhaust system, my concern is a new cat will eventually become plugged.
-
89Ru replied to 89Ru's topic in 1990 to Present Legacy, Impreza, Outback, Forester, Baja, WRX&WrxSTI, SVXRan it with open exhaust manifold. Sprayed the MAF with contact cleaner. Power restored! Video of the loudness
-
89Ru replied to 89Ru's topic in 1990 to Present Legacy, Impreza, Outback, Forester, Baja, WRX&WrxSTI, SVXAfter checking the plugs and compression I reinstalled the air intake snorkel. Didn't leave anything disconnected, afaik, but got P0102 and P0113 codes when I started it. P0102 Mass Air Flow (MAF) circuit is low P0113 Intake Air Temperature Circuit High Input Cleared them and they didn't come back on short drive. Still low power as before. Then took the cat off for pics above. Just getting weirder before it gets better. I think on this car the MAF and intake air temp are one sensor on the snorkel hose by the air filter. Looks like I need a new front cat and maybe MAF sensor. Other than P0420 many months ago these are the first codes I have gotten in a while.
-
89Ru replied to 89Ru's topic in 1990 to Present Legacy, Impreza, Outback, Forester, Baja, WRX&WrxSTI, SVXFront cat pic. Looks like it's degrading. Can't see other side without bore scope. Some loose material but no big chunks.
-
89Ru replied to Jadu108's topic in 1990 to Present Legacy, Impreza, Outback, Forester, Baja, WRX&WrxSTI, SVXBull pin always works for me. Will usually destroy the boot but you are replacing it anyway. It wedges into the gap between the pinch joint and the control arm. Keep the castle nut on, whack the end of the bull pin with a copper hammer and it pops the head of the ball joint out of the knuckle right out. 1-5/16" X 12" Standard Bull Pin klein-3259 Ordered from the tool barn...
-
89Ru replied to Jadu108's topic in 1990 to Present Legacy, Impreza, Outback, Forester, Baja, WRX&WrxSTI, SVXGet a salvage alternator. 95 through 98 is a direct swap in. Flush the power steering with new fluid and then re bleed with wheels off the ground, 6 full turns right to left. Agree about ball joint. Also check both right and left lateral links, the plastic around the bushing can crack and have play and make a popping sound in turns. Moog makes a replacement.
-
89Ru replied to RMVR53's topic in 1990 to Present Legacy, Impreza, Outback, Forester, Baja, WRX&WrxSTI, SVXif you're smelling coolant there's likely a leak somewhere. Replace the radiator. I've had good luck with Spectra premium at RockAuto. Cheap insurance.
-
89Ru replied to 89Ru's topic in 1990 to Present Legacy, Impreza, Outback, Forester, Baja, WRX&WrxSTI, SVXEZ30 intake manifold vacuum for comparison Normally running vehicle. From idle up to 3500 rpm. Vacuum increases in EZ30, where the EJ253 rises, then drops after 2000 rpm. Going to drop the exhaust.
-
Chosen engine source: JDMracingmotors of Montreal JDM Legacy JDM 2000-2002 3.0L H6 EZ30 Engine video of compression test on youtube. all over 180 psi parts list from rock auto Stabilizer Bar Bushing MOOG K200635 pack of 2 $7 Front Stabilizer Bar Link MOOG K80693 #20420AA003 pair $27 ac delco oil filter $4 air filter $7 fuel filter $16 serpentine accessory belt ac delco $17 Screw on trans filter beck arnley $5 PCV valve $6 beck arnley fuel injector refurb kit (four seals) x6 $5 ea (from dealer $36) Pre-existing RH fuel rail vapor odor- could be hoses or seals at injector Retain fuel rails from stock, due to JDM having water-dirt contamination from weather exposure. Swap fuel injectors from JDM intake to stock intake. Replace all fuel rail hoses and filter hoses Raybestos 3/8" magnetic trans filter inline at transmission cooler add-on hose ID PCV hose 0.4" valve cover 0.5" head to intake 8mm fuel line 8mm (5/16") evaporator 1/4" power steering return 0.4" 3/8" Dealer parts Trans seal(s) leaking at CV axle right side, left side also? Replace both axle seals and o-rings. leaking oil at trans, suspect from seal(s) retainer ring, o-ring x2 806984040 $2 ea retainer ring, oil seal 806730031 $5 RH verify side retainer ring, oil seal 806730032 $5 LH verify side front differential oil drain plug gasket 803926090 PCV hose to valve 11815AB083 $37 valve cover gasket R 13270AA104 $25 valve cover gasket L 13272AA104 $25 valve cover spark plug gaskets x6 13293AA051 $8 ea exhaust manifold gasket x2 44011AE040 $6 ea exhaust donut gasket 44011AE031 $9 exhaust flange bolt at donut x2 44059AA010 $3 ea exhaust spring at donut x2 44044AA010 $4 ea exhaust flange bolt nut at donut x2 802008270 $2 ea exhaust flange bolt at muffler x2 010510307 $2 ea exhaust gasket at muffler 44011AE01A $3 exhaust flange bolt at muffler 902350001 qty 2 $2 water pipe hose, right angle, top, RH front 99078AA090 $6 water pipe hose, dog leg, top, front, LH 99078AA120 $8 water pipe hose, RA, throttle body, top, RH rear 807607251 $5 hose, water pipe hose, throttle body, top, 21204AA681 $10 hose, water pump bypass, at Tstat, straight, 807615030 $10 hose, water, at oil cooler, right angle, 99078AA110 $8 hose, water, at oil cooler, straight, 807611060 $4 hose, water, at Tstat, right angle, 807611071 $5 HOSE-HEATER,OUTLET, 72421AE02A $15 HOSE-HEATER,INLET, 72411AC020 $15 hose, vacuum, Intake manifold, right side, front, 99071AB361 $4 reuse: hose, vacuum, Intake, left side, front, 99071AB280 $13 or purchase generic hose such as: High Performance Silicone Vacuum Hose - 5 feet - 5/16" ID (.3125"|8mm) - Blue https://www.ebay.com/itm/263495230935?ssPageName=STRK%3AMEBIDX%3AIT&fromMakeTrack=true parts to refurb torque converter Housing OIL SEAL 806750060 Price:$6.51 Input Shaft O RING 806920070 Price:$0.84 Oil Pump Shaft RING-SEAL,A 31361AA000 Price:$8.74 Oil Pump Shaft CIRCLIP-INNER 805343020 Price:$2.43 Low pressure side power steering hose from hard pipe near airbox to plastic reservior is cracked. Power steering low pressure HOSE-RETURN 34611AE14A two types, either $17 or $70. Unsure which one I have. Replace with Gates power steering return hose. 3/8" ID. GATES 350010 (350020) Power Steering Return Four types of power steering return hose, suction side of reservoir Will keep existing hose for now, not leaking 34611AE23A HOSE-SUCTION $19 34611AE12A HOSE-SUCTION $38 34611AE07A HOSE-SUCTION $20 34611AE08A HOSE-SUCTION $24 CLAMP-HEATER PIPE 72057AA001 $2 gasket, thermostat 21236AA010 $3 reuse existing thermostat and rad hoses (replace at next coolant flush) valve cover hose to air box R side valve cover hose to air box L side 11815AB062 $17 gasket, EGR hard pipe x2 14719AA033 $5 ea donor is RHD: swap intake over (see notes) GASKET-INTAKE MANIFOLD x2 14035AA410 $13 leave head gaskets alone reseal timing cover with three bond 1217H (for 1280B) oil pan pickup o-ring 806919080 reseal oil pan with ultra grey oil cooler o-ring replace with dealer part reseal rocker valve covers with OEM gaskets and sealant recommended sealant three bond 1280B - discontinued by SOA Replaced by THREE BOND 1217H Part Number: SOA868V9610 Alternative: 3M™ Ultrapro™ High Temp Silicone Gasket 08672 Black 3 Oz replace spark plugs x6 with NGK PLFR6A11 $8 ea platinum WASHER,CYLINDER HEAD SEALING 10982AA000 Two on timing chain cover, replaced timing cover, crank pulley, oil seal 806738200 $5 bucket and shim valve inspect. Largely in spec. replace spark plugs transmission rubber mount 41022AE12B seems intact ************** Job notes *************** intake manifold ************** prior to pulling engine- removed intake manifold due to difficulty accessing 4 torque converter bolts. injectors and fuel rails remain attached to manifold. must remove all 6 injector electrical connectors...this is not mentioned in procedure. must also remove LH oxygen sensor mate that is fastened to a metal bracket in order to remove the injectors and leave the harness on the engine. removed bracket first due to difficulty with this step. Intake differences: vacuum line to brake on right side of JDM intake, strange square plug on L side. Could just run a longer vacuum line to the fitting...or swap intake over...I chose to swap. ...notes from subaruoutback.org... Brake booster connection has a nipple on one side and a plug on the other. About half the time I can get the two broke out and swapped. If not I just run a longer hose, and save the one-way valve made into the OEM hose. AC compressor is different. Alt and PS pump are the same. No other major stuff to swap. No need to swap intake manifolds. ...end of subaruoutback.org... *********** engine separation ************** advised to use the special tool p/n 498277200 https://www.ebay.com/itm/Kent-Moore-498277200-Flywheel-Stopper-Subaru/372549661330?hash=item56bdb0b292:g:I2kAAOSwrmRcJVqM:sc:USPSFirstClass!37122!US!-1:rk:1:pf:0 Tool is a keeper for the torque converter, attached to the lower bolt hole for the starter. Otherwise torque converter can wiggle off the trans and come with the engine. This part is $130 on ebay. Some have made it themselves. Others have jury rigged something using ty-wrap, wire, or the alternator bolt and washers through a torque converter bolt hole. Part I made from 16 awg sheet metal bent on engine separation. The torque converter was easily pushed back in after the engine came out, but according to FSM, it needs to be around +0.1" offset from the trans bell housing. I measure it to around 0.25". So torque converter coming out. Not sure where the problem is. The oil pump shaft is seated on the converter well and the circlip is seated in the slots w/o obvious damage. Will reuse existing circlip. Possibly the input shaft was dislodged slightly. The input shaft came out when the torque converter was removed (easily). Has an o-ring that is degraded. Will replace. Reinstall input shaft into transmission. FSM states that it should be 0.197 - 0.217 offset from front of trans. I measure it at 0.204 so we're good. Oil pump shaft has a ring seal that is split, intentionally? Will replace. Oil seal will be replaced for good measure. Alternative, from USMB: When you get the bolts out of the TC and its free from the flexplate, take a big screwdriver or prybar and pry it back away from the flexplate. Should move back about 1/4" and disengage the pilot stub which will help keep the TC from sliding out when you separate the bellhousings. When you get the engine and trans separated about an inch, get a bolt that's about 3/4" longer than the width of the upper bellhousing. Get a nut and a fender washer to fit the bolt. slide the bolt into the top corner bellhousing bolt hole, put the box end of a large wrench, about 3/4", on the bolt, point the other end of the wrench towards the center stub of the TC. Slide the washer on, then the nut, then tighten it up. It doesn't need to be he-man tight. Just tight enough to keep the wrench from moving. Now as long as you didn't drag the TC out that far while trying to get the engine loose, it will stay seated properly until you've put the engine back in. images of timing cover internals https://www.flickr.com/photos/dbur971/sets/72157700601187324/ ************ transmission seal retainers *************** R side first Degreased externals. Removed retainer lock. Marked retainer. Removed with channel lock pliers and PVC tool. 7 turns to remove. Tapped out oil seal with rubber mallet. Removed bearing. Degreased. Reinstall new oil seal and o-ring. Reinstall bearing after coating with gear oil. Reinstall retainer 7 turns to hand tight. Used pliers to turn 1-2 more teeth to line up with mark. Reinstall retainer lock 25 ft-lb. L side next Degreased externals. Removed retainer lock. Marked retainer. Removed with channel lock pliers and PVC tool. 7.25 turns to remove. Tapped out oil seal with rubber mallet. Removed bearing. Degreased. Reinstall new oil seal and o-ring. Portion of differential popped out and was easily reinstalled with some wiggling. Reinstall bearing after coating with gear oil. Reinstall retainer 7 turns to hand tight. Used pliers to turn 3 more teeth to line up with mark. Rather tight for last tooth. Periodically rotated shaft during tightening. Shaft not overly light after retainer installed. ****************** A/C compressor ***************** swap old unit onto JDM engine. JDM has lines cut. Will be spare. Existing harness does not match JDM connectors. ***************** alternator ***************** JDM will be spare. Reinstall old unit. ****************** power steering *************** JDM will be spare. Reinstall old unit. Old cradle fits JDM engine. left side oxygen sensor cable cut. swap harness over L side knock sensor missing, harness cut. Swap sensor over. small ventilation hoses on front of valve cover to intake piping L side loose/cracked. Replace. R side seems ok Replace fuel lines on intake as needed Gates 5/16" 27348 Barricade MPI Fuel Line Amazon, 15' $41 Fuel evaporator vapor return line from intake to firewall is rotting, replaced with yellow 1/4" tygon tubing, fuel rated Tygon F-4040-A PVC Fuel And Lubricant Tubing, 1/4" ID, 3/8" OD, 1/16" Wall Replaced PCV valve. Sealed with ultra grey. Note that JDM valve did not seem to be sealed. Torque converter notes: Post submitted to USMB. See separate post of the ugliness. Tapped oil pump shaft oil seal in using a punch to try to gain some increased travel on torque converter. Ended up driving it in too far. Tried to pull it back with a slide hammer but tore the seal. Removed with slide hammer. Bought and installed new seal. Drove it in about 0.05" past lip this time to avoid covering oil access hole at 3pm position. Reinstall torque converter w/o issues on 2nd time. Separation is 0.15". Plenty of space between flex plate and converter w/o impact after engine reinstalled. Install 4 bolts, replace cover. Then install intake manifold. Flex plate: Installed while on engine stand. Used a 3/8" extension to brace flex plate against engine case. Torque to 60 ft. lb. Grease torque converter center stub and flex plate receiver. No bearing here. exhaust manifolds: scotch brite and orbital sand with 60 grit. spray gaskets with copper sealant. Leave flange prior to resonator as is. loose heat shield repaired with extra piece of sheet metal placed between shield and exhaust pipe. new donut gasket placed. front differential gear oil 80w90 @engine swap 3-2019 used walmart brand. Poured in with 1 qt container with hose/nozzle. Added about 1.25 qt. Crank bolt: Method to install in a manual trans does not work (locking brakes). No way to lock the torque converter, just spins. Should have tightened it while on engine stand when installing flex plate. Used a combination of 3/8" extensions and a large bolt to hold the crank pulley vs. the center bolt. Torque to 160 ft. lb. Took pictures of the madness. Might have stressed the idler pulley bearing on the A/C bracket. Engine install: After much trouble attempting to level out the engine on the hoist, which was pretty unsuccessful, install goes fairly smoothly anyway. Engine was listing to the right side and not tipped back to match the transmission. After a lot of jockeying to line up the two lower engine studs on the transmission bell housing, the engine was raised on the hoist effectively tipping it back. It slid in fairly far on the studs, and then a bit of wiggling and pressure at the 12:00 position got the two pins started. Had sanded and greased the pins prior. Install four upper bolts. Can't find the short bolt on the top, so use a power steering bracket bolt instead. Install four long bolts in lower portion of bell housing, plus two nuts on the lowest studs. Opted NOT to reseal trans pan. Will monitor fluid levels. Pan accessible with exhaust installed so will not have to drop exhaust for reseal. First start: cranked a long time w/o firing. Likely no fuel in rails. Cycled ign on and off 5-6 times to build up fuel pressure. Started and ran at low rpm for a short while, some chuffing and shaking/vibration of engine block that lessened. (In retrospect this shaking is likely due to bad O2 sensor wiring on RH, see below). Had coolant funnel installed. Did not get heat in cabin until temp had climbed quite a bit, but eventually had heat. Raced the engine 5-6 times then held at 2k rpm. Was checking trans fluid also so not a classic cooling system burp. Lower hose cold. Eventually cooling fans came on solid and temp climbing to 206. Shut down and capped. Next day topped off coolant, restarted. Heat in cabin came early. Raced engine as directed. Heat in lower hose, cooling fans cycling normally with temp dropping as expected. Shut down. Next start was later than evening, did a test drive with good cooling results, a bit of gurgling. Still fighting trans fluid levels. Auto trans shifted will on short test drive. Also did a burn in on new front brake pads, up to 40 mph with braking not to full stop, 5-6 times. Getting P0031 which is R side heater circuit on front sensor. O2 sensor itself is 1.6 ohms on tinned leads, open on gold leads. Suspect the heater ckt is on the tinned leads, which is normal reading. O2 sensors have 50k and 80k miles each. R side connector has two pins pushed out that are for heater ckt. Push pins back. Restart, now getting P0131 code. Engine idling rough. Swapped a spare O2 sensor on RH. Same P0131 code. Bought two new Denso O2 sensors from rock auto. New sensor on RH has same code. So now presuming there is a fault in the wiring harness. Either pinched something when installing the intake or the donor JDM engine harness had a preexisting fault. Found broken wire in RH engine harness connector, E47 on wiring diagram. Black wire, part of signal pair to ECM. Buzzed out to B21 connector at firewall. Harvest O2 connector from old engine harness and splice into new harness. Turns out that the signal pair is wired backwards from the drawing. Left as is. No more CEL codes. Three independant O2 sensor-related wiring harness problems with JDM donor harness (LH connector cut off, RH heater pins backed out, broken signal wire). Statistically, of all the potential problems with engine swap to have this type of concentration is bizarre. Transmission fluid: Having trouble getting trans fluid level measurement. Seems to be high, then low. Could be fluid residue getting on stick. Have already added about 4-5 quarts. From USMB: The only way I can get a reading is basically vehicle cold, start, shift through all gears on shifter, put in park pull stick, wipe, reinsert, (a few times, to get excess off stick) Then slowly insert stick, then slowly remove and look at both sides of stick holding it in front of the headlight. It should generally be somewhere in the cold range then. Soob says check it warm/hot but sheesh I just see fluid everywhere on all three soobs if I try it that way. Added about 2 additional quarts of wal-mart dex merc. Finally reading at low end of cold level on stick with engine running, after shifting through all gears, while cold. Next cold start still reading low, so added about 1/2 qt. Now reading just above high end cold.
-
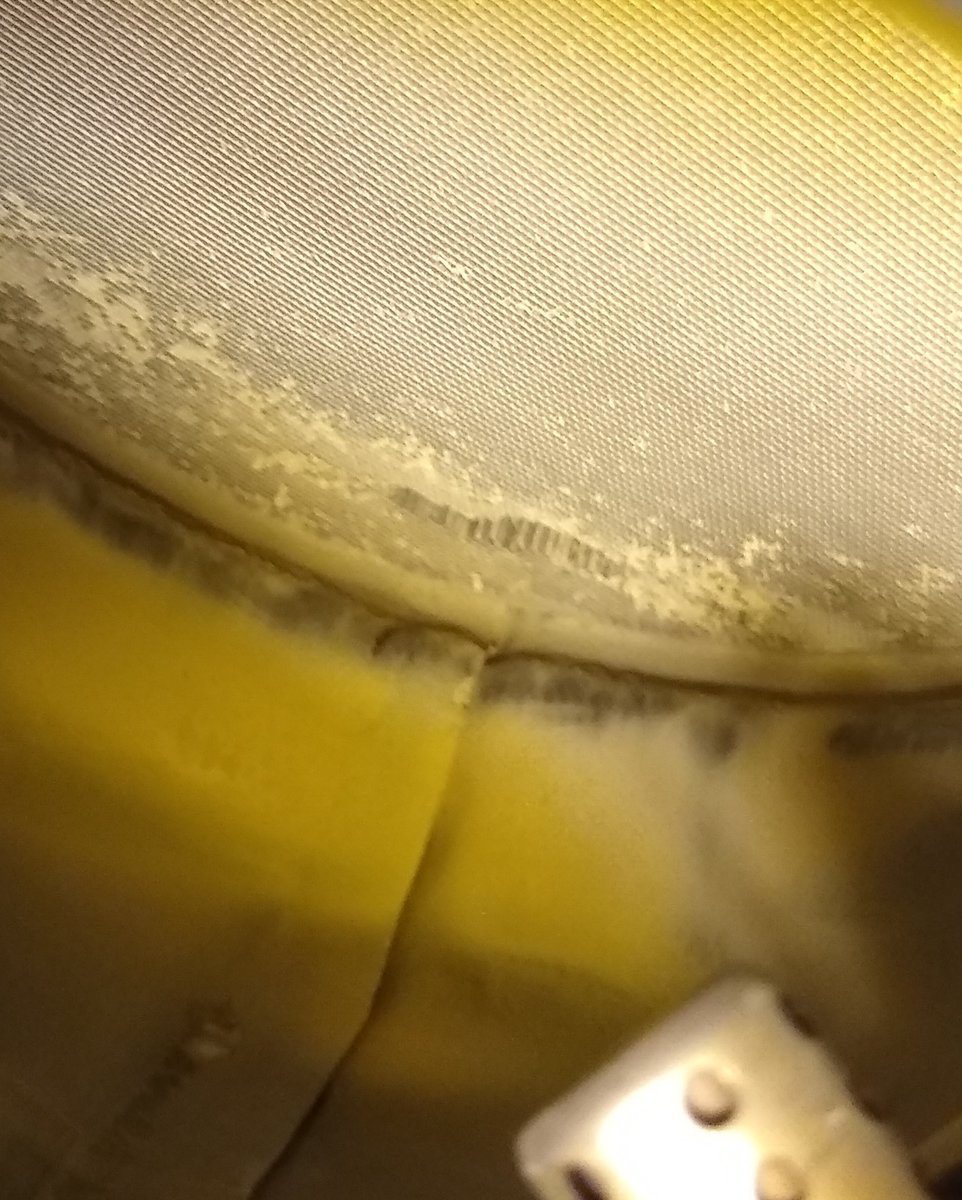
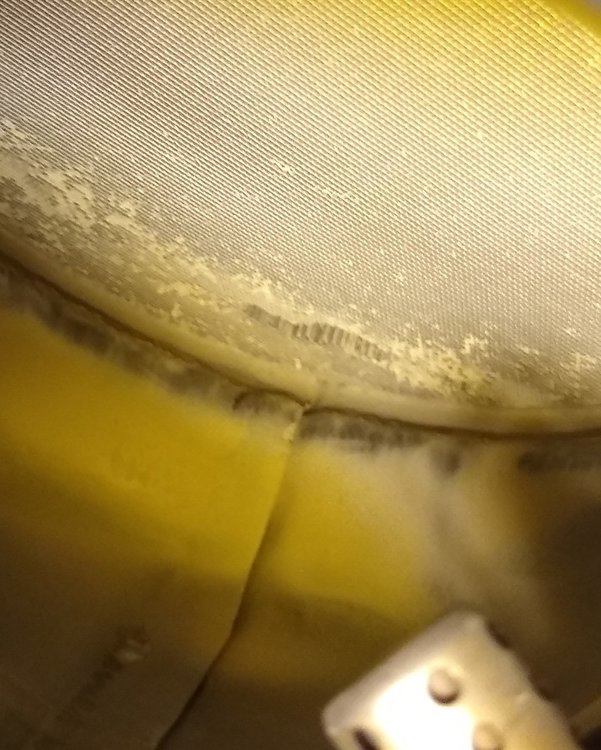
89Ru replied to 89Ru's topic in 1990 to Present Legacy, Impreza, Outback, Forester, Baja, WRX&WrxSTI, SVXFound the seal fragment on the garage floor stuck in rag. Made sure to stick the new ring seal on with extra grease and didn't squeeze all the excess out of the groove. Torque converter went back in to within 0.15" of the trans bell housing. JDM engine working great. Shout out to JDMracingmotors of Montreal for the replacement engine. They post compression test results video on every engine. They also post pictures of known defects, if any, so take a good look at the pics. Had a few issues with the wiring harness but spliced sections of the old and new together to make a complete working harness. Used the stock intake as the JDM has the brake vacuum hose on the opposite side and I could not get the plug out, some kind of strange square fitting. I suppose I could have ran a longer hose...Swapped over the JDM fuel injectors and replaced all fuel lines and injector o-rings. No affiliation with this company. Will post full write-up in a bit.
-
89Ru replied to 89Ru's topic in 1990 to Present Legacy, Impreza, Outback, Forester, Baja, WRX&WrxSTI, SVXIntake vacuum test Does this mean there is no restricted exhaust?
-
89Ru replied to 89Ru's topic in 1990 to Present Legacy, Impreza, Outback, Forester, Baja, WRX&WrxSTI, SVXFinally got some garage time. Replaced both upstream and downstream O2 sensors with Denso parts. Looks like an exact match to OEM. Took a short test drive on flats, power is still dismal at heavier loads. Much less than my 2.2L that has 290k miles. So pulled out the plugs. Gapped ok, just some brown ash, doesn't look burnt or oil fouled. Dry compression test results: cylinder 1 205 psi cylinder 3 165 psi cylinder 2 180 psi cylinder 4 185 psi What's up with 1 and 3? Just did valve adjustment in the last 5k miles when head gaskets were done and I admit I didn't check compression afterwards. If timing slipped a tooth wouldn't all cylinders be affected? Still baffled about this loss of power. Took apart the air intake. Not obviously blocked. Going to post the video of the vacuum test in a bit.
-
89Ru replied to 89Ru's topic in 1990 to Present Legacy, Impreza, Outback, Forester, Baja, WRX&WrxSTI, SVXVacuum gauge shows more vacuum at 2k rpm vs idle. If restricted, vacuum would drop. Don't think there's a restriction. New O2 sensors on the way.
-
89Ru replied to 89Ru's topic in 1990 to Present Legacy, Impreza, Outback, Forester, Baja, WRX&WrxSTI, SVXEek! So that's where my 9 lost mpg's are glowing to haha.
-
89Ru replied to 89Ru's topic in 1990 to Present Legacy, Impreza, Outback, Forester, Baja, WRX&WrxSTI, SVXI like this thought! PO had all wrong AND mismatched plugs. I was like what were you thinking? What's a blow gun? Torch?
-
89Ru replied to 89Ru's topic in 1990 to Present Legacy, Impreza, Outback, Forester, Baja, WRX&WrxSTI, SVXIdle is unchanged. I like the vacuum gauge test idea.
-
89Ru replied to Basket_case's topic in 1990 to Present Legacy, Impreza, Outback, Forester, Baja, WRX&WrxSTI, SVXFor oil pan, trans pan, I use three bond 1217H in a caulk gun tube, which is fairly affordable on Amazon. I find it easier to use than ultra grey in the toothpaste tube. Apply and immediately follow the recommended bolt pattern. Make several passes around until all are torqued to final value.
-
89Ru replied to The Chad's topic in 1990 to Present Legacy, Impreza, Outback, Forester, Baja, WRX&WrxSTI, SVXHeck yeah! It will leak a bit during the repair so have some rags handy. Just keep the fitting elevated some and it will drain into the reservoir. That plastic fitting can break so check for cracks. Get a old toothbrush and some mineral spirits before the repair to just brush off the top of the pump.
-
89Ru replied to The Chad's topic in 1990 to Present Legacy, Impreza, Outback, Forester, Baja, WRX&WrxSTI, SVXPower steering pump. There's an oring in the plastic fitting on top. Get from the dealer.
-
89Ru replied to 89Ru's topic in 1990 to Present Legacy, Impreza, Outback, Forester, Baja, WRX&WrxSTI, SVXIf it's pre-ignition then I'd say the knock sensor wasn't sensing it. CEL isn't burned out either. ECU wouldn't limit power without flagging CEL right?
-
2007 Outback 2.5i wagon, base. 110k miles. 5 speed manual. Recent hard drive through the mountains late for a wedding avg 80-90 mph about a month ago without any problems. Wife's daily driver. On a morning drive all of a sudden it could not hill climb. Any incline it loses power. Weak acceleration from a stop. I can feel AVLS kick in around 3500 rpm but it hardly helps power. On flats or down hills it can eventually get up to 65-70 but it takes minutes. On steep upgrades, it struggles to maintain 40 mph. There is a rattle from the front with engine load that sounds like preignition. No CEL. MPG has dropped from 27 to 18. Coolant temps running a bit hotter than usual, hot heat in cabin. Not overheating. Recent work in the past year: Has new radiator and water pump. Timing components replaced last year with Gates kit by previous owner. I think aftermarket wires per PO. Recently changed to new NGK FR5AP-11 plugs. Gates tb tensioner was leaking so it was replaced with OEM, $176, ouch. Head gasket job last year. Original exhaust. During engine work I noticed wet oil around exhaust port 2nd cylinder, so I'm thinking a ring problem, it consumes a lot of oil but hasn't been starved. Car is new to me one year ago. After last year's engine work, we renamed this car to "damaged" and it is living up to this quite well. About four months ago got a P0420 code (catalytic converter efficiency) but it went away and hasn't returned. Last summer it flagged CEL p0026 and that forced it into limp home mode, had loss of power (would not go above 4k rpm) but this is different. That CEL went away after replacing both Variable Valve Lift Diagnosis Oil Pressure Switches, and power was restored. So the possibilities are: Cat or muffler obstruction. Slipped a tooth on timing. There is no engine fuel filter anymore compared to my 2002 and older. Fuel injectors? Plug wires? Haven't tried anything like pulling plug wires, trying to finish an engine swap in a 2002 H6 that is taking all my garage time. How are fuel problems diagnosed? Pull injector connectors one at a time while running? I don't have a fuel pressure gauge. Any help is appreciated. Going to start with plug wires, then fuel, then timing, then exhaust.
-
89Ru replied to 89Ru's topic in 1990 to Present Legacy, Impreza, Outback, Forester, Baja, WRX&WrxSTI, SVXOld (intact) ring seal next to new torn seal.

-
2002 H6 Outback sedan. 325k. 4-speed auto trans replaced by previous owner. In the middle of an engine swap. During the engine removal, the torque converter came out a bit, despite my crappy hand made ring gear keeper tool. After replacing input shaft o-ring, and oil pump shaft oil seal, spring clip, and seal ring, and reinstalling the input shaft into the transmission and the oil pump shaft into the torque converter, I attempted to reinsert the torque converter into the clutch case. It had some resistance that I thought was 'normal.' It went in to within 0.1-0.2" of the trans bell housing. Spec is 0.11" so I pulled it back out. Upon removal, the majority of the seal ring was just inside the clutch case opening. No sign of the missing 2 cm fragment of the ring seal. I had stuck it on with some dielectric grease but it must have popped out of the groove in the shaft and sheared off. I used a piece of copper wire to fish around inside the area where the oil pump shaft resides without finding anything. So my obvious choices are: 1. Install new seal ring, reinstall and hope for the best, like the missing ring fragment either stays put in the shaft area or ends up in the trans pan and doesn't block any oil ports. 2. Drop the trans and remove the torque converter clutch case and fish out the piece. Would love some input on this dilemma.
-
89Ru replied to 89Ru's topic in 1990 to Present Legacy, Impreza, Outback, Forester, Baja, WRX&WrxSTI, SVXGood thought. That's engineering talk. If I ever do this again I'll try to remember that. PV = nRT and all that. I used to use only Subaru rad hoses. I've gone cheaper, these are probably Gates. They don't fit quite right and the old style OEM wire-bolt clamps don't work as nicely anymore. Those new compression band clamps seem to have too small ID. Wonder if they fit better with Subaru hoses. Thinner wall and therefore reduced outer diameter?
-
89Ru replied to 89Ru's topic in 1990 to Present Legacy, Impreza, Outback, Forester, Baja, WRX&WrxSTI, SVXRebooted the NTN driver's side inner boot. Drawing shows a circlip for the inner cup but unless it got ground to bits it isn't there. Tripod is mildly pitted. I used a Doorman part with a Lisle 30950 band clamp tool. Disassembled, wiggled the tripod bearings back into the cup, and reclamped the aftermarket inner side. No problems since reinstalling. I know these will need replacing eventually so I'm in the market for salvage yard NTN's to rebuild. Problem is that in Tennessee at least two salvage yards lists other model years as non-interchange. One won't bother looking for or selling me anything but my model year. Opposedforces.com lists 2003 and up as compatible. This is the list from the dealer website for front CV axle interchange. Why do the salvage yards have a different (and much more restricted) list? Going to shop at car-part.com. I miss the yards in Maryland who let you bring tools and pull parts yourself. Subaru Legacy 2.5L 4AT 4WD Limited 2005, 2006, 2007, 2008, 2009 Subaru Legacy 2.5L 4AT 4WD Limited Wagon 2005, 2006, 2007, 2008, 2009 Subaru Legacy 2.5L 4AT 4WD Sedan 2005, 2006, 2007, 2008, 2009 Subaru Legacy 2.5L 5MT 4WD Limited 2005 Subaru Legacy 2.5L 5MT 4WD Limited Wagon 2005, 2006, 2007, 2008, 2009 Subaru Legacy 2.5L 5MT 4WD Sedan 2005, 2006, 2007, 2008, 2009 Subaru Legacy 2.5L TURBO 5AT 4WD GT Limited Sedan 2005, 2006, 2007, 2008, 2009 Subaru Legacy 2.5L TURBO 5AT 4WD GT Limited Wagon 2005, 2006, 2007, 2008 Subaru Legacy 2.5L TURBO 5AT 4WD GT Wagon 2005, 2006, 2007 Subaru Legacy 2.5L TURBO 5MT 4WD GT Limited Sedan 2005, 2006, 2007, 2008, 2009 Subaru Legacy 2.5L TURBO 5MT 4WD GT Limited Wagon 2005, 2006, 2007, 2008 Subaru Legacy 2.5L TURBO 5MT 4WD GT Wagon 2005, 2006, 2007 Subaru Legacy 2.5L TURBO 6MT 4WD GT Limited Sedan 2006, 2007, 2008, 2009 Subaru Legacy 3.0L 5AT 4WD Limited Sedan 2007, 2008, 2009 Subaru Legacy 3.0L 5AT 4WD R Sedan 2008, 2009 Subaru Outback 2.5L 4AT Base 2005, 2006, 2007, 2008, 2009 Subaru Outback 2.5L 4AT Limited 2005, 2006, 2007, 2008, 2009 Subaru Outback 2.5L 5MT Base 2005, 2006, 2007, 2008, 2009 Subaru Outback 2.5L 5MT Limited 2005, 2006, 2007, 2008 Subaru Outback 2.5L TURBO 5AT XT 2005, 2006, 2007 Subaru Outback 2.5L TURBO 5AT XT Limited 2005, 2006, 2007, 2008, 2009 Subaru Outback 2.5L TURBO 5MT XT 2005, 2006, 2007 Subaru Outback 2.5L TURBO 5MT XT Limited 2005, 2006, 2007, 2008, 2009 Subaru Outback 3.0L 5AT L.L.Bean 2005, 2006, 2007, 2008 Subaru Outback 3.0L 5AT Limited 2005, 2006, 2007, 2008, 2009 Subaru Outback 3.0L 5AT R 2005, 2006, 2007, 2008