89Ru
Members
-
Joined
-
Last visited
Everything posted by 89Ru
-
89Ru replied to 89Ru's topic in 1990 to Present Legacy, Impreza, Outback, Forester, Baja, WRX&WrxSTI, SVXGood to know. Going to also get a new coil; during a test drive after the coil swap to the donor car the suspect coil created cyl 1-4 misfires in a previously well running car ('08 outback) before I even drove one block. It's looking like two separate problems. Coil is rusty, car came from the salty winterlands.
-
89Ru replied to 89Ru's topic in 1990 to Present Legacy, Impreza, Outback, Forester, Baja, WRX&WrxSTI, SVXMe neither. The MAP is easy to pull out, just a little prying with a screwdriver, the o-ring makes it tight. A little dab of dielectric grease on the o-ring to pop in a new one.
-
Was swapping identical parts between '07 and '08 Outbacks and have a no start condition where the car I borrowed parts from was running fine prior. Car is 2008 Outback wagon auto trans, 175 k miles, previously running fine until today. Recent purchase about 6 months ago with broken timing belt. Got car working several months ago and has been running great. Am having issues with my '07 so I was using the '08 to borrow parts. I swapped a known good MAP and coil pack over from the '08 to the '07. I also actually ran the '08 with the '07's suspect coil pack and got cylinder 1-4 misfires immediately on test drive, confirming the issue with the '07 which is also having misfires. Also get a strange EGR code, P1492 in the '08. So bottom line is now after putting the '08 into its original state with its original known good MAP and coil, and resetting all the codes, I try to start it and it won't fire. Just cranks. Sounds fine otherwise, like battery is strong (2019 battery). Doesn't make any noises like compression or timing is off. I get a P0335 code immediately, even before cranking the CEL was flashing, which is new, which is a crankshaft position sensor code. I didn't touch any part of the harness near the crank position sensor, didn't mess with the timing cover, just removed the snorkel so I could get to the coil pack. All vacuum lines are reconnected as far as I can tell. So a previously running car now won't fire, probably because the ECU doesn't know where the crank is. The freeze frame on my code reader says the control voltage is 10 volts, during cranking, which may be low? Could also be total randomness in that I have a bad crank position sensor all of a sudden. Or could I have created a situation from the misfires, with the EGR and CPS code showing up all of a sudden? The engine seemed to stumble a bit on the test drive, once around the neighborhood at low speeds. I replaced both ground straps (were rotten) when I did the heads several months back. Battery voltage at no load is 12.4V, probably not the issue but I'm charging the battery anyway and have also pulled the negative battery cable to reset the ECU. I can swap the crank position sensor from the '07 if I need to.
-
89Ru replied to 89Ru's topic in 1990 to Present Legacy, Impreza, Outback, Forester, Baja, WRX&WrxSTI, SVXNo fire from any orifices thankfully. Wires were correctly installed. Coil swap from a 2008 (my daughter's car) didn't change anything except some glaring looks from her teenage face haha. Car still searching for idle speed all over 600-800 rpm and rough. The MAF is different so couldn't swap that. So I pulled the MAP connector from the throttle body and started it and it flagged a CEL immediately, BUT, NO MORE WANDERING IDLE! Pulled the MAP sensor from the '08, swapped it, reset codes, and voila, its purring like a kitten. I live essentially in a flat plain without major altitude changes so I may be able to run like this until I can get a replacement. Maybe some vaporized crud in the intake found its way into the sensor. Sprayed some electrical contact cleaner into the MAP sensor cavity, but maybe best to replace with OEM?
-
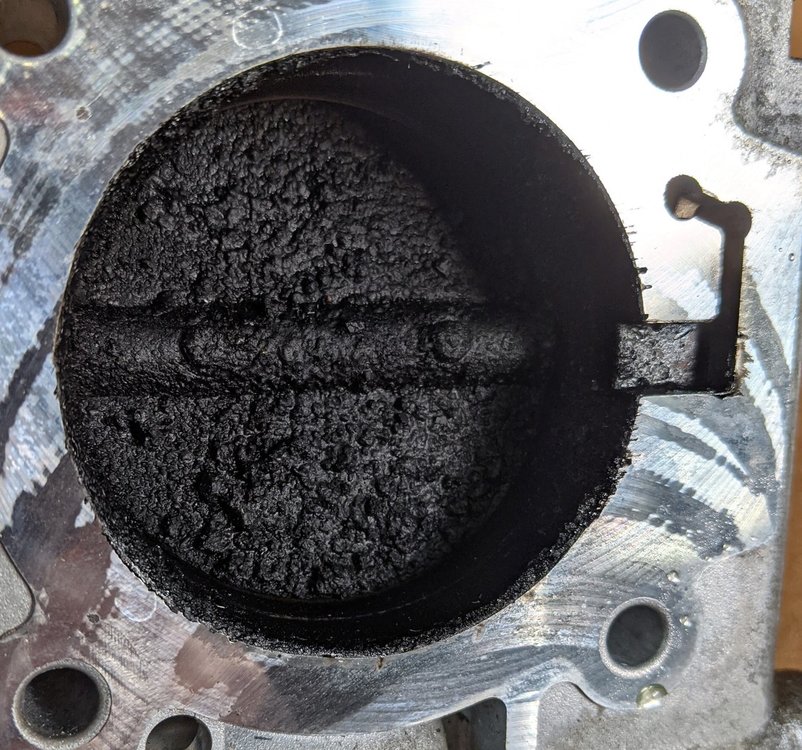
89Ru replied to 89Ru's topic in 1990 to Present Legacy, Impreza, Outback, Forester, Baja, WRX&WrxSTI, SVX89Ru replied to 89Ru's topic in 1990 to Present Legacy, Impreza, Outback, Forester, Baja, WRX&WrxSTI, SVXDid another can of Seafoam spray into the intake, this time by the book, so I left the airbox on the entire time and used the hose with the 180 degree turn that came the can, that loops over the lip into the throttle body so the airbox can stay put. Spray took about 10 minutes while running the engine at 1400 rpm. Let it sit for 20 minutes. No codes. Didn't run any better afterwards, after letting all the smoke out. On the test drive, saw four pending cylinder misfires, and a new pending code P0172 "system too rich" that didn't make it to an official code flagged, instead two misfire codes were flagged cyl 3 and 4. Oh and I got the same pre ignition noise that seemed to improve by the drive end. Had changed the knock sensor for a spare, that didn't seem to make a difference. This is getting downright interesting. Got the intake cleaner combo kit from Subaru but I kind of doubt it is going to make much difference now. Coolant temp cycles up to 212-214 until the fans turn on while sitting in neutral, and down to normal operating temps on the road. Going to have to dig into the P0172 code to see why this is running rich. Never had this code before. Could it be from a leak in the air snorkel from the seafoam tube?89Ru replied to 89Ru's topic in 1990 to Present Legacy, Impreza, Outback, Forester, Baja, WRX&WrxSTI, SVXRan seafoam into the open intake. Remove the air box/snorkel, after disconnecting the MAF connector. Run the engine until warm, CEL will illuminate for MAF code(s). Spray 1/2 can of sea foam into the intake, slowly The engine will slow with each spray, I did this step at idle. Probably done better with someone on the gas pedal. Engine stalled when I sprayed a bit much. Let sit for 5-30 minutes Start engine - for me would not run well, or at all, until I reconnected the airbox. With airbox reconnected, clear CEL codes, and run at 2k rpm until tailpipe smoke clears So the car still idles low and rough. I also put a whole bottle in the gas tank. Test drive revealed worse preignition, probably from extra carbon nasties in the combustion chamber, that might have gotten a bit better at the end of the drive. I might repeat seafoam spray and/or get the kit from Subaru: SOA868V9341, containing three items: Top Engine Cleaner, Fuel Injection cleaner, Throttle Plate and Induction Cleaner Of note, the car didn't run any different with the MAF (and airbox) disconnected, still idled rough during the entire seafoam step. So perhaps that eliminates the MAF as a suspect. Probably worth changing the oil after all is done to remove any contaminants that find their way into the crankcase.89Ru replied to 89Ru's topic in 1990 to Present Legacy, Impreza, Outback, Forester, Baja, WRX&WrxSTI, SVXCompression test 20k miles ago while diagnosing clogged cat. Has some oil filler cap blowby, but adequate power. cylinder 1 205 psi cylinder 2 180 psi cylinder 3 165 psi cylinder 4 185 psi Pcv replaced with oem a year ago, was aftermarket. Has newer aftermarket knock sensor that I installed to try to correct preignition, that didn't help. Still knocking under load. Coolant temps report at low 180's typically on highway. I can try to seafoam the intake, will lookup the process. How to control the rpm while sucking cleaner in the intake since this car has no throttle cable on the intake like 2004 and older?89Ru replied to 89Ru's topic in 1990 to Present Legacy, Impreza, Outback, Forester, Baja, WRX&WrxSTI, SVXNot detecting any fuel vapors as far I can tell. I'm sure I didn't allow the proper idle relearn sequence after disconnecting the battery for the plug change. I wonder if this is something that has to be done every time the battery is disconnected? Today I cleaned the throttle body, see pic of thick gunk on intake side of the throttle blade after separating the throttle body from the intake. Probably saved me from a future problem. Did the idle relearn procedure as written, ran rough as before, like its missing, as the idle slowed down as the engine warmed up. Didn't touch the gas at all, per procedure. Didn't stall. On the 5 minute idle, got misfire codes in cylinders 1,2 and 3. With it running rough/misfiring, I'm assuming that the ECM relearned the idle as best as it can with another problem on board. I may have to repeat this step. So for now, its back to the troubleshooting chart above. I recall the previous occasions of stalling happened after I touched the gas, which dropped the rpm's. Probably some time late next week I'll start swapping parts from the 2008 auto, starting with the MAF and manifold pressure sensor because they are easier to change, and the coil pack. I have a freeze frame from my new code reader that doesn't appear like anything is obviously broken, to my untrained eye.
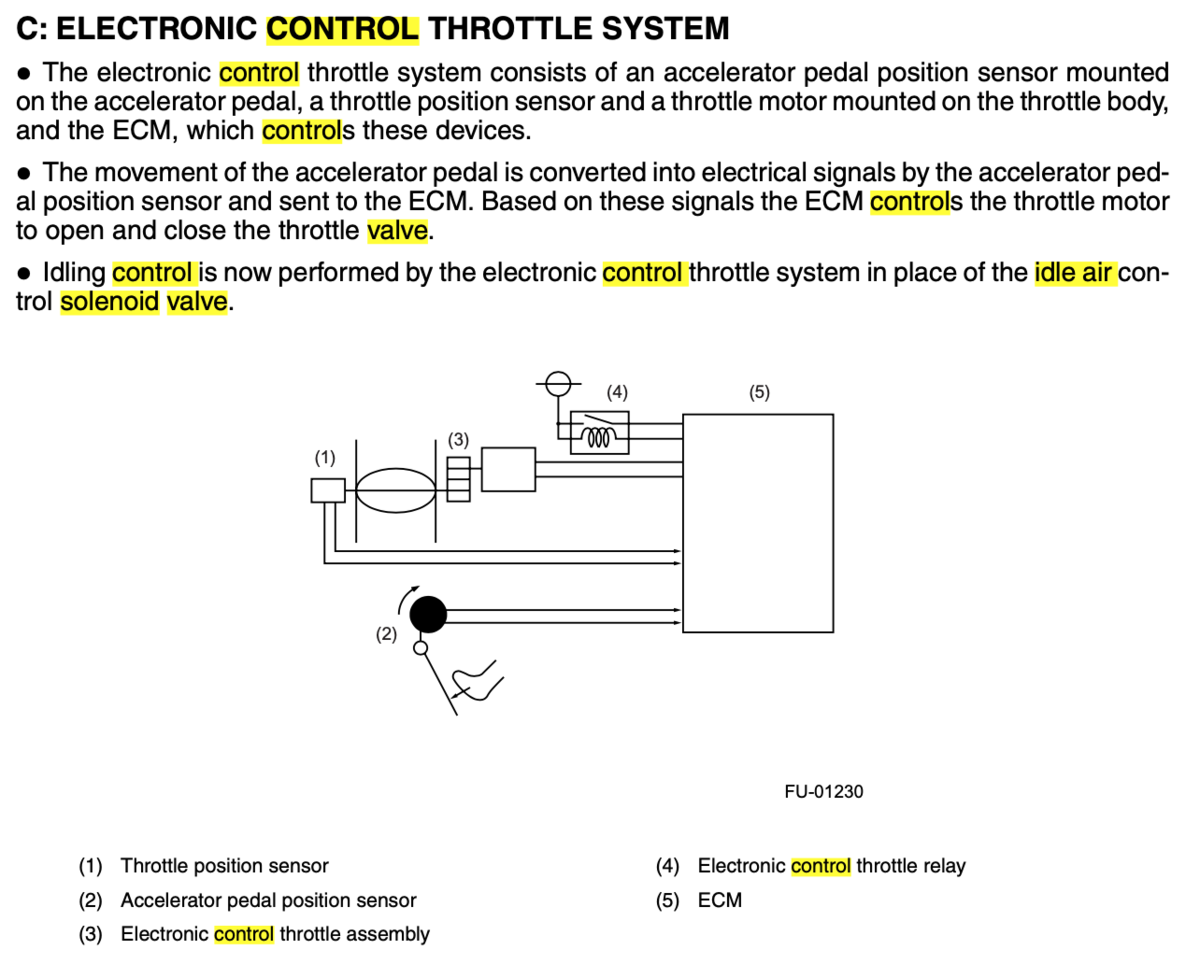
 89Ru replied to 89Ru's topic in 1990 to Present Legacy, Impreza, Outback, Forester, Baja, WRX&WrxSTI, SVXAll makes sense. Car is an Outback wagon 2.5L manual, base model. No new codes so far. Just idles like crap. Will clean throttle body and perform the idle relearn sequence. Videos are helpful and show how much crud can build up on the backside of the throttle blade. I typed up the two procedures, without changes, credits to original author, to save some time. Clean throttle body (disconnect battery now if you plan to do the idle relearn procedure) From time to time you will need to clean your throttle body. Over time carbon and oil deposits form on the throttle blade and bore and restrict airflow. This procedure is more important to do regularly on 05+ models with electric throttle bodies. These vehicles use the throttle body alone to regulate idle speed and don't use an Idle Air Control valve or servo. Remove airbox. Use a lint free rag, old toothbrush, brake cleaner, can open the throttle body blade manually to get behind it, use a long handled brush. For additional cleaning, take apart. Clamp cooling lines off with rubber hose pliers and remove. Disconnect electrical connections. Remove four rear facing bolts. Clean backside of throttle blade. Reassemble. Can reuse throttle body gasket but should have one on hand anyway. On reassembly, retorque bolts x4 to 6 ft lbs. Execute idle relearn procedure Disconnect battery for 10-30 min, and reconnect Turn key on for 10-15 seconds, throttle body motor will go through sweep procedure Start engine w/o any additional electrical loads (radio, A/C, blower, etc) Idle engine for 10 minutes w/o any loads, do not touch accelerator pedal Shut engine off, leave key in off position for 20 seconds Turn key to on position for 10-15 seconds Start engine, idle for 5 minutes Turn off engine, wait 20 seconds Test drive, idle relearn complete89Ru replied to 89Ru's topic in 1990 to Present Legacy, Impreza, Outback, Forester, Baja, WRX&WrxSTI, SVXWhere is the IAC? It's not listed in my FSM. Idle control appears to be electronic, controlled by the ECM. From Factory manual, troubleshooting guide 1. Engine stalls during idling. 1) Manifold absolute pressure sensor 2) Mass air flow and intake air temperature sensor 3) Ignition parts (*1) 4) Engine coolant temperature sensor (*2) 5) Crankshaft position sensor (*3) 6) Camshaft position sensor (*3) 7) Fuel injection parts (*4) 2. Rough idling 1) Manifold absolute pressure sensor 2) Mass air flow and intake air temperature sensor 3) Engine coolant temperature sensor (*2) 4) Ignition parts (*1) 5) Air intake system (*5) 6) Fuel injection parts (*4) 7) Electronic throttle control 8) Crankshaft position sensor (*3) 9) Camshaft position sensor (*3) 10) Oxygen sensor 11) Fuel pump and fuel pump relay 12) EGR valve 3. Engine does not return to idle. 1) Engine coolant temperature sensor 2) Electronic throttle control 3) Manifold absolute pressure sensor 4) Mass air flow and intake air temperature sensor 5) EGR valve
 89Ru replied to 89Ru's topic in 1990 to Present Legacy, Impreza, Outback, Forester, Baja, WRX&WrxSTI, SVXOk will check that out. Good to know I can't just swap it over from the auto.2007 Outback 2.5L 5-speed wagon, 130 k miles. Running rough, stumbling at low speeds and stalling at idle when rolling to stops. Power is normal, I can't tell any differences on the highway. Was getting cylinder misfire codes. Just put on new NGK spark plug wires, swapped all NGK spark plugs and both O2 sensors with spares and no change. Idles slow, rough and stalls when it warms up. No misfire or any other codes since pulling the battery for plug swap. Carbon dust on plugs and O2 sensors, like its running rich? I have a virtually identical 2008 2.5L Outback auto to swap parts from. Where to start? Has aftermarket knock sensor, and both O2 sensors are aftermarket Denso. O2 sensors checked out ok with an ohm meter.89Ru replied to 89Ru's topic in 1990 to Present Legacy, Impreza, Outback, Forester, Baja, WRX&WrxSTI, SVXSure does! Thanks for the axle-centric diagnosis. Even my daughter, who I'm fixing this car for, said, "You know how to change an axle don't you?"89Ru replied to 89Ru's topic in 1990 to Present Legacy, Impreza, Outback, Forester, Baja, WRX&WrxSTI, SVXSwapped out the left front axle with a spare. No more clunking in turns! Wheel bearing was ok. Just because, I greased the pins of the left front brake, pads looked ok. Nothing obvious was loose. Axle goes back to rebuilder for another go.89Ru replied to 89Ru's topic in 1990 to Present Legacy, Impreza, Outback, Forester, Baja, WRX&WrxSTI, SVXBoth front axles were professionally rebuilt. He won't touch aftermarket axles. I've never had one go back for noise which is why I'm so confoozled. Gotta do paperwork this morning then its back to wrenching. While I'm down there I'll spin the wheel bearing which I didn't do last time. If it feels bad I'll swap it out. The other potential noisy items are strut bearing, diff, control arm bushing, and sway bar bushing.89Ru replied to 89Ru's topic in 1990 to Present Legacy, Impreza, Outback, Forester, Baja, WRX&WrxSTI, SVXHope not, I don't sense hesitation or feel the tires skipping or binding up. Can the center diff be messed up and only clunk one way in turns? It did have heavily worn and mismatched tires front vs. back...I just finished rebuilding the heads that were trashed from a t-belt snap. I had it flatbed hauled here. I haven't driven it more than a few miles just t-shooting the noise. Maybe I should do some slow figure eights with the windows down in a dry parking lot to recheck. It isn't insured or even registered yet so don't tell.89Ru replied to 89Ru's topic in 1990 to Present Legacy, Impreza, Outback, Forester, Baja, WRX&WrxSTI, SVXJust published the videos, they should be public now. I agree about the noise, it doesn't sound like anything else to me either other than a bad CV. If anything, the sound is worse after the rebuild. I'll swap out the left side with my spare tomorrow and see if that changes anything. Previous owner was a schoolteacher but I don't know its history if it was offroaded or not.2008 Outback wagon, 130k miles. Car is new to me. Car was clunking in turns, I think both ways. Left axle (Subaru) had two torn boots so I had it rebuilt. Still noisy but right axle was aftermarket so I had another used Subaru axle rebuilt and swapped it out. So now with two rebuilt Subaru axles it is still clunking, only left. Also replaced both ball joints and both lateral links with aftermarket parts. Noise is from left side in left turns. I have another spare rebuilt subie axle but I haven't had problems with rebuilt subie axles before. I suppose first time for everything. What about the hub/bearing? Can those clunk? Attached a few videos of the noise in turns. Wheel isn't loose and no growling at higher speeds like bad bearing sounds. Variable speed left circle https://youtu.be/9tgmE4NkDdE Slow left turn up slope https://youtu.be/9utvZ7WLv5I Slow left turn https://youtu.be/PXv3KyF4hX4 S turns driving. Can hear a faint noise at first https://youtu.be/wmXeJDweGGM Backwards left turn. https://youtu.be/7q_lzYIo80A89Ru replied to steve56's topic in 1990 to Present Legacy, Impreza, Outback, Forester, Baja, WRX&WrxSTI, SVX+1 for this fix for a 2008 outback. Airbag light was intermittent, sometimes fail, sometimes pass though lately it was failing consistently. Reflowed all components on both sides of the board using just enough heat to flow the solder completely, including the wire junctions to the board. The bad joints in my case seemed to be the 330 ohm (labeled 331) chip resistors on the back side of the board, had cracks in two places at the solder joint, probably from mechanical stress/temperature cycling. The 000 resistors are just that, zero ohms. Should be a dead short across them no matter what else is in that circuit. The airbag light went off immediately after power on self test without using a scanner to reset it.89Ru replied to Ez30D-4.444's topic in 1990 to Present Legacy, Impreza, Outback, Forester, Baja, WRX&WrxSTI, SVXInterrupt relay was not part of my vocabulary until this thread! The inhibitor switch is a small black box that bolts to the passenger side of the trans. No relays in there.89Ru replied to Ez30D-4.444's topic in 1990 to Present Legacy, Impreza, Outback, Forester, Baja, WRX&WrxSTI, SVXB12-11 and B12-12 jumpered together bypasses the transmission mounted inhibitor switch. Fools the car to thinking its in a safe gear to start up. I used to have to do this on my 2002 H6 because the inhibitor switch was slightly out of calibration and when the car warmed up it would not start again until it cooled down. Car is dead when this happens, no crank. I would disconnect B12 (it sits on top of the transmission), jumper pins 11-12 with a paper clip, start the car, and reconnect.89Ru replied to laegion's topic in 1990 to Present Legacy, Impreza, Outback, Forester, Baja, WRX&WrxSTI, SVXI have a 95 aftermarket leggo radiator, new in box, has trans cooling connections. Yes it has the plastic sides. I paid $200 for it, would let it go for $50 plus shipping. Sold my 95 legacy a while back, was a great car, my last non interference engine and the first of the subaru line to have OBDII, a year before it was standard. I routinely change radiators before they fail, every 100k, just cheap insurance. Never had a problem with side tanks, but had a leak from a top tank once on an impreza. I have a 2002 EA4T with an external transmission cooler plus an inline mag filter in addition to the stock screw-on filter, that isn't routed through the radiator. All my towing is done with a manual gearbox. I figure a clutch is slightly easier (and far cheaper) to replace than a transmission, and I've done both. Sounds like you know your way around under the hood. Hope you stick around on this board.89Ru replied to 89Ru's topic in 1990 to Present Legacy, Impreza, Outback, Forester, Baja, WRX&WrxSTI, SVXNever mind, PO had a piece of black tape underneath the gauge covering the CEL, so no disassembly needed! GD here in TN they fail you if the CEL is burnt out, no mercy.