Subaru Scott
Members
-
Joined
-
Last visited
Everything posted by Subaru Scott
-
Subaru Scott replied to thook44's topic in 1990 to Present Legacy, Impreza, Outback, Forester, Baja, WRX&WrxSTI, SVXI can't remember what the grip range was, they were the standard base range for single thickness sheet that they had on the shelf, probably the lowest range. 0-3/16" maybe. I tapped around where I wanted to drill, to try not to run into a brace or anything. In a couple places there were and the inserts crimped down in double thickness with no problem. My set got washed away in a flood, or I would go look at the inserts. I may buy another, I think of things from time to time it would be handy for. The tool was only about 30 bucks too, reasonable.
-
Subaru Scott replied to holmes47905's topic in 1990 to Present Legacy, Impreza, Outback, Forester, Baja, WRX&WrxSTI, SVXYep, inside the disc/drum.
-
Sounds like the build is going great. She'll be a nice car when you're done! WAY back when I was into my EA82T, I got tired of the leaky RTV sealed cam cases and found some bulk o-ring material. Can't remember now what size it was but it laid in the cam case groove nicely, and was just slightly proud enough to get good squish. Super glue the ends together at the top. Reusable, and didn't leak.
-
You will need another ignition setup at the very least to make it run. The distributor itself may be ok, but the ignition unit on the coil is toast. Option 1: Find a replacement electronic ignition unit like the one you have, which is the first generation electronic. 2: Find a later model, 2nd generation electronic distributor, which is self-contained and doesn't have the box on the coil. 3: Find an older points distributor. Just be sure to get the matching coil with ballast resistor.
-
I was gonna say after your first post, that it sounded like someone hooked the battery up backwards... You're going to have a mess there. The ignition unit will be fried as well as the alternator and regulator most likely. Easiest way out of this would be find a parts car somewhere to get a harness and components out of.
-
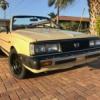
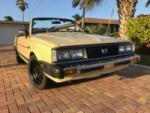
Just a quick update: Still trying to source a few body parts. Nothing major, just a few cosmetic items mostly. But I think I've called and emailed half a dozen wrecking yards that have pics of Tribecas on ebay listings, and none of them have responded. I even supplied part numbers for everything I'm after. So either they don't have what I want, or they just have bigger fish to fry, and in any case, don't have the decency to give me any response. So in the meantime, I decided to pull the engine and do a re-seal. Grossgary/idosubaru advised that it wasn't necessary, and maybe I should have listened. But this will be the wife's daily, as well as the tow vehicle for our houseboat, that we plan to do some cross country trips with. Plus, now is the time before we sell the SVX, so I'm not in a rush. Aaaand, I've never had one of these engines down before, so curiosity has gotten the better of me as well. So, let's see what makes it tick! Cool!! Chain drive, double overhead cams, 4 valves per cylinder with bucket lifters and shim adjustment. This is just like a big Japanese motorcycle engine! I worked in a Honda/Kawasaki dealership in the early 80's, and wondered why cars didn't have engines made like they were... the future is NOW!! Could have definitely taken idosubaru's advice and just left it alone for now, because I found no issues at all. The head gaskets showed no signs of any leakage, external or internal, and I even pulled apart the metal gasket layers and looked between them. The valve adjustment was even perfect. I'm certain it could have made it to 200k without a hitch. But it was nice to see inside one of these engines, and it's good to know that all the gaskets and seals are fresh now. I do have to say that whichever Subaru engineer came up with the bright idea of going with socket head fasteners throughout most of the engine (Trying to win himself a promotion, no doubt), is now on my s*** list!! The allen bolts in the timing cover... Not a fan!! I was able to get them all out without drilling any, but I had to use all my tricks, growing up in the salt belt, I consider myself a master of bolt removal. Inside the cover was the same fight, and the very last bolt on the oil pump cover stripped, and I had to drill it. I think at that point I was just in a hurry and overconfident. The first allen driver I tried on the headbolts broke. So I cut a 10mm allen wrench off and loaded that into a 10mm, 1/2" drive, deepwell impact socket. Still felt like something was going to break getting them all loose... Not a fan!! These smarmy engineers need to try and take apart some of this themselves on an engine over 10 years old!! It's easy to reach a torque spec assembling new parts... But the cake was the flex plate bolts. Torx 2??? It took quite a bit of research just to find out what was going on there. Seems the patent was running out on Torx 1, so they suddenly came up with something better just then... Absolutely nothing available at any auto parts or tool supply near me, so I had to order online. Those things were in there tighter than the hubs of hell!! Obviously installed with an impact wrench. Twisted and damn near broke the tool. NOT A FAN!!! The heads cleaned up nicely and I called a couple of machine shops about just getting them checked for flatness. They both tried to hard-sell me on full valve jobs, refacing, etc. No, I don't want to reface unless absolutely necessary, because the compression ratio is already 10-1. So I ordered my own machinists straightedge and feeler gauges for under 100 bucks and checked them myself. They were well within spec. I couldn't detect any unevenness whatsoever. Pulled the oil pan and cleaned all that out, then re-assembled with Lucas assembly lube on everything, even coated the head bolt threads for torquing. Popped in a new water pump as well. The timing components all looked just fine. Hooked a test light up to the oil pressure switch and spun the engine over by hand till the light went out, so I knew it was primed. I think it was a little easier installing the engine without the intake on, but I really should have put the wiring harness on first. Napa had some silicone heater hose, but no pre-formed elbows, so I had to load some springs in the bypass hoses on top of the engine so they would bend without kinking. I used string to pull the springs in nice and even, worked great! Working outside in Florida Summer isn't so bad
-
A good welder should be able to repair your wheel. And if you have a dedicated wheel shop in your area, they may be slightly more expensive but steel wheels are no problem. I've seen miracles performed with aluminum wheels even.
-
Subaru Scott replied to thook44's topic in 1990 to Present Legacy, Impreza, Outback, Forester, Baja, WRX&WrxSTI, SVXBehold: Been going strong 4 years now. I don't have any pics of me hauling anything real heavy, but I do I've seen a lot of factory racks that I know for sure aren't nearly as stout as mine.
-
Subaru Scott replied to thook44's topic in 1990 to Present Legacy, Impreza, Outback, Forester, Baja, WRX&WrxSTI, SVXNorthern tool has a really great blind thread insert tool. Get that with a pack of their stainless 1/4-20 inserts. No need to drop headliner, just use a very short bit or a drill stop so you don't go too far and through the headliner (like I did before I put the stop on). Stick an insert in the tool with a little silicone around it, and the tool crimps it in the roof, just like a big hollow rivet. Works a treat!
-
Subaru Scott replied to mickytrus's topic in 1990 to Present Legacy, Impreza, Outback, Forester, Baja, WRX&WrxSTI, SVXThanks... now I'm hungry! The thread chaser trick is just so easy and works so well that we're excited to share it. The other day, I was looking for my 6mm tap, because I had a genuine blank hole to tap, and realized after a while that it had broken a couple years ago, and I've been using homemade chasers since!
-
Subaru Scott replied to matt167's topic in 1990 to Present Legacy, Impreza, Outback, Forester, Baja, WRX&WrxSTI, SVXDO IT! Put a manual control switch for the AVCS on the shifter and... Oh, wait, it's a woman's car, right...
-
I would highly recommend looking for an EA81 engine in good shape and compare that to the cost of just your materials in an EA82 top end job. You may have to look for a while, or take a road trip to find one, but it will be a much more fitting mill for your trike. Much less maintenance and headaches, and more parts availability.
-
Subaru Scott replied to mickytrus's topic in 1990 to Present Legacy, Impreza, Outback, Forester, Baja, WRX&WrxSTI, SVXI use a high-speed cutoff tool. You can also use a right angle grinder with a fiber cutoff disk, or a dremel with a disk. Cut a shallow groove along the length of the bolt, at an angle so the "teeth" you create on the trailing side of the groove while screwing in, will have a sharper point. Works very well. golucky66 beat me to it... I'm a slow typer.
-
Subaru Scott replied to Miles7757's topic in 1990 to Present Legacy, Impreza, Outback, Forester, Baja, WRX&WrxSTI, SVXIf you can get it rocking side to side, then it won't be coming from a wheel. Most likely a rubber bushing. Spray them one at a time with silicone spray while rocking the car. Start with the sway bar bushings.
-
Subaru Scott replied to nicksubaru's topic in 1990 to Present Legacy, Impreza, Outback, Forester, Baja, WRX&WrxSTI, SVXIf it has the 2.2, it's non-interference and will be fine with a belt and pulleys. If it has the 2.5...
-
Bad piston rings do not make noise. Sorry, no.
-
Subaru Scott replied to saltydog463's topic in 1990 to Present Legacy, Impreza, Outback, Forester, Baja, WRX&WrxSTI, SVXThat really disappoints me with Subaru...
-
You know for a fact? That is not a fact, only some crazy theory you dreamed up. Facts have proof to back them up. Where is your proof? Here are facts: Fact: A fastener which is lubricated will turn farther at a given torque vs. a dry one. Thereby drawing the attaching parts tighter together. Anyone can prove this by torquing a bolt down dry, marking it's position, then after lubricating and torquing to the same value, the bolt will have turned further. Fact: Subaru specifies lubricating head bolts upon assembly. The torque spec the factory service manual states is for lubricated head bolts, not dry ones. If you torque it dry, it is NOT TIGHT ENOUGH! Fact: Aluminum threads are very fragile. ANY high torque fastener in aluminum threads must be lubricated or the threads will gall. In my opinion, every fastener in aluminum needs to be lubricated, high torque or not. In fact, I use marine grease on EVERY fastener that goes into aluminum, or has even a remote chance of being exposed to moisture. I've been doing this for decades now. And guess what? None of them ever come loose on their own. So I don't know what it is you're doing to make your head bolts come loose, but it has absolutely nothing to do with lubrication. And again, of course you're free to do whatever you want with your own vehicles, tear em up! But don't get on here giving bad advice like it's fact. You are free to discuss all the theory you like as well. Just make sure to include, "In my opinion", or "I believe" along with it.
-
Sounds like fuel filter to me. there is one in the back at the pump, and one under the hood behind the master cylinder. When you set your timing, you must first unplug the vacuum advance hose from the distributor and plug the hose.
-
Subaru Scott replied to saltydog463's topic in 1990 to Present Legacy, Impreza, Outback, Forester, Baja, WRX&WrxSTI, SVXThe factory Subaru filters are a fine stainless steel mesh with no paper in them. At least the ones for the first gen EJs, I never cut open any later ones. The original filter is still on my daily with over 500k miles, never been changed. I did have one plug up once on my EJ swapped houseboat after getting gas from a crappy marina. I just back-flushed it and put it back on. Since the filter media never degrades, it can only filter better as it collects particles. Up to the point that it no longer flows, of course.
-
Subaru Scott replied to whynot162's topic in 1990 to Present Legacy, Impreza, Outback, Forester, Baja, WRX&WrxSTI, SVXThat's the way they like it!
-
Oh, sorry. Maybe that link only works for me, copied from my order page. Thanks Mike!
-
Who is feeding you this gibberish? STOP listening to them and trying to spread misinformation please! Thank you.
-
No, sorry. I'm not wrong. You, obviously, must have some stuck valves, seizing camshafts, idlers or oil pump, or no idea how to tension belts. They do not "skip" ever, unless you have issues MUCH more critical than how old your belts are. If you could load a house on your roof rack, it would not put even the tiniest bit of extra strain on your camshaft belts. The distributor can in no way ever "feedback" torque to the camshaft, no matter how the plug wires are located, or the way it is positioned. It is driven by a wormgear. So that means even if you put a breaker bar on the distributor, you would break the distributor shaft before you would turn anything. All it does is spin around sending signals and spark. There are NO forces going on in the distributor. I don't know who is feeding you this "information," but you should stop listening to them and read more...
-
Putting the finishing touches on Tribeca engine reseal and the alternator plug was pretty much destroyed by the PO when he replaced the alternator. No chance to get one from Subaru, so I started combing the net and found this: Subaru Alternator Wire Harness Plug Kit Oval Gr... Exact replacement and also fits other Soobs. The plastic was so brittle, it just crumbled apart with only finger pressure. Old one with new: