montermahan
-
Posts
57 -
Joined
-
Last visited
Content Type
Profiles
Forums
Gallery
Store
Everything posted by montermahan
-
Small coolant hose EA82
montermahan replied to montermahan's topic in Old Gen.: 80's GL/DL/XT/Loyales...
I did build the overflow reservoir and will continue using the small hose. Thanks for reply -
Small coolant hose EA82
montermahan replied to montermahan's topic in Old Gen.: 80's GL/DL/XT/Loyales...
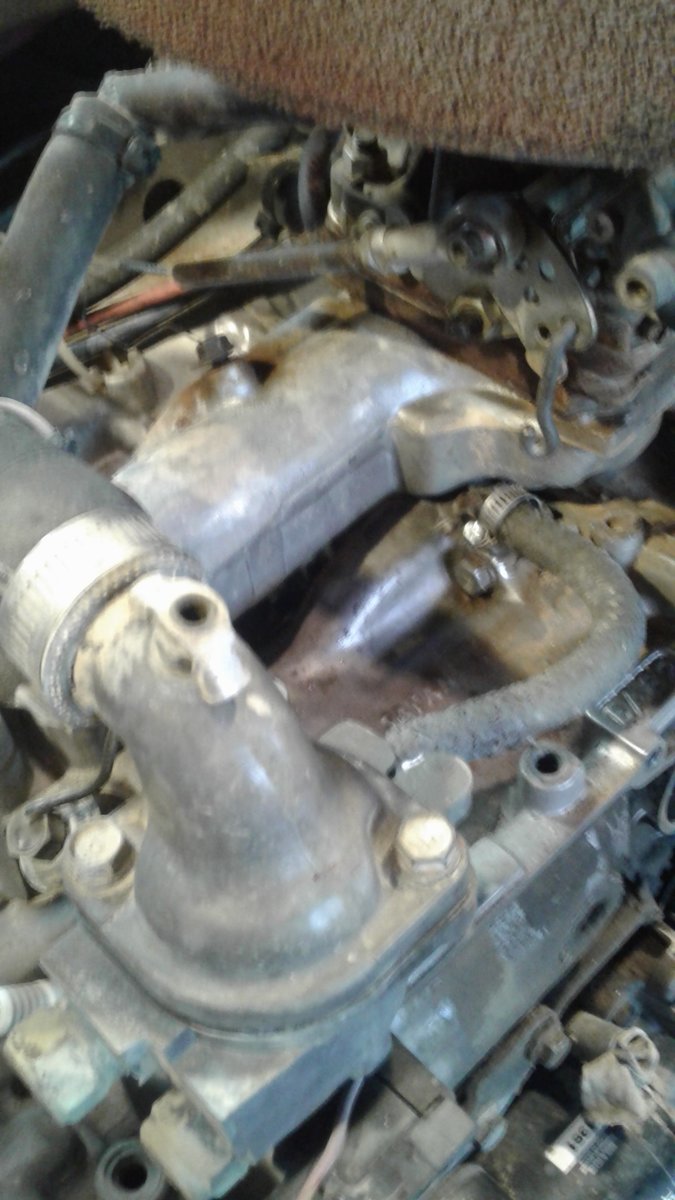
I see what you mean about airlock. I put a peacock on top pf thermostat housing and force coolant in there with motor running to get the air out of that area, but I guess I better do as you suggested with a tap and hosebarb fitting, don't know how much air could be trapped at top of block and what harm it could,do.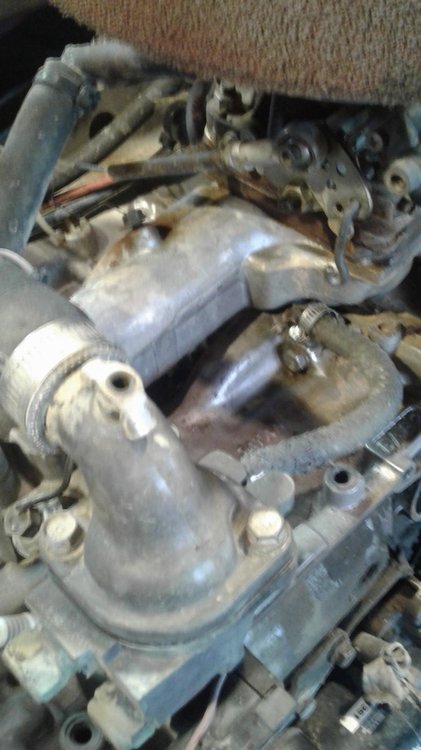
-
Small coolant hose EA82
montermahan replied to montermahan's topic in Old Gen.: 80's GL/DL/XT/Loyales...
After closer examination, the line goes from thremostat housing to the top of the block. Sorry. -
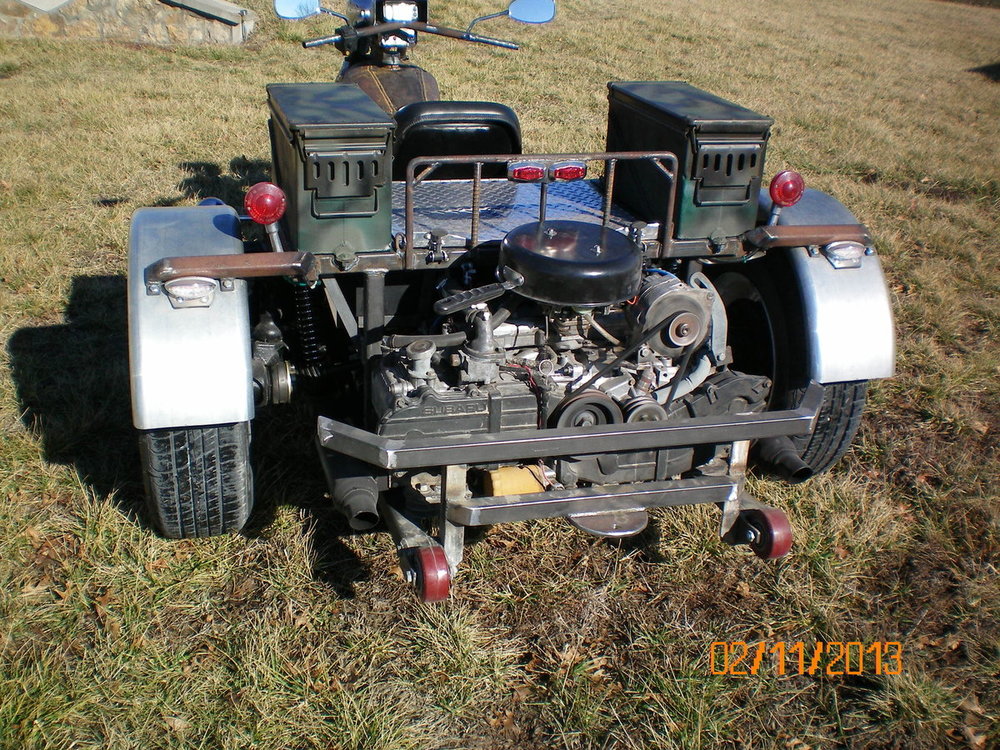
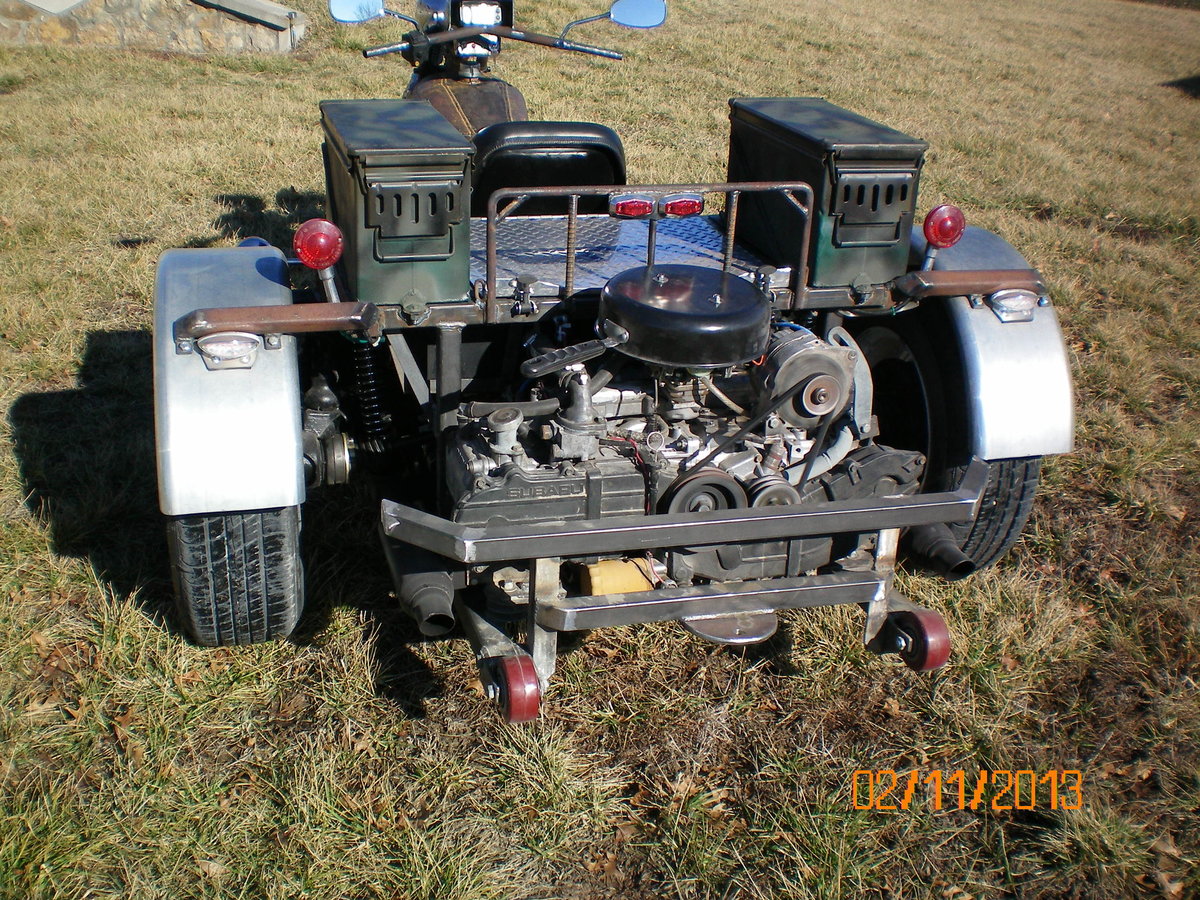
What is the small coolant hose that is under thermostat going to top of block? And can I plug it off. I think the little pipe is rusting off. It is on a trike, definately not to be driven in cold weather.
-
Weber Backfire on Shutoff
montermahan replied to Brett!'s topic in Historic Subaru Forum: 50's thru 70's
A thought. My tractor does that. I just let it idle for a few seconds befor turning off ignition. The carb will keep putting gas in the exhaust system as motor spools down after you shut off ignition, them something hot will set it off. -
I use propane almost exclusively. I have acetylene rigged up for brazing, but for cutting up to about 1/4" an acetylene tip will work for mild steel, any thicker, I use a propane tip. a little longer to get cut started, but @ $80 for medium acetylene tank refil vs. $20 for propane I can wait a little longer. And for the big heating job, a rosebud works just great on Propane.
-
EA82 "Hail Mary" pass repair
montermahan replied to rickyhils's topic in Old Gen.: 80's GL/DL/XT/Loyales...
The last one I did on my trike had very little ridge. I was just wanting to freshen it up with bearings, rings and rebuilt heads. I used a fine hone on the cylinders (which I have learned, is not necessary ). I'm old, always used chilton and motors manuals (befor internet). But there was not enough ridge to warrant use of ridge reamer. Good luck. UTube is a wonderful source. I would recommend checking with GeneralDisorder on engine questions. I am mainly an US auto repairman. Thank's, MM -
EA82 "Hail Mary" pass repair
montermahan replied to rickyhils's topic in Old Gen.: 80's GL/DL/XT/Loyales...
Good luck. From what I read here, the consensus is not to hone. I guess Im old school and I honed mine. I will learn from it if it goes south on me. -
EA82 "Hail Mary" pass repair
montermahan replied to rickyhils's topic in Old Gen.: 80's GL/DL/XT/Loyales...
Good informative article. I guess there are 2 schools of thought . I just go by what the ring manufactures suggest. New times and new ways of doing things. Thanks. MM -
EA82 "Hail Mary" pass repair
montermahan replied to rickyhils's topic in Old Gen.: 80's GL/DL/XT/Loyales...
CYLINDER BORE REFINISHING Cylinder bore refinishing is extremely important in the engine rebuild process. There are some basic rules and facts that will prevent common problems incurred when deglazing or refinishing cylinders. Cross Hatch Angles The correct angle for cross hatch lines to intersect is approximately 45 degrees. Too steep an angle promotes oil migration down the cylinder resulting in a thin oil film, which can cause ring and cylinder scuffling. Too flat a cross hatch angle can hold excess oil which conversely causes thicker oil films, which the piston rings will ride up on or hydroplane. Excessive oil consumption will result. The diagrams will illustrate cross hatch angles. Honing Methods Two basic systems are used to refinish cylinder walls either rigid stones or a flexible brush. Correct cylinder finishes can be achieved with either system if used correctly. In all cases the manufacturers' instructions must be followed with respect to: Stone grit Honing oil Stone pressure (Automatic equipment) The vertical speed of the brush or hone in the cylinder is what causes the cross hatch angle on the surface of the cylinder wall. Too slow a vertical speed causes too flat an angle, while too rapid up and down motion of the hone or brush causes too steep an intersecting angle. In the case of hand honing it will be necessary for the operator to experiment to learn the proper up and down movement in relation to the rotating speed of the one to produce proper cross hatch angle. Cylinder Roughness Substantial controversy exists on the correct cylinder roughness for proper seating of piston rings, whether chrome, moly, or plain cast iron. It has been our experience that the use of 220-280 grit stones and achieving proper cross hatch angle produces a finish compatible to all three types of the above rings. Cylinder Cleaning The single most critical factor of any cylinder refinishing job is the cleaning of that cylinder after the honing operation. It can be stated, pistons, rings, and cylinder bores will forgive slight variations in roughness, cross hatch angle, etc. No engine component will tolerate dirt! Honing cylinders leaves two types of "dirt" on the cylinder wall; honing stone residue and cast iron dust. If not removed before the engine is reassembled, the world’s finest lapping compound is waiting to destroy all the hard work of assembly the instant the engine is started. Proper cylinder cleaning consists of a thorough scrubbing of the block with hot, soapy water taking care to clean the surface under the cylinder facing the crankcase. Rinse with hot water, dry, and lightly oil to prevent rust. For detailed honing questions it is wise to contact the manufacturer of your specific equipment. They are experts in metal finishing and of course completely understand their own equipment. In general if the practices above are used excellent engine performance will result. This is copied from a "F---king morons" directions from Hastings info@supercircle.in +91-11-41446500 HOME ABOUT US PISTON RINGS APPLICATION RANGE QUALITY ASSURANCE CONTACT Select Language▼ PISTON RING INSTALLATION INSTRUCTIONS Home Piston Rings Piston Ring Installation Instructions Supercircle piston rings are designed to give original performance. Their correct fitment, suitable ring end gaps and proper side & back clearances in individual pistons leads to long life of engines, less oil consumption and increased power output. The piston ring installation instructions are as follows: Piston Ring Installation Instructions Remove wear ridge on cylinder walls before removing pistons. Failure to do this may lead to cracked or broken piston ring lands. Use a good ridge cutter to do this. Remove glaze of the cylinder bores by light honing or by a glaze breaker. Thoroughly clean the cylinder walls to remove all grit and carbon and smear them with light engine oil. Check the size of the cylinder bores and correctly choose the size of rings for trouble-free performance. Piston Rings are available from standard size to different oversizes for all engines. Chromium plated piston rings must not be used in chromium plated cylinder liners. Place the new ring set in individual cylinder bores and check for correct ring end gaps. The normal recommended ring end gaps of rings for internal combustion engines are as follows: Another Morons thoughts. I guessing Subaru is something special and requires no glaze breaking, if so, Disregard these articles from other people. I have overhauled a lot of motor's for people in the last 50 years and have used a glaze breaker or fine hone on them all and not a one of these people has called me a "F----ing Moron". I hate people that try to make themselves look smart by trying to prove other people wrong. There's more than one wright way to do something. The End. MM -
1984 GL 4WD wagon, all my problems, advice please
montermahan replied to mkoch's topic in Old Gen.: 80's GL/DL/XT/Loyales...
Damn, I have him looking for a condenser and now he's looking for a toaster. Now I will have him look for a skillet.
-
EA82 "Hail Mary" pass repair
montermahan replied to rickyhils's topic in Old Gen.: 80's GL/DL/XT/Loyales...
I'm sorry I didn't do that 30 k miles ago, its been 150 k now. all is good. I've never worked on an American motor that didn't recommend honing a cross hatch pattern in the cyl's for proper break in and seating of new rings. But I mainly have worked on American engines and they must be different. I'm sorry, enough said. I will let the subaru people make recommendations from now on. -
EA82 "Hail Mary" pass repair
montermahan replied to rickyhils's topic in Old Gen.: 80's GL/DL/XT/Loyales...
Sorry to put your panties in a bunch. My motor, my way. -
1984 GL 4WD wagon, all my problems, advice please
montermahan replied to mkoch's topic in Old Gen.: 80's GL/DL/XT/Loyales...
A condenser could always be figured into the problem. -
EA82 "Hail Mary" pass repair
montermahan replied to rickyhils's topic in Old Gen.: 80's GL/DL/XT/Loyales...
I just ran a hone thru the cylinders to break the glaze and put in new rings. -
On a vehicle I had, I messed and messed with the carburetor cause it would run better with the choke part way out or partial throttle. eventually, I found the coil was the problem. I'm guessing the choke would lower the compression and let the coil work. I would change the plugs and try a different coil. (just a thought)
-
Distributor side timing belt snapped again
montermahan replied to montermahan's topic in Old Gen.: 80's GL/DL/XT/Loyales...
I took the offending head to a professional repair shop this morning and they thought the knurled guides were too tight and they reamed them with the proper sized reamer. I now hope all is well. I will have gasket set tomorrow. There will be a test. -
Distributor side timing belt snapped again
montermahan replied to montermahan's topic in Old Gen.: 80's GL/DL/XT/Loyales...
My miss seamed to be valves that were ground and seating getting warm and warping a little bit. I put in new valves and the problem went away, till now, I believe the stems are to tight and dragging. I don't see how they can receive any lubrication with those stem seals. I run a little MMO in the fuel. I will take it to a engine building machine shop Monday and see what they think. I bet they will want to ream the guides a little. -
Distributor side timing belt snapped again
montermahan replied to montermahan's topic in Old Gen.: 80's GL/DL/XT/Loyales...
Thanks DaveT. I will build tool like you mentioned so I can put 15 lbs torque to belts. But I had a binding goin on, really hard to turn distributor side cam when lobe coming up in an intake valve, other side cam turns fairly easy, has to be valve stems, verry little if any clearance in stems. every thing else looks new. -
Distributor side timing belt snapped again
montermahan replied to montermahan's topic in Old Gen.: 80's GL/DL/XT/Loyales...
I'm on to something, not sure what. getting ready to put new belts on, I turned camshaft on side opposite distributor by the 10mm bolt on pulley and it turned fairly easy. turning one on distributor side, it turned a little and got tight enough I was afraid I was going to twist off bolt. I removed dist. and still tight. removed valve cover and saw nothing wrong, turning cam I would notice it got tight on one of the intake lifters. I pulled head and removed valve springs and I think the valve stems are running dry. About a thousand miles ago I thought I had a slightly stuck valve, after 20 miles it cleared up. I have stem seals on all valves and they are the type that slip over the guide and fit tight over the stem with a little spring on them. These are remanufactured heads from J&C Enterprises. Upon putting them on, at first, I would start it up and run fine, after a minute it would start missing a little and compression would be low like a valve was warping a little.. rather than sending them back, I purchased all new valves and all was good, for about 10,000 miles, now this. The guides had been knurled. I'm wondering if my new valves were a little tighter than what they had fitted, there seams to be very little play and secondly, should all the valves have seals on them, seam's like there would be no lubrication other than what was put on them upon installation. I will take the head to a machine shop and see what they think, maybe they will need reamed out a little. Any one have any thoughts about what I found? -
Distributor side timing belt snapped again
montermahan replied to montermahan's topic in Old Gen.: 80's GL/DL/XT/Loyales...
I do quite a bit of riding on gravel roads and would be scared of a rock getting in there and breaking belt also. -
Distributor side timing belt snapped again
montermahan replied to montermahan's topic in Old Gen.: 80's GL/DL/XT/Loyales...
I will try the 15 LB. torque this time, New belt should be in mail today. Thanks for the info. glad it didn't happen in Nowhereville either time. My present Subie is a dinosaur '84 GL wagon with the gear driven ea81. Regressed to seemingly more reliability, so far. BTW, I like the air cleaner on your trike! Thanks for the come back. If this happens to me when I'm farther from home, I might consider swapping to the EA81. -
Luckily this is on a trike, 30 minutes to get taken apart. First belt was a NAPA kit, Snapped after about 5 thousand miles, I ordered a kit from EBay and it lasted 21,ooo miles. First one I only tightened by the spring tension, Second, spring tension and probably 20 lbs. pressure on pulley. I do a lot of riding and luckily, both times it happened 10 miles from home, but I take a lot of 1,000 mile trips and would hate to be farther from home than I would like to use a tow strap. I had no luck finding an OEM in a hurry and this one I ordered this time was from RockAuto, said to be AC DELCO parts? I know others have used non OEM belts, but don't know if they had any better luck than me? I carry a spare belt belt and belt and tools, but would still be a pain to change it on the road.

-
I'v put 47,000 miles on it in 3 years.
-
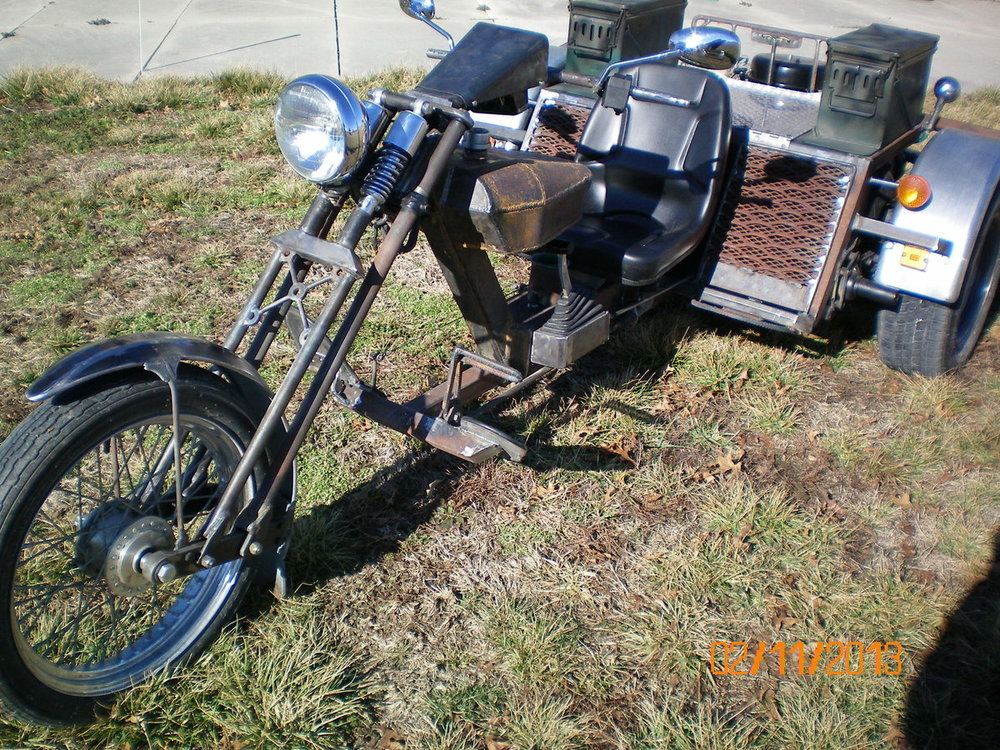
EA 82 motor adapted to VW automatic with a Kennedy adapter and 2 Goldwing radiators for cooling. Best combo for trike out there.