

nvu
Members
-
Joined
-
Last visited
Everything posted by nvu
-
nvu replied to Steptoe's photos's topic in 1990 to Present Legacy, Impreza, Outback, Forester, Baja, WRX&WrxSTI, SVXI haven't worked on it myself. From what I understand with the USDM immobilizers starting on 05 on, they are matched to the ecu that came with the car. People doing engine swaps have the old key taped to the immobilizer antenna and tucked away. We didn't get immobilizer models in US until 2005 so I'm guessing your 99 would be the older style. It's not simple voltage/resistor to bypass. https://iwireusa.com/blogs/iwire-university/what-does-it-mean-that-my-subaru-is-immobilized
-
nvu replied to idosubaru's topic in 1990 to Present Legacy, Impreza, Outback, Forester, Baja, WRX&WrxSTI, SVXGood to know. It's only been a little over a year for me. I'll check on it every once in a while and report back.
-
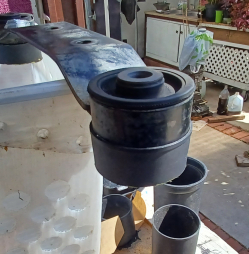
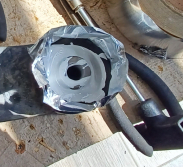
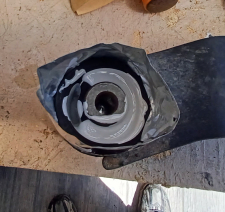
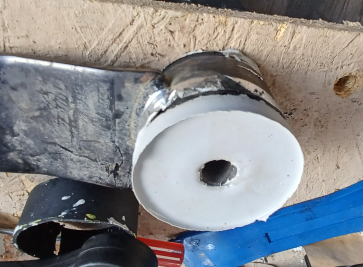
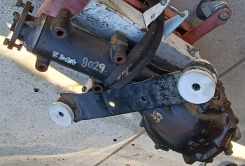
nvu replied to idosubaru's topic in 1990 to Present Legacy, Impreza, Outback, Forester, Baja, WRX&WrxSTI, SVXThey were all dirty or cracked bushings, definitely failing state. I've only went with window weld if was too lazy to take things apart, though nowadays window weld is pricier than getting replacement bushings. I did have one that needed extra stiff bushings, so used concrete leveler. Needed to make molds to pour it in, but it completely filled the voids after some days of curing. It was definitely close to solid, had to tap it in with mallet. Car already had stiff cusco style transmission and engine mounts, so a little more noise from solid diff mounts isn't an issue. It was $7 at home depot.

-
nvu replied to idosubaru's topic in 1990 to Present Legacy, Impreza, Outback, Forester, Baja, WRX&WrxSTI, SVXI've done a couple, it's okay if you want to do it on car. More than likely you'll need to soap and water to get the grime off. Brake cleaner or acetone is fine. mainly to get the water off.
-
nvu replied to nelstomlinson's topic in 1990 to Present Legacy, Impreza, Outback, Forester, Baja, WRX&WrxSTI, SVXThe first oil change is to flush out and machining swarf and loose particles. Put in conventional oil now, cut open the filter and inspect oil. It's an EJ25 with standard rings and metal headgasket, after the first oil change and you don't find unusual glitter, just drive it hard and get the seating over with. Get it warm, accelerate harder than usual, use lots of engine braking in between.
-
nvu replied to Daskuppler's topic in 1990 to Present Legacy, Impreza, Outback, Forester, Baja, WRX&WrxSTI, SVXGreat to hear things are fixed! Also you're talking about the pod on top center of the dash? I have a 2003 impreza and it cracked, replaced it with a 2006 one, it also cracked. The plastic just gets brittle over time. I've given up repairing it and covered the hole with some scrap plastic sheeting and double stick tape.
-
nvu replied to myhilo's topic in 1990 to Present Legacy, Impreza, Outback, Forester, Baja, WRX&WrxSTI, SVXIf you're doing timing belt, break loose the crank bolt before taking out the engine. On retightning, service manual probably says 90ftlb's, I'd do 100-110ftlb's.
-
nvu replied to nelstomlinson's topic in 1990 to Present Legacy, Impreza, Outback, Forester, Baja, WRX&WrxSTI, SVXThis sounds way too familiar, I've had a freshly rebuilt 98 sohc skip 6 teeth on the first test drive. It fired up and idles perfect the first two days as I was putting the rest of the car back together. Then on the first test drive, gave it the beans and it was barely idling. Reset the belt the following week and it never skipped again, it's been 5 years now no belt issues.
-
nvu replied to nelstomlinson's topic in 1990 to Present Legacy, Impreza, Outback, Forester, Baja, WRX&WrxSTI, SVXOh, you're right. There's no MAF on an '02 nonturbo sohc.
-
nvu replied to nelstomlinson's topic in 1990 to Present Legacy, Impreza, Outback, Forester, Baja, WRX&WrxSTI, SVXJust for kicks, try starting it with the maf sensor unplugged.
-
nvu replied to nelstomlinson's topic in 1990 to Present Legacy, Impreza, Outback, Forester, Baja, WRX&WrxSTI, SVXYes, exactly because it was loose. Tighten to 133ft-lb, treat the procedure like headbolts. Oil up the bolt, clean out crankcase threads, try to torque in big 60 degree sweeps and avoid creaking.
-
nvu replied to Stevo F's topic in 1990 to Present Legacy, Impreza, Outback, Forester, Baja, WRX&WrxSTI, SVXWas it making this noise with the leaky cam seal head before? The new tensioner could blow a seal if it was retensioned too quickly. Either way, have your mechanic look at some of these videos, https://www.youtube.com/results?search_query=subaru+timing+tensioner+check
-
nvu replied to Stevo F's topic in 1990 to Present Legacy, Impreza, Outback, Forester, Baja, WRX&WrxSTI, SVXslow knocking like that is valve train related; slow pace like sewing machine. piston/rods related knocking is faster like machine gun speed. it doesn't sound like rod knock here.
-
nvu replied to evor1's topic in 1990 to Present Legacy, Impreza, Outback, Forester, Baja, WRX&WrxSTI, SVXYeah, the cover gasket almost never leaks. At least top up the fluid and see how much was missing.
-
nvu replied to Daskuppler's topic in 1990 to Present Legacy, Impreza, Outback, Forester, Baja, WRX&WrxSTI, SVXcheck out some videos about new pad and rotor bedding if you've never done it before. when changing the pads, pull out all the slide pins and discard the plastic bushings on them. reassemble with synthetic brake grease if possible
-
nvu replied to Daskuppler's topic in 1990 to Present Legacy, Impreza, Outback, Forester, Baja, WRX&WrxSTI, SVXMy bad, the cable is detachable on your model from the hvac unit. You should be able to get to it by taking off the lower drivers side dash only.
-
nvu replied to Daskuppler's topic in 1990 to Present Legacy, Impreza, Outback, Forester, Baja, WRX&WrxSTI, SVXThe blender door cable is a solid core wire, they last forever. You'd have to take apart the hvac unit to replace the cable anyways. Maybe try cycling the door a lot once it's hot, hopefully it frees up things. Also no way to grease things as the mechanism is inside the hvac unit
-
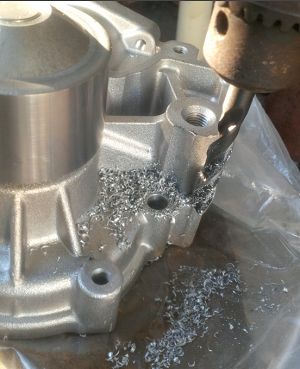
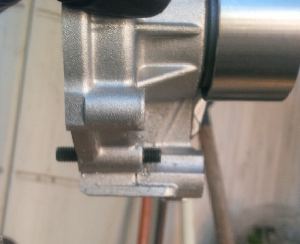
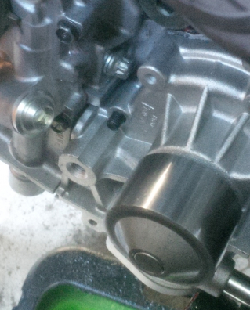
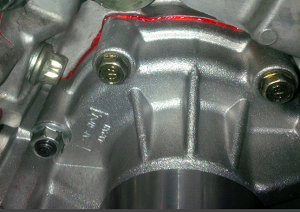
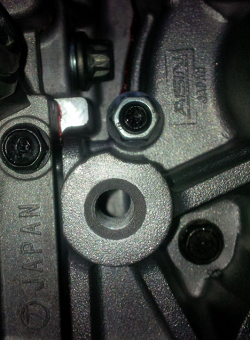
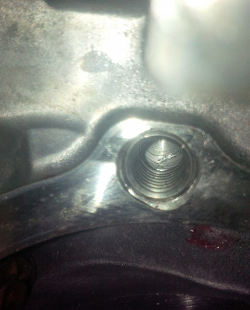
nvu replied to Daskuppler's topic in 1990 to Present Legacy, Impreza, Outback, Forester, Baja, WRX&WrxSTI, SVXI did have a really fubar'ed hole on one block and went with a 12mm stud and 12mm nut. Retapped it to fit the 12mm stud. The water pump housing needed drilling slightly larger, but the fix saved an otherwise usable ej25 block. Luckily the hole was in the center of the pump and barely had enough room to fit the 12mm nut. I'm probably using the wrong terminology, but what I mean was the stud that normally fits in where a 12mm hex head bolt goes. Really not sure the actual size of the stud was, the nut was 12mm hex head. Dug through camera, still have pics
-
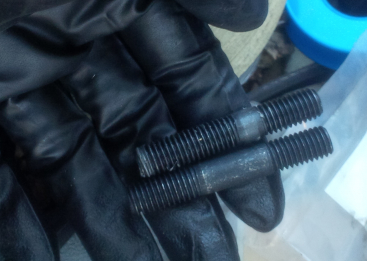
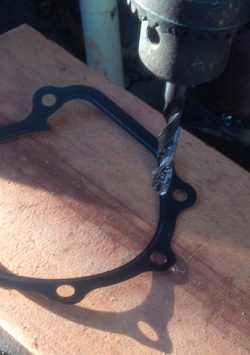
nvu replied to Daskuppler's topic in 1990 to Present Legacy, Impreza, Outback, Forester, Baja, WRX&WrxSTI, SVXbtw, the coolant crosspipe bolts love to strip too, I've had bolts strip or snap when trying to loosen. anywhere there are 10mm bolts in aluminum touching coolant are prone to corrosion and have weakened threads. a little late on water pump tips, but i've had good results swapping a 10mm bolt for a 10mm stud and nut on the water pump. it makes installing with the gasket a breeze. you have to grind down the stud beforehand so it doesn't protrude into the t-belt area, ask me how i know.
-
nvu replied to Daskuppler's topic in 1990 to Present Legacy, Impreza, Outback, Forester, Baja, WRX&WrxSTI, SVXIt sounds strange the the overflow only bubbles as you start releasing the cap. Did you get the right cap that allows excess pressure to overflow into the bottle, but also lets water suck back into the radiator after the engine gets cold? For subaru OEM caps, the ones with the tabs are for the overflow bottle, they have a one way valve for back flow. The fully circular ones are pressure release only, no back flow. Aftermarket ones you have to check carefully.
-
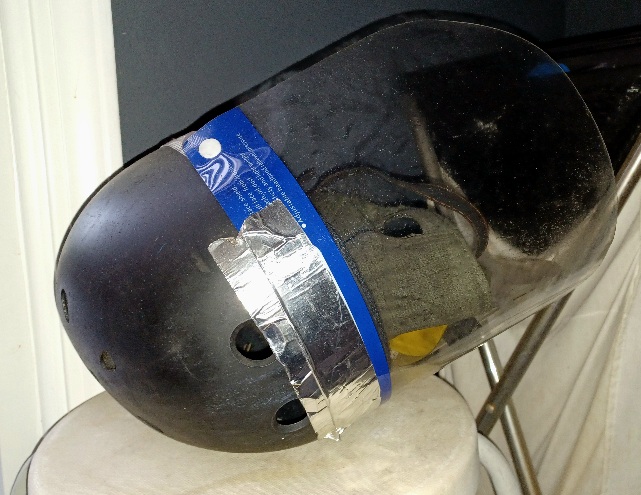
nvu replied to brus brother's topic in 1990 to Present Legacy, Impreza, Outback, Forester, Baja, WRX&WrxSTI, SVXFor extra fun, those covid worker face shields were like $5 for a 15 pack at local swapmeet. Taped one to a helmet and it's been ghetto fabulous. Skater helmets are designed to be really comfortable for lying on concrete; the default position of many new skaters.
-
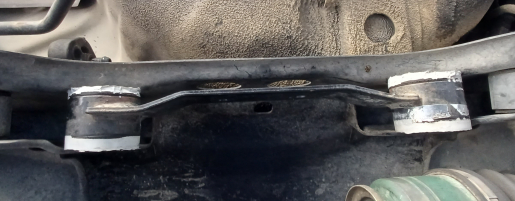
nvu replied to brus brother's topic in 1990 to Present Legacy, Impreza, Outback, Forester, Baja, WRX&WrxSTI, SVXDoesn't look like there's room to get a torch properly in those legacy multilinks hubs, you'll probably make those bushings unhappy. They're 14mm bolts no? 1/2 in breaker bar and 1/2 socket good enough to loosen or break off bolts up to 17mm. Fun Btw, if you're ever under the car or working on your back, get a face shield.
-
nvu replied to brus brother's topic in 1990 to Present Legacy, Impreza, Outback, Forester, Baja, WRX&WrxSTI, SVXget zinc coated rotors, centric gcx ones are nice, but any coated rotors are fine.
-
nvu replied to brus brother's topic in 1990 to Present Legacy, Impreza, Outback, Forester, Baja, WRX&WrxSTI, SVXit's still good science
-
nvu replied to brus brother's topic in 1990 to Present Legacy, Impreza, Outback, Forester, Baja, WRX&WrxSTI, SVXmaybe it only works when the oil is tilted between 40 and 60 degrees


