Leaderboard
-
GeneralDisorder
Members3Points23391Posts -
idosubaru
Members2Points26995Posts -
czny
Members2Points817Posts -
heartless
Members1Points4647Posts


.thumb.jpg.96479a473cd1ed4b8bac667c0ee181f5.jpg)
Popular Content
Showing content with the highest reputation on 08/08/18 in all areas
-
2 pointsIt's just inexperience. We do this (fill Subaru cooling systems) about 3-5 times a day at my shop and this never really happens. 1. Do use a fill funnel that raises the level above the filler neck. 2. On a cross-flow system (yours), remove the bleeder screw and fill till it pours out this port then plug it. At that point the system is pretty much full. 3. Run the engine and once the oil has warmed (about 10 minutes), rev the engine repeatedly to 5k RPM. 4. Continue revving the engine and also massage the upper hose to clear air pockets. 5. When you feel the left radiator tank get hot it is starting to flow. Once both hoses are hot keep running it till the fans cycle on and then back off. 6. Cap the system and fill the overflow to about 1-2" above the full mark. That's really all there is to it and you don't need ramps or any special equipment. This is not difficult at all. Just takes patience. GD2 points
-
Hi guys I hope this site is still semi active with other enthusiasts. I have a 92 Subaru loyale that I will be starting a build thread this might be slow due to funds but I hope y'all enjoy it1 point
-
1 pointlimit on USPS Flat Rate boxes is 70lbs, that's my full time job mon-fri calculating postage and analysing data, so i would know lol. a large box isn't very large, might fit, but i have my doubts...1 point
-
1 pointNo - the 633 gaskets were used till 10. The few EJ25's made after 10 use the same 770 gasket as the turbo models. But this was only Legacy platforms in 11, and 12 models IIRC. None of the Forester or Impreza models got the 770 gasket because they switched to the FB25 starting in 11. Those have worse problems with insufficient ring tension leading to massive oil consumption which, ironically enough, requires an even more invasive job than replacing the head gaskets. The dealership solution is to replace the entire short block. Honestly the best used Subaru from that vintage that you can buy would be a manual (6 speed) transmission 2011 or 2012 Legacy platform. Comes with the proven EJ and factory 770's, and no early CVT problems. I can't think of any down sides to an 11/12 Legacy/Outback 6MT car. Except possibly the random 8-14 rod bearing failures that we have seen. Usually this is turbo models though...... The turbo Legacy GT have some interesting one-off parts and the maintenance work on those is expensive and time consuming with the front mount turbo. You don't want to know what goes into doing the timing belt and water pump on one of those. It's a beast of a job. I would own one, but then I'm not a typical Subaru owner either...... GD1 point
-
1 pointget a used OEM starter and install new brushes in it and you'll never have issues again. www.car-part.com verify it's popping out while on the vehicle. verify you have excellent voltage and power supply *at the starter*. starters draw boat loads of amps and need excellent connections to function. although normally they'll just click and not spin...you're spinning which is weird. aftermarket starters are terribly inconsistent, a sucky aftermarket starter is likely but we are dealing with a 16 year old car with unknown history and electrical/battery/starter signal/mechanical condition.1 point
-
the tires are most likely what caused the problem (or hastened it along) but the real problem is the duty c & the transfer clutch pack - the only way to really resolve it is to replace them. buying mismatched, used tires for these cars is a really bad idea.. for future reference, AWD Subarus really need to have matching tires all around - same brand, same model, same treadwear, and within 1/4 in circumference on all 4.1 point
-
1 pointFor automotive purposes CR has some very limited usefulness for the mechanically blind as a rough starting point. This is so common on auto forums "why is brand XYZ, something something something" on CR?" The auto market is too complicated to fit into nice, repeatable, one size fits all reviews. I wouldn't give it more than a cursory toilet glance, maybe, if i'm bored, for cars. Cars don't just get purchased and sit like an appliance and sit in nominal, conditioned, environments, and cars have higher expectations than appliances. They're subject to much more diverse markets, demanding and increasingly mechanically unfamiliar consumers, environments, expectations and bias and latent inaccuracy is going to be the norm. Whatever mechanisms they use to gather data is always limiting. They have a tough job to do that doesn't translate well to all markets, automotive being one of them. They're data aggregaters, not mechanically astute reliability experts. I've seen the same two different models with essentially the same mechanical components have wildly differing rankings when it's the same !()%*%)(! parts except body panels. I just show my wife and chuckle. But they've got a tough job, so i get it. Ive seen german cars get ranked high in certain categories that you'd have to have the IQ of a watermelon to rely on. German cars would get ranked as "Fewest winter and rust issues" around here if you looked at the data. Because they're awesome winter cars? Hell no. Because they're packed away and never used in the winter or the very few people that slash salt with them throw gobs of money at them, buy new ones every 3 years anyway, or have jobs/routines where they can avoid driving in snow/salt. And on and on and on - this happens all the times in numerous ways. and people are anecdotal and increasingly mechanically unfamiliar - when combined with other market principles, this creates inaccuracy as well. if a company sees huge growth -where that growth comes from impacts reviews. if they're trying to buy cheaper when the economy is down - then they're moving from higher tiered cars to lower tiered cars and bringing high catered expectations with them. if they're moving "up" because the economy is up - then they're easily wowed....or alternately they could be easily annoyed with high expectations of paying higher prices for cars. if a germa car company gets hit hard on numbers - they'd likely retain all their fanboy diehards and have great reviews even if people are fleeing for the lives for some reasons. some of those are illustrations more than fact and latent with their own inaccuracy and bias - but they still make a point. Relying on consumer reports for anything meaningful is like trying to rebuild an engine with a screwdriver. Like CR, Screw drivers are excellent tools, but they're very limiting and low grade if you want real work/data. If you've never used a screwdriver it might be a good starting place. Otherwise, don't waste your time except for cursory, uninformed data to compare against wider trends.1 point
-
1 pointNo. I meant a basin wrench like you use to tighten/loosen undersink water lines for a sink faucet like these: https://www.google.com/search?q=basin+wrench&tbm=isch&source=iu&ictx=1&fir=Rxdvy-isn1leKM%3A%2C1gC7kxgA4VaVxM%2C_&usg=AFrqEzcSjNyYUP9HHoOieYx1O8iTOXvkJA&sa=X&sqi=2&ved=2ahUKEwjpyP3S1tzcAhWGQ5AKHSHsB6IQ9QEwEnoECAMQCg#imgrc=Rxdvy-isn1leKM: Any Ace or TrueValue hardware stores would have them. Or Homeless Depot, etc. These wrenches allow you to turn nuts at right angles from a distance. Like up underneath a bathroom or kitchen sink. Also handy for twisting a stubborn hose loose deep in a mess of hoses etc. where your hands don't fit.1 point
-
1 pointIf you can borrow or have one, a plumbers basin wrench could give you enough grip & leverage to twist that dipstick loose. Long reach too. I too can empathize with the arthritis handicap. On generic celebrex &/or Alleve for it myself.1 point
-
1 pointIt may have been pure coincidence but disconnecting that green connector under the hood 100% solved the problem. Was able to drive it out of the woods and work on it now.1 point
-
1 pointI have a transcript of the chat from last week, where I'm told by a vendor rep that the vendor will pay for the shipping. Now I'm waiting for the prepaid shipping label. I'm going to see if they have a corporate HQ. If they do then I'll pester someone there.1 point
-
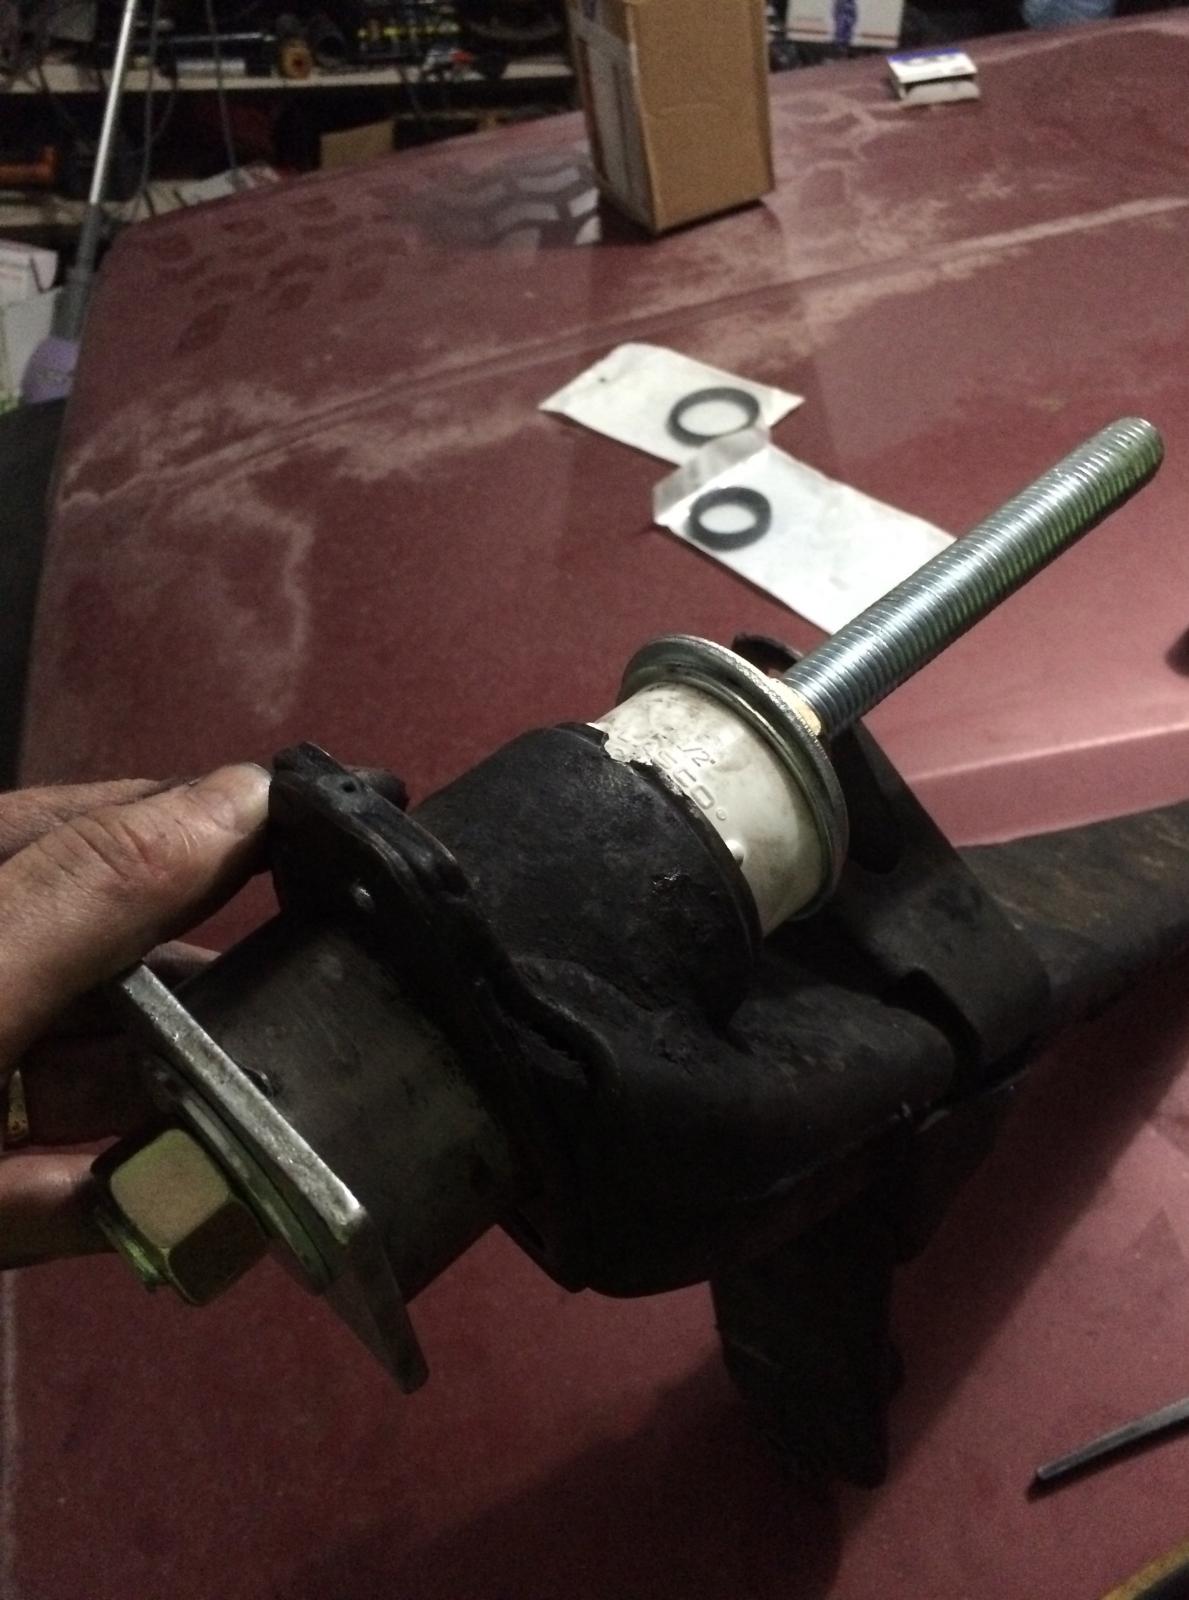
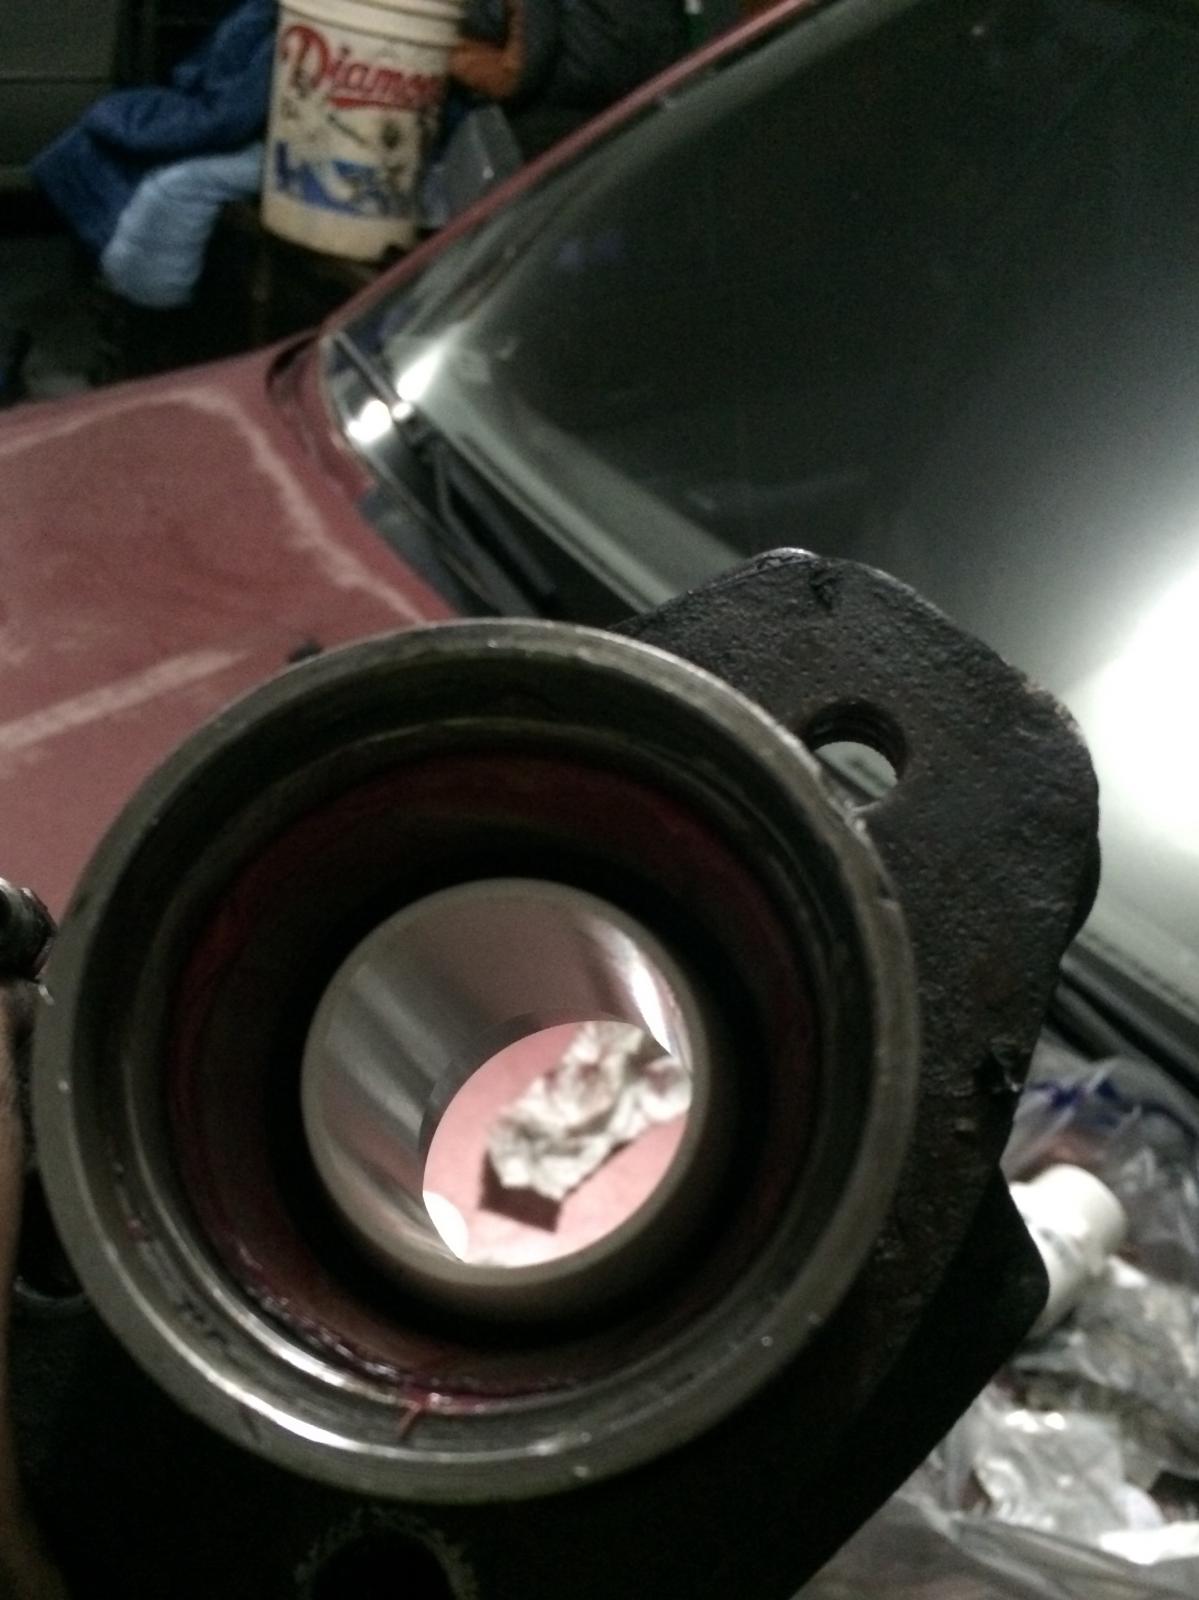
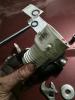
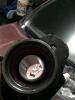
I made this DYI tool to press in Rear 4wd bearing sleeve in my 93 Loyale wagon 12" x 3/4 allthread 3ea 3/4 nuts 1ea 3/4" x 3" sq (slotted) washer 1e 3/4" x 1-1/2 round washer(placed on top of PVC adapter) 1ea 3/4 x 2" Round washer 1ea 3/4 x 2-1/2 Round washer 1ea. 1-1/4" PCV adapter this was perfect fit As you can see the PVC Adapter protects the bearing sleeve from the allthread. . Just place the bearing sleeve straight in and place the PVC adapter in the sleeve. Then slide allthread inside and place washers/nuts on either end. Tighten but not a lot , just enought to take slack out. Then center the tool , and make sure that sleeve is still striaght. Make small adjustments as you tighten by hand. Once centered... Start to tighten inside nut slowly. Bearing should move easily, i encountered only at little resistance when 7/8 through. Just countinye to tighten till it is a firm stop. Remove tool to check if fully seated. Leave the PVC adapter in place till tool in removed to prevent damage to bearing sleeve. I'm sure all of you get the idea, just though it might helpfull to add to this great write up.

 1 point
 -
Once you get the shaft through, bolt the suspension back together. I didn't take detailed pictures of this because it goes back together the same way you got it apart. I advise doing it exactly the reverse of how I said to take it apart. The hardest part will be getting the strut back on, I had to kneel on the knuckle and simultaneously thread in the bolt. Now you have it all back together. At this point, if you were keeping your drum brakes all you'd have to do is put the hub on, put on the cone washer, the flat washer and bolt it all together. Don't forget your brake line! But I'm not keeping the drum brakes. So I bolted on the backing plate for the disc brakes. Now if you're using either drum of disk brakes you'll want to clean up the part that mates up to the bearing and outer seal. Shine it up nice and make sure it's devoid of dirt. Don't contaminate that brand new bearing! Next put the drum hub or disk hub back on and tighten her up! Don't forget the cone washer and the big flat washer! Here's the cone washer, the flat washer looks like, well, a big flat washer. Note from years later: The flat washer IS NOT A FLAT WASHER. It has a concave and a convex side. The convex side (the side that bulges out) goes toward the cone, the nut rides on the convex side. Here's the hub all bolted back on with the cotter pin in. DON'T FORGET THAT!! The way I torqued the castle nut on is more or less the same way I got it off. Stand on the breaker bar until I can't get it to turn anymore, the jump on it until I can put in the cotter pin. And remember, I only weigh 145lbs, so if you're a lot larger you might break something, I don't know... Then you'll want to bolt on the calipers. They'll go on the same way they came off, if you're converting refer to TheSubaruJunkie's swap thread. As a final part of the brake swap I decided to shorten the metal lines. The metal line goes directly into the drum brake, and the disc brake caliper has a length of plastic hose. So the plastic hose on both ends of the metal line has a lot of stress on it. I decided to cut the metal line to a more appropriate length. I did this partly because it makes sense and will prolong the life of the plastic lines, and partly because I couldn't get the brake line off the left caliper. I just turned the head off the nut. In order to shorten the line you need a double flare tool. After all the brake lines are connected up you'll need to bleed the brakes. I'm not going to go into detail because it's easy and there are probably guides on here how to do it. But a very important note whenever removing brake lines is that you never want to run out of brake fluid in the reservoir under the hood! Then you'll be bleeding the master cylinder and yuck yuck yuck. So if you lose a lot of fluid flaring a line, or bleeding just keep it topped up. Pretty easy especially considering what happens if you don't. You are now DONE with your wheel bearing AND brake swap! CONGRATULATIONS!!! BUT, don't drive your car yet. As excited as you may be. First get under the car and check EVERY nut and bolt you touched. Make sure they're all torqued down. Make sure they're all there and you didn't forget to put some important bolt back in. Make sure you're brake lines aren't leaking where you made new flares and connections. Make sure the brake bleeders aren't leaking. Make sure you have the cotter pins in the axle nuts. Make sure you put the axle pins back in the axles if you removed those. Before you put the wheels back on the ground grab a hold of them and make sure they don't wobble. This would very quickly destroy your new bearings. Make sure that if I left something off this list that you check it so your car is safe. NOW. FINALLY. You are ready for your test drive. Take it slow, make sure everything is alright, and be amazed at how insanely quiet your car is!! After your test drive do another double check. Check axle nuts to see if you can get them any tighter. You REALLY don't want them loose. And also VERY important check to make sure you don't have any leaks in any connection in the brake lines you touched. Some final notes: The reason the suspension arm must be removed is because you can't pound the stub shaft out without either removing an axle or the arm. I couldn't get my axles off. After you remove one arm, you do not need to remove the other. Just drop the differential and slide the axle out. If you do this, you take the gamble that you won't be able to get the race back in and the arm will have to be removed for pressing the new race in. Then the arm will have to come off anyway. EDIT ********************** EDIT ******************* EDIT It's almost 8 years later and I'm editing this to change my links to imgur from photobucket due to a few requests to repair this guide. I'd like to note that, when I did this, I had absolutely no idea what I was doing. It's probably abundantly obvious by reading through so take it for what it is. GD lists a few good points in the next post and even though some of my techniques are poor, the pictures tell a pretty good story on their own. Most of the time knowing what something looks like inside is better than words.1 point
-
1 pointSave money and headache by re-booting/rebuilding your own axles, instead of buying remanufactured ones that are likely to fail in short order. you will need a couple specialty tools to complete the project that you wouldn't need for the removal of the axle. These are a snapring pliers and a CV Boot clamp tool. with some patience and cussing, the snapring can be removed without the tool, but the cost is worth it, even if you only use it once. the clamp tool can be rented from some stores. Both are readily available at any auto parts store for less than $10 each: DSCF0669 by Numbchux, on Flickr you'll also want a roll of paper/shop towels nearby. as there's a lot of grease in there that'll need to be cleaned out. and a good hand cleaner and a solvent. NOTE: it is possible to replace only the DOJ/SFJ boot (on the tranny/diff side), but it's only about 5-10 minutes extra work and $5-10 extra cost to replace the outer while you're at it. whereas you have to do the whole project to replace the outer boot. so just do it while you're at it, and then you don't have to worry about it! first, remove the axle. This is a fairly common topic, and write-ups for your specific subaru can be found all over the internet. once you've got the axle out, and on the bench (or the floor....). Start the disassembly. DSCF0664 by Numbchux, on Flickr now you'll need to remove the clamps: DSCF0665 by Numbchux, on Flickr For future reference, this inner joint, with the squared off cups is a DOJ (double-offset joint) or SFJ (Shuderless Freering tripod Joint) on newer models. both of these designs allow the axle to telescope, and change length a bit. this can be done with a cutoff wheel, tin snips, but I prefer to pry the clamp apart with a chisel or screwdriver: DSCF0667 by Numbchux, on Flickr This outer joint is a CVJ (Constant Velocity Joint), it does not telescope, but does allow higher angles without binding. DSCF0668 by Numbchux, on Flickr now pull the boot back from the axle cup: DSCF0671 by Numbchux, on Flickr ewwww....that grease is very contaminated and worn out. once most of the grease is cleaned out, use a screwdriver (or tip of a pliers, or even a pen...) to pry the circlip out of the axle cup: DSCF0672 by Numbchux, on Flickr then pull the joint out of the axle cup: DSCF0675 by Numbchux, on Flickr now, if your joint looks like this, you have an SFJ, which doesn't need to be disassembled. skip the next few steps to pulling the snapring off: 2017-08-04_10-14-35 by Numbchux, on Flickr here are the components of a DOJ, cleaned, layed out, and labeled: DSCF0681 by Numbchux, on Flickr wipe some of the grease off, and then rock the retainer back and forth to force the balls out: DSCF0676 by Numbchux, on Flickr once all 6 balls are out, rotate the retainer a bit, and slip it off the inner race onto the shaft: DSCF0677 by Numbchux, on Flickr then use your snapring pliers to remove the snapring: DSCF0678 by Numbchux, on Flickr DSCF0679 by Numbchux, on Flickr then you can slide the inner race off the shaft. at this point, be sure to take note of which side goes where. the first time I did this, I used a couple dabs of white-out on one side of the race and retainer so I knew how it went. now slide both boots off the shaft. now comes the task of cleaning out the CVJ. this is a little more difficult, as it cannot easily be disassembled (I know it's possible....but I've never done it without destroying it). this one is pretty nasty, dried up and crusted with dirt. DSCF0682 by Numbchux, on Flickr I prefer to work some petroleum based hand cleaner (like Goop or Gojo......make sure to get the petroleum version. easiest way to tell is look at the directions for use. if step one is something like "do not wet hands", you've got the right stuff), and work that into the joint: DSCF0683 by Numbchux, on Flickr then rinse it repeatedly with a solvent (gas works....if nothing else) DSCF0684 by Numbchux, on Flickr once cleaned out, you should be able to move it around fairly easily. don't be alarmed if it binds up while dry. it takes quite a lot to damage these irreparably, once you've worked some grease in there, it should free up quite a bit. now to put it back together. fill the CVJ with grease (go ahead and use the whole pack), and then slide the boot on the shaft. then the small clamp. next slide the other smaller clamp, and the inner boot. now slide the retainer on, followed by the inner race (make sure both are facing the right direction....remember those marks you made?). then install the snapring, and re-assemble the retainer and 6 balls (again, not necessary if you have an SFJ). DSCF0202 by Numbchux, on Flickr put the joint into the axle cup, and re-install the circlip. now, open your other pack of grease and put a bunch in the axle cup, and the rest in the boot. slide the boot onto the cup, seat the boots in the indents on the shaft/cups for the clamps. now install and tighten the clamps. and you're done! DSCF0203 by Numbchux, on Flickr now move the joints through their range of motion repeatedly to work the grease into the joints. re-install in the car. and enjoy!1 point