aba4430
Members
-
Joined
-
Last visited
Everything posted by aba4430
-
Thank you. I will post an update when I improve mine. Right now, not too happy with the output.
-
What LED lamps did you install? I am looking into better lighting for my 87 Brat. Right now, I have Hella conversions, but these are halogens. I am sure if I give them adequate power via dedicated relays, I can get them to do better. The low/high uses a H4 lamp and the high, an H1. However, reasonable and good quality LED's that don't blind oncoming driver's are preferable. Hella Hi/Low with H4 bulb Hella Hi with H1 bulbs
-
My apologies. Please disregard.
-
The 5.5" bolt pattern equates to 139.7 mm, so closer to 140 mm for the Brat. A 4.5" wheel is equivalent to 114.3 mm. OP, you may want to research the hub bore size. These wheels may not clear the hub bore. If you see the original hubs on the EA 81's that are bolted to rotors, there are four alignment protusion's on each hub that the wheels clear and center around. The wheels in the link appear to have much smaller hub bores, but that is just based on the pictures.
-
Fixed the mounts satisfactorily today. Used a combination of two ratcheting straps looped over the front driveshafts and hooked onto the front sway bar, an engine support bar and a floor jack, and managed to get the engine/tranny assembly aligned properly. Now to continue with remainder of the work on the Brat. In the past two weeks, the Brat has been treated to the following: Engine oil and filter change. Original front lower ball joints. Original front wheel bearings and seals. New front driveshafts (Duralast) Rear Disc brake conversion with straightened and refinished backing plates, and Beck Arnley remanufactured loaded calipers. I have just procured new rear rotors (Raybestos) and the short hose (Centric) that fits the caliper. Will replace the old hose and rotor over the next few days. Magnaflow front exhaust manifold/catalytic converter, along with new gaskets. Original part was perfect and will keep as spare. Got the Magnaflow from AMZN for a steal. Still left to do: Front strut mounts and boots. Got a set of Mevotech mounts today and will do this tomorrow. Years ago when I replaced my struts and shocks, I reused the original mount, but remember that I had greased ball bearings in the mount (or was it separate? It has been a while!). However, the Mevotech does not include ball bearings. For boots/bump stops went with KYB's. Will tackle this tomorrow. Front rotors (Raybestos) and pads (Wagner Thermoquiet PD291). Need a new hood. Mine has a bunch of rust on it, and a slight ding. After it is sound mechanically, will get the interior spruced up and possibly a respray.
-
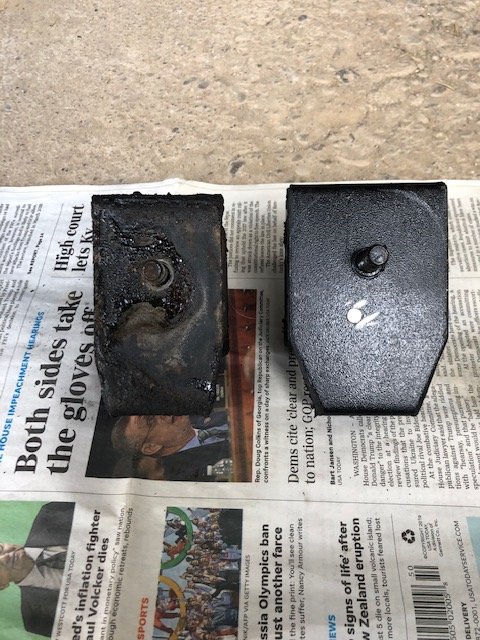
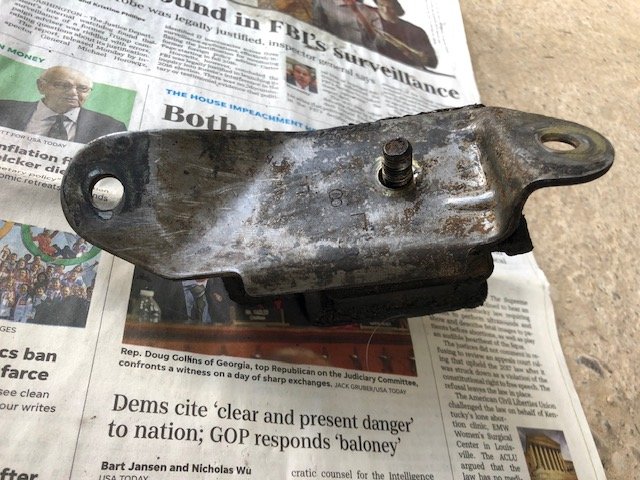
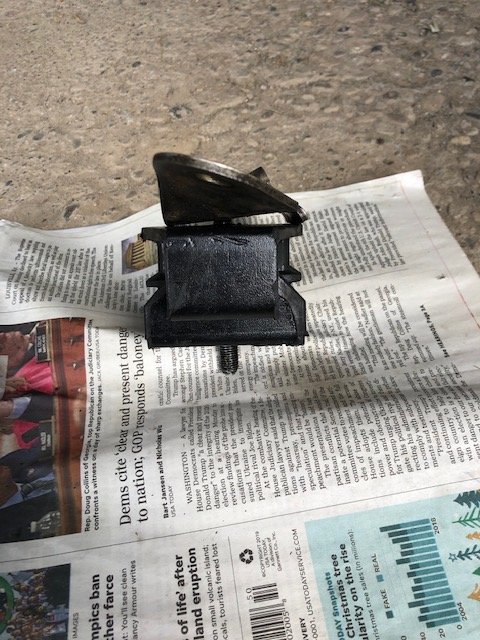
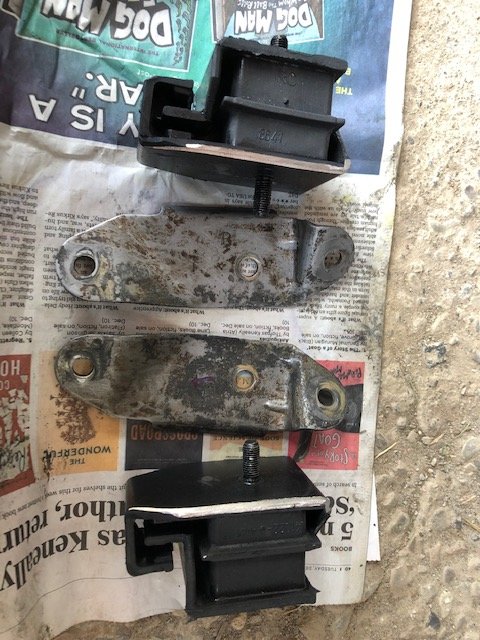
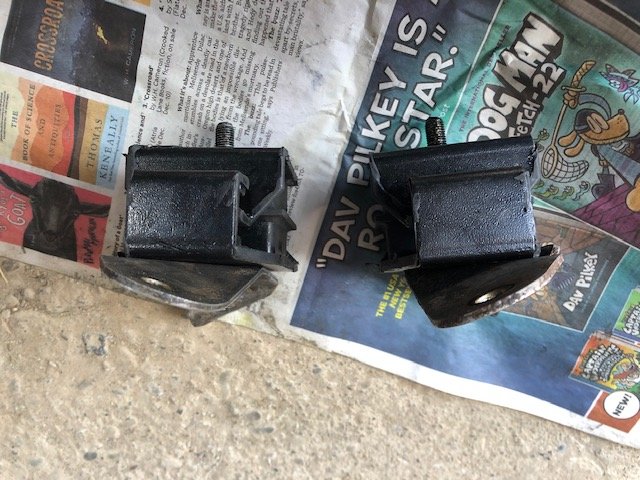
I am in the midst of replacing front and rear mounts on my 87 Brat. The transmission mounts are DEA A6700 and the engine mounts are DEA A6702. The engine mounts needed to be modified in order to fit properly on the mount brackets. Otherwise they will not work well. I ground out a locating pin and also had to take off a couple of mm of metal on one side of each mount so the mount brackets would bolt up flush with the bend on each bracket clearing the edge of the mount. However, I have run into a slight problem. After installing the tranny mounts, I left the mount stud bolts off to prevent any stress on the mount when lifting the engine to replace the engine mounts. Of course, while lifting the engine with a engine support bar, the tranny mount studs cleared the tranny cross member. Now the entire engine/transmission assembly is approximately 1/2 an inch or a bit more, shifted forward and I am having a hell of a time lining things up. Looks like the assembly is also twisted a bit, i.e. a bit higher on the right side vs. the left side. I fought with the set-up all afternoon and finally called it a day. Will tackle again tomorrow morning. Can I use some ratcheting straps under the car to better align the engine/tranny to the proper position? I am thinking of hooking a strap on the front stabilizer bar and placing the strap hook on the tranny bracket just behind the tranny drain plug and using this set up to pull the assembly back some; with appropriate slack on the engine support bar chain. I Appreciate any ideas and TIA. Some pictures of the modifications required with the motor mounts are attached. I do not recommend the DEA A6702 motor mounts if you want an easy bolt on replacement. Note the 33 year old original mount is smaller than the new mount. That picture shows the locator pin on the A6702 mount ground off. There is also a picture of the new mount sitting cocked on the mount bracket due to size, both mounts with the edges trimmed off and the modified mounts sitting flush on the brackets.

-
Have not posted in a while, but I have been doing a lot of work on the Brat lately, and checking USMB out. Just saw this post. The exact replacement part number is 721342110, I believe.
-
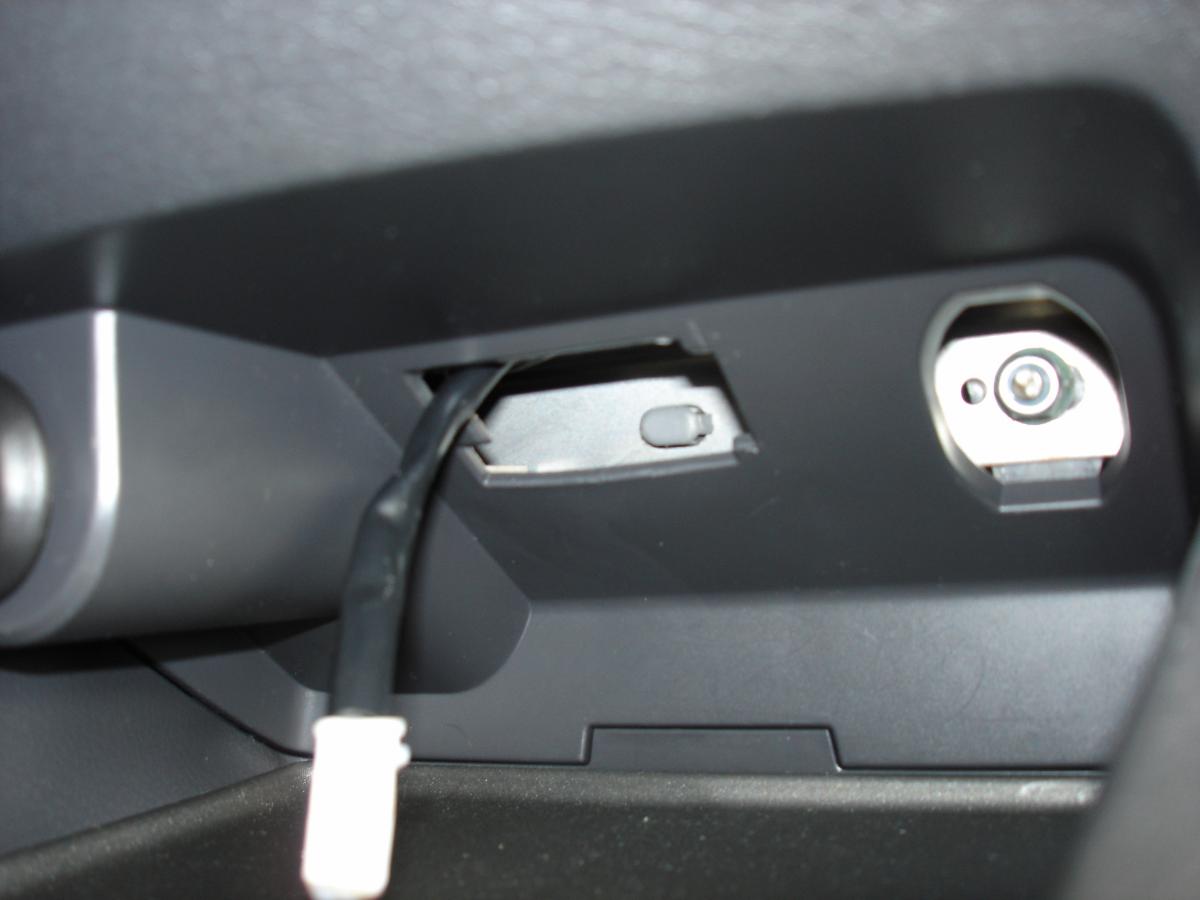
We had the passenger side airbag on our 2008 OBS replaced under recall at the local dealership in late October. Did not really notice much after the work, other than the dash buzzing. Felt around for any issues and noted that the silver painted trim that goes from the passenger side and surrounds the HVAC controls was not fully snapped in. No issues, snapped the trim piece and the buzzing went away. I do not drive this car regularly, but on a cold day, tried to use the defroster and could not get the air to come out of the defroster vents. Tried the air mode switch in all positions and noted that air flow was only from the front vents. Checked the mode control cable and found it connected to the switch end, but did not want to mess around the other end. Took it back to the dealership and they connected the mode control cable. It does not work as smoothly as before, but works and is functional now. Then after a few weeks drove the car to ATL to pick up my son for the Christmas break. Was traveling back in the evening and noted that the ambient blue lamp in the dash center cubby was not on. Felt underneath and found no harness, but two holes (see picture). Next morning checked everything carefully and found a missing trim screw in the glove box area. Called the dealer and had to explain to them that the ambient LED lamp was standard equipment on the car, plus a piece of trim next to it was also missing, and could they just order the parts? No go, I had to take my car in and they replaced the trim screw, ordered the LED lamp, but said that the trim was not installed in the car from the factory - no luck with part look-up etc. Can anyone with 2008 (and 2009 and 2010 possible) tell me whether the trim piece to the right of the ambient lamp (hole with the nut visible) is on their cars? If not, no issues, but looks odd to be missing from the factory. In any case, I fished out the harness connector for the ambient lamp after removing the radio bezel; did not want the dealership to mess around in the dash area more than necessary. I take it back again this morning to get them to put the ambient lamp back. Headaches......
-
If your axle seals are leaking, they should really be ready to fall out. However, a small screw driver or hooked pick tool may come in handy. Be careful you do not scratch the sealing surface. My Brat is a 87, 4 speed DR. The original part numbers for the 85 to 87 models are as follows: Front LH (drivers) seal: 806727040 Front RH seal: 806727030 O-rings: 062807110; you will need two of these. Valve cover and oil pan gasket leaks are easy to fix. If you really need to learn the procedures, then I suggest you carefully read the HTKYSA manuals. There is also a PDF copy floating around on this site. As with any repair, the appropriate safety considerations and tools are a must. Separately, the leak that is getting to your clutch disc could also be due to a leaking rear main seal. If you have some forum members close by, they may be able to help you.
-
If it is the axle seals, you do not need to take the tranny out. I did this during my Christmas break in 2014 (87 Brat with 4 speed DR) and it was actually quite easy. If I remember, you will need two O-rings (same part number for both sides, but part numbers are different for auto and manual transmissions) and LH and RH seals - I believe these are different part numbers and also different for manual and auto transmissions. If you need more detailed instructions, write back and I can help. However, drain the transmission fluid and get the axles out. Then work only on one side at a time as otherwise you can screw the assembly up. You have to place reference marks on the seal retainer nut and transmission housing. Remove the retainer nut locking clip by undoing the nut. Then use a 6 inch 3/8" drive extension bar or another tool with a blunt end, and a rubber mallet and gently hammer the retainer nut such that it turns counter clockwise. Count the number of turns to completely remove it. Then after having installed the seal and o-ring (lube seal and o-ring with grease or gear oil), turn the retainer nut clockwise the same number of turns and align it with the match mark(s) previously made. Secure it with the clip and bolt.. These are really crude steps as I am hazy on all the details. This should fix the gear oil leak due to worn axle seals and/or retainer O-rings. PS. If you need part numbers, I can look these up for 85 to 87 Brats.
-
aba4430 replied to aba4430's topic in 1990 to Present Legacy, Impreza, Outback, Forester, Baja, WRX&WrxSTI, SVXSpoke to ES a few minutes ago and they confirmed that the end links should have had metal sleeves. They are sending me a pair of sleeves and a couple of packets of ES bushing grease. Replacement will wait until next week. Not sure how the kit was released from their factory, but it will be resolved.
-
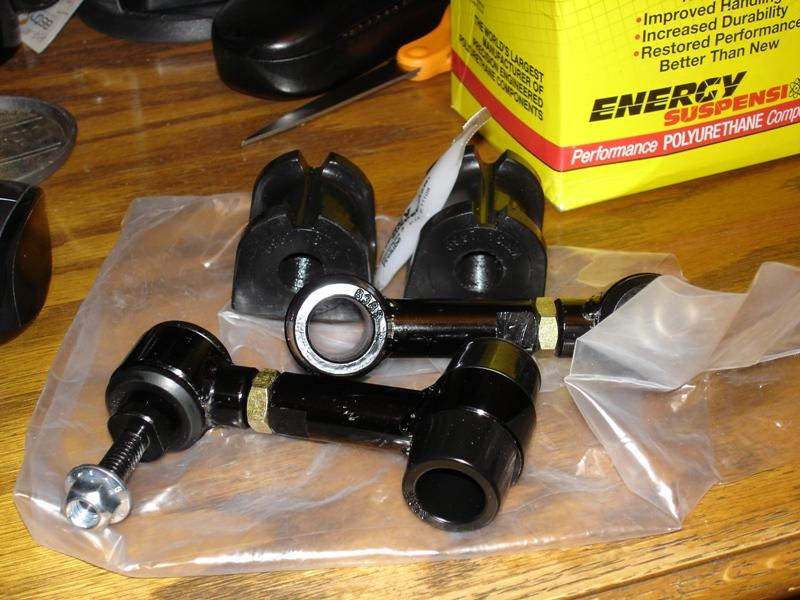
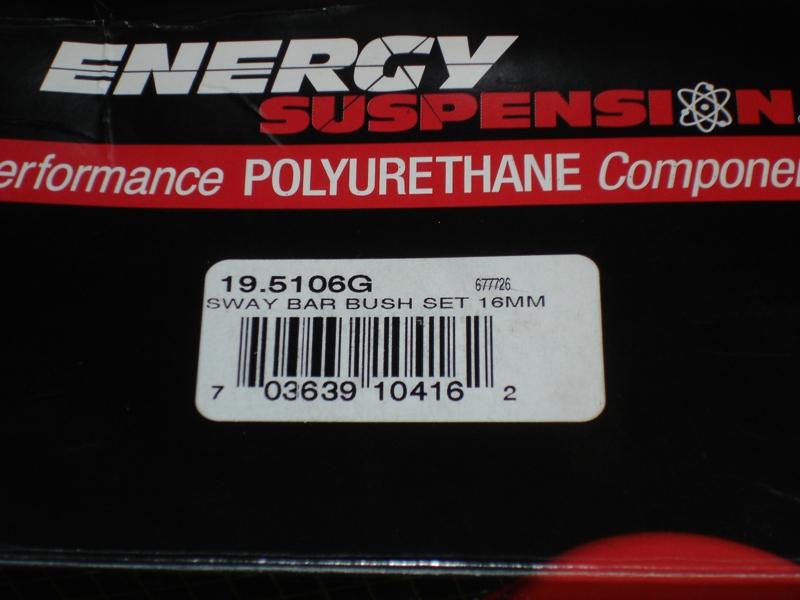
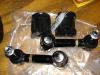
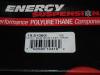
I am changing the front and rear bushings with ES bushings on our 2008 Impreza OBS. I have received the 19.5105G front bushings (21 mm) and 19.5106G rear bushing (16 mm) kit with end links. I ordered the front P/N after verifying suitability at AMZN, but their guide is not always perfect and I hope the front ones fit the car. The car did not come from the factory with a rear stabilizer bar; I added the 2009 16 mm WRX stabilizer bar (bar, links, bushings and hardware) to the car at @4K miles and it has worked well. The car now has a over 105K miles. I have two questions: Anyone know the front bar size for the 2008 OBS? The rear kit (19.5106G) I received appears missing metal sleeves in the links. Please see the following link: http://www.energysuspensionparts.com/19.5106. The ES web site also shows metal sleeves installed in the fixed link ends. Now look at the pictures of the kit I received today. The end links are missing the metal sleeves. Do I need to swap parts from the OEM end links to the ES ones? I will also follow up with ES CS tomorrow to clarify.

-
aba4430 replied to Mglovr's topic in 1990 to Present Legacy, Impreza, Outback, Forester, Baja, WRX&WrxSTI, SVXI have used the Fram Ultra filters (XG6607) since they were introduced a few years ago several times on our 2008 Impreza OBS and am extremely satisfied with the quality. I have also used the XG3682 Ultra version on the 87 Brat during a recent oil change with no issues. Fram has moved forward...... FYI - other filters we have had good experience with on the Subaru Impreza OBS Pennzoil Platinum HPZ-37 and Bosch Distance Plus D3300 filters. In summary, I find no issues with the Fram filters. I also use Purolators (PSL24457 or PL24457) on our 1987 Brat and 1994 Altima. These are great filters as well.
-
It is under the lever.
-
Thanks for the F/B. I will try and look up the foam material at the craft stores.
-
Just finished replacing most external lamps (other than head and fog/driving lights) with LEDs. All lamps were Sylvania Zevo's, as follows: Rear tail: 1157R (red, running and brake) Reverse: 7506 (white, interchanges with 1156). The left lamp is much dimmer than the right one. Just called O'Reilly's and they have ordered a replacement. Rear turn: 1156A (amber) Front side marker: 194A (amber) Front turn: 1156A (amber) Front parking: 194. This is currently white and I don't think looks good on the Brat; not even sure whether it is legal as a parking lamp. I will change these to the license plates eventually. Need to order another pair of 194 ambers for the front parking lamps. License plates: Will use 194 whites from number 6 above. Wally World has the Zevo's at decent prices, even better than Amazon. Wally World has a few numbers in stock, but their web prices are much lower than in store prices. They will match their web prices also. O'Reilly's matches Wally World web prices and I was able to get some there. Amazon has the widest color variety, but not the greatest prices. I had a Tridon EP-34 electronic flasher from @3 years ago and replaced the original Niles with the Tridon to test the LED lamps. The turn signals and emergency flashers work great.
-
https://www.amazon.com/gp/product/B001HLZ6JG/ref=cm_cr_ryp_prd_ttl_sol_0 I have been using this one since 2012 in the 87 Brat. There was nothing wrong with the original one. The Hitachi has been working well and fit perfectly; I also believe it is from Japan. The coil in the link you provided has good reviews. I was not worried about resistance etc.
-
Last time I checked, the TL gasket was only available for one side, the other side was NLA (not sure which one). However, what are you folks doing to seal the lens to the bulb housing. Can butyl rubber rope gasket (stretched thin evenly) be used. I see the thinnest available is 1/8" X 1/4". Any ideas appreciated. Thx.
-
Do you also have pictures?
-
Called the dealership yesterday and found out that the headlamp nuts are still available, but the screws are not. Will go ahead and order enough for the lamps. Will source the screws locally. However, will go to a few places today to see if there are suitable local alternatives. Separately, I installed the conversion kits. Need to aim the lamps and the Brat is still sitting in the garage. However, everything works as it should. I also spliced in new Dorman connectors on the Original Hi/Low harnesses after cutting off 3 to 4 inches off the end. The ones I used were sitting in my parts box for a few years. http://www.amazon.com/Dorman-84790-Headlight-Socket/dp/B001SGBZSQ/ref=sr_1_1?s=automotive&ie=UTF8&qid=1465058738&vehicle=1987-13-54-4-59-31-8-8-3195-113-2-4-435-212-1-0&sr=1-1&ymm=1987%3Asubaru%3Abrat One observation, the original headlamp wiring is ~14 gauge and I am sure Subaru did not skimp and used OF copper wires; the wiring was shiny copper. The Dorman connectors. I believe are 16 gauge and the copper wiring appeared tarnished upon stripping the ends. However, used 14 - 16 gauge butt connectors with heat shrink tubing and all should be well. In order to minimize power requirements, but keep the car glitz free, I am looking at some simple Sylvania LED exterior lamps. So far, I have sourced Zevo 1156 lamps (clear/white for the reverse lamps), Zevo 1157 red lamps for the rear brakes and Zevo 194 lamps for the license and parking lamps. These have yet to be delivered. Will also source Zevo 194 amber lamps for the front indicators, and research suitable Zevo 1156 amber turn signals. I do not want to use resistors and hence reading up on LED compatible flashers. Another irritating concern I have been tackling for years is with the dome lamp, i.e. not coming on with the door open - just works if you manually flick the switch. The door ajar indicator works just fine. I remember a few years ago, I noted corroded wiring/connectors under the passenger side carpet and removed some sections. I never rebuilt the wiring there and wonder if that could be linked to my dome lamp behavior. Does anyone have a wiring diagram for the under passenger seat wiring? Will continue to update.
-
Thanks. Will look these up.
-
I see another thread on the same topic, but did not want to hijack. However, I am upgrading all 4 lamps with Hella conversion kits for High/Low and Hi beams. Took the old sealed beams out and the tiny screws holding the trim around the 4 lamps were severely rusted. I had to remove the entire right headlamp frame to get one stubborn screw out by starting it from the back side with a small locking plier. However, got 16X M4-0.7 X 8 mm machine screws from Home Depot and will replace all the trim ring screws. Any leads on where to source the aim adjustment screws? These are also severely rusted and would be good to replace all of them. Thx,
-
aba4430 replied to RallyKeith's topic in 1990 to Present Legacy, Impreza, Outback, Forester, Baja, WRX&WrxSTI, SVXI will get under and take another look.
-
aba4430 replied to RallyKeith's topic in 1990 to Present Legacy, Impreza, Outback, Forester, Baja, WRX&WrxSTI, SVXWe have a 2008 Impreza OBS and I do not see any provision for an external spin on filter, not even a block-off plate. When I ordered a filter, thinking I was ordering a spin-on filter, I received a routine transmission screen filter that is specified for our OBS based on the VIN. OP, do you have any pictures about this block-off plate? Or can you provide a link to the parts diagram you reference?
-
http://www.amazon.com/s/ref=sr_nr_p_72_0?fst=as%3Aoff&rh=n%3A15684181%2Ck%3Aautomotive+double+sided+tape%2Cp_85%3A2470955011%2Cp_89%3A3M%2Cp_6%3AATVPDKIKX0DER%2Cp_72%3A1248861011&keywords=automotive+double+sided+tape&ie=UTF8&qid=1437309623&rnid=1248859011 These are some specific automotive options.