
All Activity
- Today
-
 I have seen throttle bodies for sale on eBay. Granted, they really aren't cheap. Enough to make me wince ($350-$400). HOWEVER - with the throttle body you get a TPS, an injector, a fuel pressure regulator, and an IAC valve. You'd spend over $400 if you bought the parts separately (if you can find them *cough* injector & OEM regulator). It's not the cheap route, but the parts would be genuine and you'd have spares. You may get lucky if you spend a few hours on the eBay rabbit hole. I saw someone list a throttle body as a carb a few months back for a crazy low price. I'd just check all the electrical hoopla going to the TPS before plugging it in. Just my 2¢. :]
 -

FUJI Bond...aka Super three bond or what not
subaru1988 replied to WJM's topic in Old Gen.: 80's GL/DL/XT/Loyales...
I suspect the reason people say they might "leak for no reason" are the bolts being previously overtightened which creates a pinhole/crack behind said bolt for the coolant to come out of. As a result, someone might suspect a gasket leak. I had this problem, and I fixed it with the Permatex coolant specific RTV. A light smear on the gasket and bolts worked. That said, you really shouldn't have to do this, as the paper gasket should be fine, but these cars are older with many hands that have been on them at this point. - Yesterday
-
 And Car-part.com: 1999 Engine Computer Subaru Impreza 22611AE510 X AA0682 $125 Avalanche Auto Parts USA-CO(Denver) E-mail 1-303-722-3151
 -
P.s.s this age they should be PlugnPlay - remove the battery cables 1st if you're not familiar w/the process. Also, check the EGI (?) fuse under the hood- the big one. Might have gotten blown, too. GL
-
This shows '99 only but AT and MT use the same: https://parts.subaru.com/p/Subaru__/Engine-Control-Module-ECM-Engine-Crankshaft-Position-Sensor-Bracket/49232072/22611AE510.html I'm not sure about the '99 being MAF or MAP based? If it has the MAF by the airbox then it's likley a one year only ECU, since I believe the '00-'01 EJ22 were MAP. Here's one on Ebay: 22611ae510
-

1987 GL-10 Wagon Throttle Position Sensor Issues
OCDan replied to OCDan's topic in Old Gen.: 80's GL/DL/XT/Loyales...
Well, no luck finding anyone parting out a SPFI 1987 GL-10. Also came up empty on wrecking yards. I was about to order another Hitachi SERA484-2 from PartsGeek, but fortunately checked their return policy. It is very strict when it comes to electrical parts. I chatted with a rep and asked about the return policy on this part. From that conversation: "If your part fails, we will issue you an RMA number to return the product. Faulty parts and improperly installed parts return decisions are left up to the manufacturers’ rules and regulations . We process the return for you by accepting the part and then forward the part directly to the manufacturer for final approval. In this case, this part is returnable as long as it is due to an error whereby the incorrect part was delivered, or similar cases. Returns are not accepted in cases involving warranties or returns due to electrical failure of the part, or because it burned out due to an electrical failure in the vehicle, or similar cases." Ugh! So back to the drawing board... -
 The tapers should be easy. Your fork looks a bit big, it might rip the old rubber but it should work. The pinch bolt on the knuckle that sometimes get so corroded it snaps in two. Inspect and be careful. Unlink the antiroll bar to make it easier to push down on the lower control arm.
 -
 If you are getting the "beep of imminent death" from your ECU, when driving around, or even on startup, then your timing has issues. Various issues include, 1. rotor screw dropped out, 2. timing belts have never been tightened which should be done every 5000 to 8000 miles, 3. one side has skipped a tooth due to loose timing belts. Other symptoms include, engine power fluctuating, idles at a lower rpm than usual, less than normal power, runs rough on startup, heavy valve lifter noise. All of these indicate a timing issue.
 -
 My 05 forester started doing clicks and clacks in the front suspension over low speed bumps, seems like its time for suspension ball joints. no fee play in the steering ones. Received already my skf joints, but before trying to install and getting stuck, some questions: 1. does my fork tool look like the right size and shape? 2.how bad is freeing the tapers on these? Car has no rust but the joints where never changed in 20 years.. 3.any other tips in terms of work steps? tnxs!
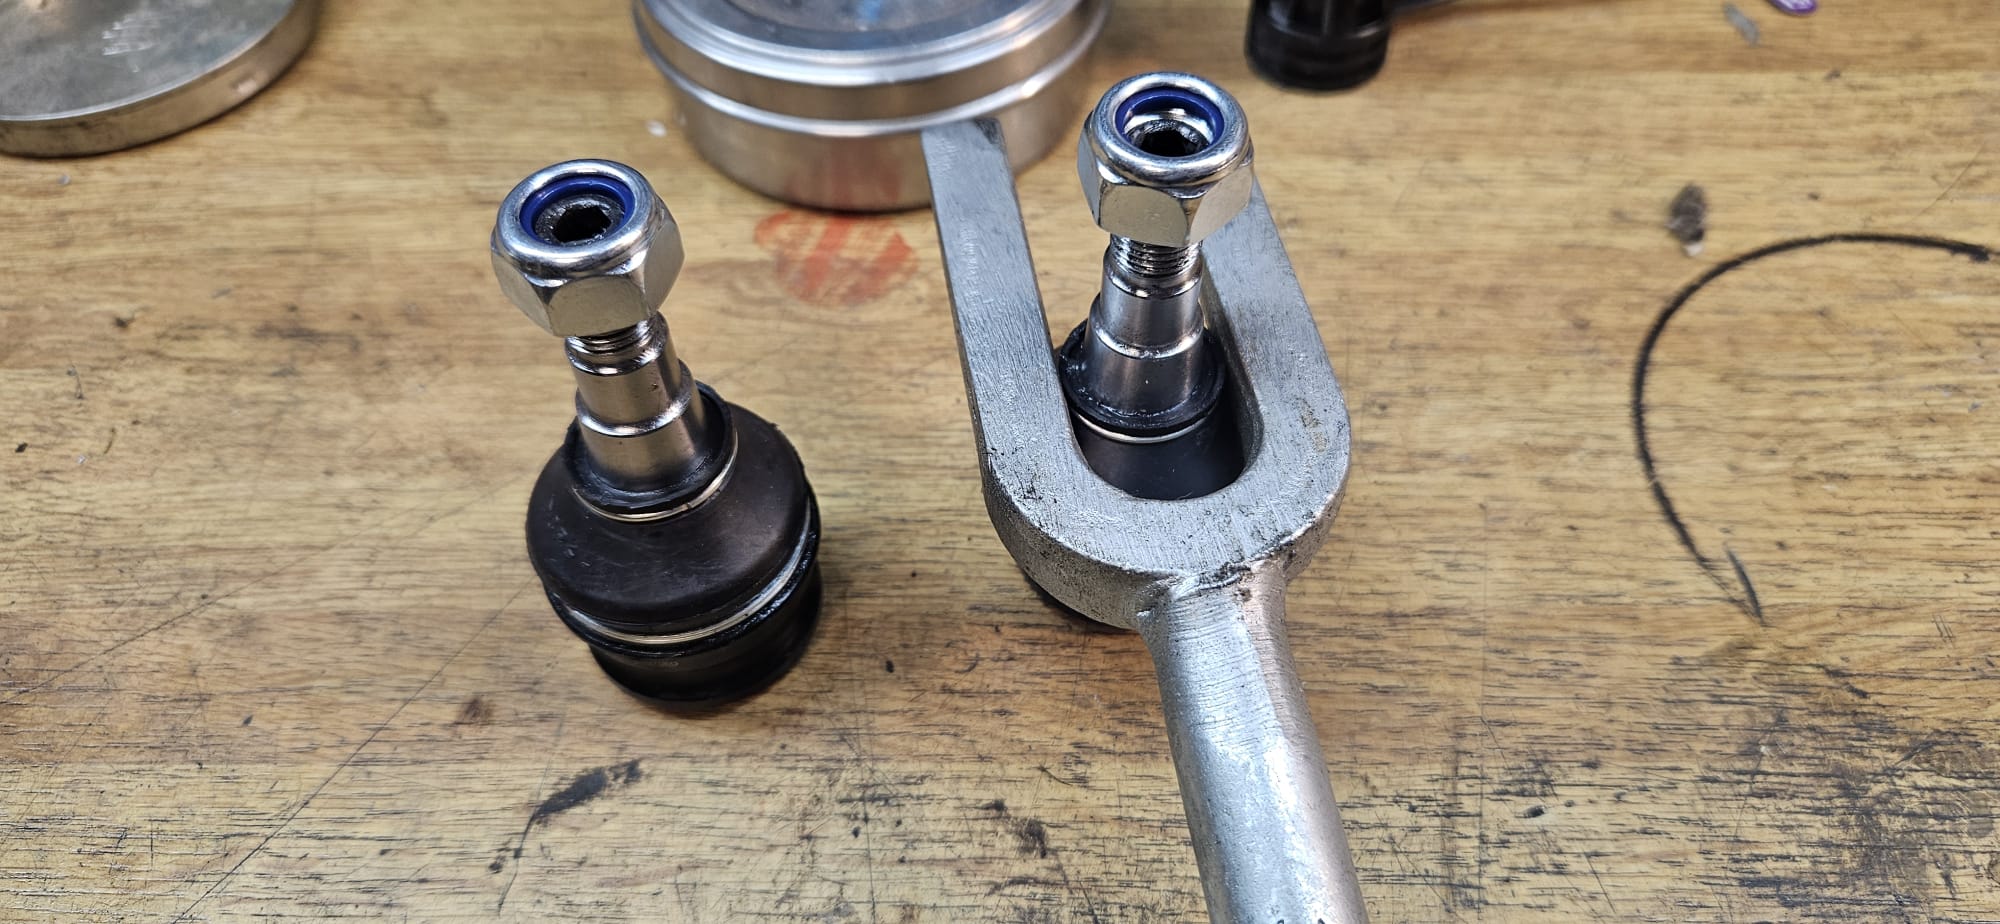
-
that much i know.... but how do the us headlights work? separate bulbs for low and high?
-

FUJI Bond...aka Super three bond or what not
moosens replied to WJM's topic in Old Gen.: 80's GL/DL/XT/Loyales...
Light bead maybe 1/16 to 1/8” but as you mentioned about clogs don’t over do it. And i’ve put the bead to the pump body, slap on the gasket then bolt it up without applying any bond to the engine case. Over here you can find the same product at the Nissan deal way cheaper. And if you have more than one Nissan dealer call them before driving over because some dealers just automatically mark up higher. -
 H1 bulb are single-beam. H4 bulbs are twin-beam High/Low.
 -
FUJI Bond...aka Super three bond or what not
SuspiciousPizza replied to WJM's topic in Old Gen.: 80's GL/DL/XT/Loyales...
'89 GL I have a question regarding Fujibond C aka Threebond 1324 anerobic sealant. In the '89 FSM it states that this sealant is for use on the periphery of the water pump mechanical seal however nowhere in the FSM (that I can find) does it mention how it's used. Most water pumps come with a paper gasket. Should the anerobic sealant be used with the paper gasket or just the anerobic sealant? How thick of a bead? I'd assume 1/16-1/8 inch. I'd prefer to use the anerobic sealant as I've heard the pumps are prone to leak "for no reason" is this due to the fact that most people just use the paper gasket supplied rather than the proper sealant? The anerobic sealant needs an absence of air to cure, so if any seeps into the water passages, it'll remain liquid and not cause any clogs. Any thoughts here? I'm a bit confused. :] P.S. After triple checking the FSM the nomenclature "mechanical seal" refers to the seal for the water pump shaft but doesn't mention it being used when installing the shaft seal. I'm so confused. -
are you sure its H1? in europe hedalight lamps are H4.... in any case, i went el cheapo with these, like 35$, thye lasted 2 years..... look in thier shop, maybe they have the H1 you need https://www.amazon.it/dp/B07XF6VBV8?ref_=ppx_hzsearch_conn_dt_b_fed_asin_title_2
-
 I generally run Cougar Motor LED bulbs off of Amazon. They generally last 1-2 years. You could check Diode Dynamics and see what they offer, they'll run about $200 for a set. I've never had a Diode Dynamics product fail, and I have a lot from them. Fantastic customer service as well.
 -
Hello Everyone, I've got a '99 Impreza 2.2 5mt and a fried ECM. Are these interchangeable as long as it is for a 2.2? Is there anything special I need to look for when finding a replacement? Does anyone know where to find one? Is there any programming or other special concerns when replacing it? Cheers!


-
 Yarlissa joined the community
 -
(2).thumb.jpg.bec89cdb417321b805950fa2084ffc78.jpg)
long travel Outbacks or making Subarus faster and more reliable offroad
travelvw replied to pontoontodd's topic in Off Road
Should have been black, yep ;). Front end looks like it can handle a smash from an amateur driver! Nice work. K -
 Got the spare tire well tank for the Impreza back from the fab shop. Before sending out for paint I capped and sleeved this tube so it doesn't just fill up with a pint of mud. Welded and painted passenger side bumper mount. That square tube goes a good foot back into the body. Replaced the engine mounts, that was more difficult than expected. Split engine mounts in middle, they didn't have the retaining plates like the ones off the other engine I installed. Lowered the exhaust to do it, the gaskets were definitely blown out. Unfortunately even after replacing with new the one still seems to leak a bit. Removed the oil pan and hammered it back out, bit more capacity than stock now. If nothing else it will take longer to get smashed up against the pickup now. Put foam strips around the radiator to seal up the gaps. Who knows if it will help, if nothing else helps keep the top tank from rubbing on the radiator support. Had to put in new threaded inserts for the skidplate. Those tack welds are just so they can be tightened down initially, they expand and clamp on the inside of the crossmember. Bracket for skidplate support, dipped that one in the enamel paint and looks good for now. Replaced trans cooler, condenser, and radiator. Bumper and skidplate etc back on. Maybe should have tried harder to find a paint shop that could match the body side color better but this place at least seems to use some very durable paint. Plus I think they're the only place in town that sandblasts prior to paint which was necessary with some of the old rusty pieces. Thought about going with white instead but I'm not sure that would be any better. I know, travelvw and slammo think I should have gone with black. Still need to replace the driver's side radiator fan and install the front sheet metal panel and license plate. Drove around the block and seems to be back to normal. No leaks I've found. Plan on driving it quite a bit tomorrow.
 - Last week
-
1987 GL-10 Wagon Throttle Position Sensor Issues
OCDan replied to OCDan's topic in Old Gen.: 80's GL/DL/XT/Loyales...
I have not done that, but good point. I'll do that. Thanks! -
Have you called around wrecking yards? Maybe Facebook Marketplace, Craigslist or the like? Sometimes if there's a car that's been listed for a while, the seller would be willing to part it out, especially if they mention the car will be wrecked if it isn't sold. I've gotten lucky and have saved some very scarce parts at a very good price that way. I see you're in Oregon, so you're in the Mecca of parts availability. I'm sure if you looked around you'd be able to find something used. If not, then that really is the writing on the wall for the rest of us in the boondocks. :]
-
1987 GL-10 Wagon Throttle Position Sensor Issues
OCDan replied to OCDan's topic in Old Gen.: 80's GL/DL/XT/Loyales...
Thanks for the update. It appears that for me, my only option will be to order a second TPS from PartsGeek and test it very thoroughly with a temporary connection to the connector, before cutting wires to replace the connector. -
Air Struts: Repair, Replace, or Swap?
moosens replied to LaMamelle's topic in Old Gen.: 80's GL/DL/XT/Loyales...
Good luck but i think you should be happy with springs or shop a true contemporary set up from the bag culture. I don’t see those as easily serviceable units. Let us know how it all shakes out. -

Air Struts: Repair, Replace, or Swap?
LaMamelle replied to LaMamelle's topic in Old Gen.: 80's GL/DL/XT/Loyales...
Well, unfortunately my brilliant plan did not work. Not super surprised but still disappointed. I agree with you bushytails, that rubber is just too far gone, and even if I did fix it, who knows when the next one would go. I think my new plan is going to be to take them off, take them apart, and replace the rubber entirely with a similar material, or something that can hold the pressure. I am not sure how any of it is built, so if anyone has any details on what kind of rubber it is, or how the thing is put together, that would be super helpful. There seem to be some detailed plans in a 1988 manual that I found online, hopefully that should suffice. I haven't found any detailed information on how to rebuild those struts online, so I will do my best to wing it and document what I do here. Maybe do a little guide so that future people can do the same. Until then, I'll there is a junk yard north of me with an 86 GL in their lot. I'll take the conventional suspension off of that, replace the struts and use that until I finish the rebuilt of the air suspension. Wish me luck! -

Cannot Fully Seat Rear Axles
bushytails replied to SuspiciousPizza's topic in Old Gen.: 80's GL/DL/XT/Loyales...
File or saw (hacksaw, sawzall, portaband...) the notches 1.5mm deeper in the castle nut. I absolutely would not run without the cotter pin. I've had multiple wheel hubs loosen up over time, and threadlocker does not sound sufficient to keep the nut from unscrewing once there's no compression force on it. -
Cannot Fully Seat Rear Axles
SuspiciousPizza replied to SuspiciousPizza's topic in Old Gen.: 80's GL/DL/XT/Loyales...
So I did everything I could to seat the axles in further. They did move maybe a fraction of a millimeter. After about 20 minutes of hammering on one side. I noticed the cone washer sat quite far out from the drum. On the OEM drums I pulled, the cone washer sits almost exactly 2mm from the drum face. Whereas with the aftermarket drums I installed, the cone washer sits 3.5mm from the drum face. The countersink isn't as deep. I know that doesn't sound like a lot but only about 1/4 of the cotter pin hole on the axle is exposed. So that extra 1.5mm really adds up. I'm kinda at a loss for what to do. I truly think the axles are as deep as they'll go. They didn't take this much effort to remove, I don't know why installing would take more force. The two ideas I have (both of which seem like big no-no's) are: 1: Do the old glass & sandpaper trick to the cone washers to hone them down and get them to sit more flush with the drum face. 2: Don't use a cotter pin. Torque the axle nuts to 200ftlbs, maybe use some blue thread locker and keep a breaker bar, 36mm socket and extra axle hardware in the car. Check periodically when checking tire pressure. I don't like either of these ideas but again, I'm kind of at a loss. I have new spring washers on the way too. Any thoughts? :]


