myhilo
Members
-
Joined
-
Last visited
Everything posted by myhilo
-
myhilo replied to myhilo's topic in 1990 to Present Legacy, Impreza, Outback, Forester, Baja, WRX&WrxSTI, SVXThe comments are all great, however can't someone give advice on... Advice on buying parts that is what sources (company) are currently in business.
-
myhilo replied to myhilo's topic in 1990 to Present Legacy, Impreza, Outback, Forester, Baja, WRX&WrxSTI, SVXGreat advice, thanks all, but I need even more advice. I should pull the engine to replace the clutch and this will make all the above work easier, correct. Advice on buying parts that is what sources (company) are currently in business.
-
poor subaru, has sat since clutch gave out. I want to refresh all parts, new clutch, may need heads, but I can do leak or compression test when I get that far. Anyone want to suggest best way to make this thread fun????
-
So my 11yr old grandson is visiting, we are taking a engine apart for fun. He is learning how to use wrenches and socket and we are having a great time. However, this old chicago rusty engine now has me at a standtill, I don't want to bore him so I think he as seen enough of removing stuck fasteners and so the rest of the disassembly need to go smoothly. I can't seem to remove the distributor, I've soaked the joints, and hammered it, but it's not coming out. Am I doing something wrong? The ear on the distributor for the bolt is broken off, the aluminum distributor is also now broken off from my pounding and I the outer hollow shaft and the rotating spring advance assembly are all that's left. No force seems to make the outer portion move.
-
GD suggested I can get the FSM for electrical for my 93 loyale JF1AC4226PC200963. I was thrilled, so I called my local Subaru dealership, said not available, doubted anything was available. Did I try the wrong Dealer, the Parts guy did remember the Loyale, checked with his manager, said not available.
-
I have a 1993 Loyale, pre ODBII so scanner's don't work. I believe there was a way to jumper the ODB 1 socket to get codes. I also have manuals which refer to connectors which can be connected for diagnosis, but the descriptions in my manuals don't allow me to identify the correct connectors. I'd really like the electrical schematics , I missed a factory service manual set, the other day, already sold. I do see some sets but they omit the electrical schematic volume. I do see on-line 'dvd' suppliers but comments suggest they are frauds, so any suggestions? Even old posts which may help would be great. This is such a great car, it should never die....
-
Idle problems 93 Loyale EA82, 3sp auto 2 wd 4dr sedan Idle too low stalls in cold, when warm runs fine. Idle goes high, 2000rpm? as it warms. Vacuum seem fine, no leaks ( sprayed starter fluid at all vacuum hose joints. Tap into AT vacuum line w/ vacuum gauge, is in green ~ 21", drops to maybe 15 on throttle fast press, goes right back up. to green in few secs. Raise rpm, to 2500 or 3000? Vacuum stays steady after brief dip. Can pull codes if I can identify ODB I black and green plugs, don't seem to be around fuse panel, any suggestions? Thanks for your help, Subaru made such good cars in 80's and 90s, now trying to obsolete them my limiting parts??? Anywhere I can fine new or used TBI or parts to rebuild?
-
Is Subaru discontinuing to sell parts for '80' or older parts?
-
-
Great, just let me know I'll be happy to pay for it and shipping. I live in Chicago Suburbs. Brian Burke 4N070 Swift Rd. Addison, IL. 60101 my strange street address " 4N070" is not recognized my UPS and FeEx's database but will work anyway, just find the " use this address anyway" button. I also have Chase Bank which allows me to send money to someone securely, my wife know all the details if that interests you. Otherwise I'll arrange what ever you like.
-
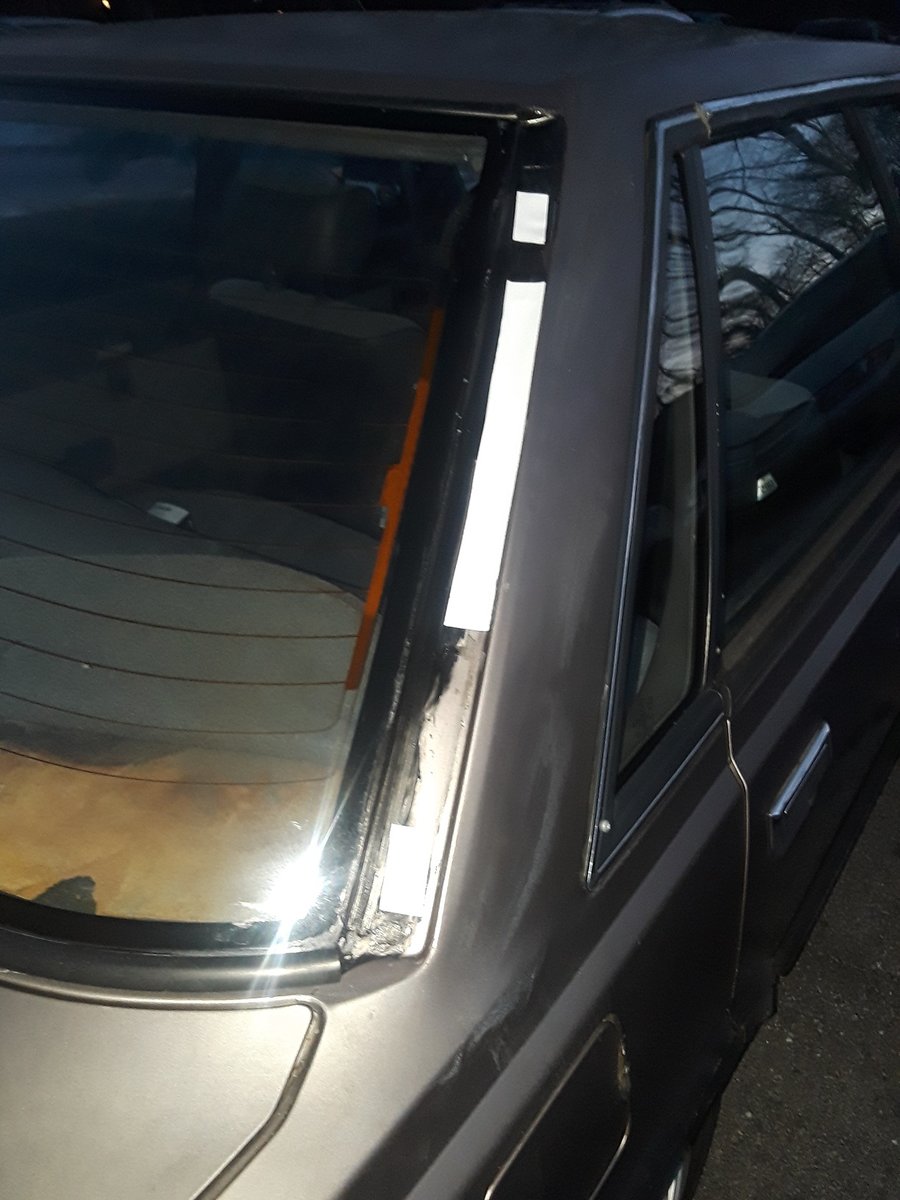
Car leaking at Rear Glass (back windsheild??). Leaking at lower right corner. I had the rear glass removed and reinstalled. To remove rear glass you need to remove the two plastic side vent covers. I need the right cover, the sister lost the part and I can't even find a part no. in any of the online part supplier drawings. 93 Loyale Sedan Rear Glass Side Vent Covers (plastic) these cover openings on each side of the rear glass which let air which enters the cabin from the cowl to exit the cabin. The covers fit well and stop any water from getting in. I have a few photos. Can anyone tell me what Subaru calls these? Or, what the part numbers or section of the Subaru parts catalog to look in? They press on/in and the clips are old plastic and can break. My glass guy got the left side off with only one clip breaking and was able to reinstall it by gluing the broken clip.


-
Electrical gremlins, old relays? moving seat belts sometimes get stuck, or don't move. Now running (position) lights don't go off when all off and key removed? I can only find a few relays, need relay locations and complete car schematic. I have Chilton's Total Care manual but it only shows major engine schematics. It's a great car, everything simple and easy to work on, I've kept it running for my Mother in Law for the last ten years with minimal expences. She's retired on Soc. Security and it's cost less than a couple hundred dollars a year for all this time.
-
New fiberglass wings, for a brat?? Haven't heard of these, any details on source would be appreciated.
-
Can you tell us how you hooked a wideband O2 sensor, How do you power it (I believe wideband O2 sensors have a heater)? How do you read it? I think at the basic they are Zirconium dioxide devices which produce a millivolt output dependent on the O2 concentration.
-
Reading through the post, I have a 2WD Loyale sedan Vin JF1AC4226PC200963 and Napa suggested the KYB 341063 for $75 ea plus shipping Shockwarehouse wants $32 each, still dickering re: shipping. Any thoughts? Do I need a spring compressor to remove shock from spring assembly?
-
So do you need a spring press, it sort of looks like a strut assembly?
-
So, when he goes to replace easy things, such as first schrader valves and then O-rings. As he lossens the schrade valve core, if he hears any escaping gas sounds ( do this when it's quite around, no car's passing), so if he hears escaping gas, the A/C unit still has refrigerant in it and needs to be taken to a recycling machine at a shop. If there is no escaping gas the A/C system is empty and he can proceed as you suggest in post #4 with a clear conscious.
-
Explain to us all how the test strip helped diagnose please
-
Wow, best years of Subaru, this is when Subaru made it's customer loyality / reputation. Now just keep other's fenders away and keep it out of the museums and the Salt Belt: Connecticut Delaware Illinois Indiana Iowa Maine Maryland Massachusetts Michigan Minnesota Missouri New Hampshire New Jersey New York Ohio Pennsylvania Rhode Island Vermont Virginia WestVirginia Wisconsin District of Columbia Cool Car....
-
myhilo replied to Stelcom66's topic in 1990 to Present Legacy, Impreza, Outback, Forester, Baja, WRX&WrxSTI, SVXI had great success with eastwood's glass polishing kit, it came with abrasive stick and a polishing pad that fits into a drill. Now the item #12525 on http://www.eastwood.com/pro-glass-polishing-kit.html?reltype=3 seems to be what they offer now.
-
Great, iluvdrt, thanks for the explaination. I'm looking forward to your getting through this problem, did you get the Redline regulator installed yet? "I'm going to order the weber redline regulator and install it inline with a gauge. Seems to be the best option I think." (#27)
-
So the Subaru Carburetor has a pressure control valve (device) built into it if it has a fuel returning line, Correct?
-
myhilo replied to Smo's topic in 1990 to Present Legacy, Impreza, Outback, Forester, Baja, WRX&WrxSTI, SVXWhat your photos seem to show is good clearance in front of the threaded boss. What I would suggest is to take your old bent bolt to the hardware store and find a metric nut which will screw onto the bolt. The nut thread size will tell you what thread/pitch you need, so buy a tap of that size, they can help you at the hardware store if you explain to them what I am suggesting. The tap you buy will be inexpensive <10 bucks, the size will be something such as M6 x 1.0 which means 6.00 mm bolt diameter by 1 thread per mm of pitch. Another common size is M8 x 1.25 The tap you buy will be shaped with a tapered point. This taper will allow you to turn in the tap into the threaded hole for easy starting but it will also bottom out on the blind hole your photos show. This means that you will be able to start the tap into the old threads but as you turn the tap and the cutting edges clear out threads of the hole the tap will bump it's tapered end into the bottom of the hole before you have cut new threads to the bottom of the hole. What you will want is to be to cut threads deeper into the bottom of the threaded hole. The new deeper threads will give you additional strength for your pulley bolt. To get threads deeper into the hole you can take your tap and grind the pointed part down to make what's referred to as a bottoming tap. You will need a bench grinder or even a rotary stone on a 1/4" drill shank. This will take a long time if you just have a drill and a rotary stone, but it will be cheap. Be sure to keep the tap cool by dipping it in water as it heats up from the grinding. The final shape you want to achieve is full threads almost to the bottom of the tap, having shortened the tap by grinding back all the tapered part. If you go to a auto parts store and ask them to show you a thread chasing tool set you will see the shape of the tip of the tap that you will want to make. Notice that the thread chasing taps have a blunt threaded end with a slight bevel at the last thread. This is the shape you want to make you single tap be like after the grinding. This is now a 'bottoming tap. It will be harder to start without cross threading so be sure it threads in by hand only. But it will follow the threads in the tapped boss and will cut down further into the hole giving you new additional threads to strengthen the new bolt. A few things you need to be very careful of is: First; make sure the tap you first buy is started correctly, exactly at a right angle to the boss, not tipped over at all. This is just like the care needed when you thread a bolt into a hole, it just takes even more care because the tap is a cutting tool and will cut new threads with the same twisting effort as a normal bolt would need, so it's real easy to mess up the threads already there by cutting new threads on top of the existing threads and that will just weaken the metal and stop a normal bolt from being threaded in. Second: the tap will come with a square drive on the shank and is intended to use a special 'tap wrench' to firmly grip and turn the tap. You will have to improvise with a adjustable wrench closed up quite small to fit the flats of the square drive. Additionally, a tap wrench has a short handle which gives better control and lessens the amount of twisting force you can apply. This is part of the tool design, because most of the time a tap is cutting new threads into steel and they don't want you to use too much torque, because taps are made of hardened steel which won't bend, instead it will break suddenly. This would be very BAD. Broken taps inside a threaded hole are almost always fatal to part the tap is broken into. So the tap wrench's short lever arm makes the mechanic stop and see what's wrong before he breaks the tap. In your case will be using an adjustable wrench with WAY too long a lever arm so be WARNED, Make sure the tap is started correctly and use very little force. You will be cutting into aluminum, use some WD40 or other light oil to lubricate the tap cutting. But the tap will go into the aluminum like butter not needing much force at all. Third: the first time you use the tap, it will be long and tapered as it is when new and as you turn it in chasing the existing threads, it will suddenly come to the bottom of the hole and stop turning. It will not want to turn further at all, so don't forced it. Remember you have way too much lever arm and it's very to easy force things. This could punch the bottom of the soft aluminum hole breaking the engine block or you could strip out the threads with the tap again setting you back and creating new, more serious problems. Fourth: the second time you use the tap you will have cleaned up the original threads and will be cutting new threads at the bottom of the hole and again it will be very easy to OVER torque the tap as it comes to the bottom of the hole. It will jam in place and must be backed out. So, go slow as you near the bottom of the hole, removing the tap after each full turn and checking your progress. Lastly, you will need to make a custom bolt just slightly longer than the original one which will thread in deeper and take advantage of the new, deeper threads. All these procedures are a little touchy to do, but I've use this technique many times to repair machines with a stripped thread. Bear in mind that this takes about the same level of skill as using a helicoil installation does and if this technique doesn't work, you can still go the helicoil route, but all the 'blind hole' precautions still need to be taken. pm me if you like, I can give you more details. Watch a few you tube videos on tapping a hole to get more help, and good luck, what I've suggested requires very little money to get you to the next step in reinstalling the timing belt so you can proceed with your testing.
-
-
Speedo Cable to Trans, remove how? 79, EA81 wagon 4WD, 4sp dual range manual transmission. The Speedometer Cable has a rubber/plastic boot which I have slid upward to expose a ~1/2 diameter collar then a hex fitting which a 17mm fits onto loosely. the 17 mm hex is about 1" long and seems to be made of plastic although it's blacked by crud and doesn't seem to clean up with penetrating spray. When I turn the 17mm Hex counterclockwise as viewed from above it seems to flex but NOT UNSCREW. If it's plastic I may break it or strip any plastic threads going into the transmission. How does the cable come out??