heartless
Members
-
Joined
-
Last visited
Everything posted by heartless
-
heartless replied to eppoh's topic in 1990 to Present Legacy, Impreza, Outback, Forester, Baja, WRX&WrxSTI, SVXgrossgary - Point taken. you, and a few others here, have a tad more experience with this stuff than the greater majority of us, so if it works for you, that is wonderful. (and i am thinking that 400K + is just a tad bit more than just luck. ) I guess I am pretty lucky in that the shops around here dont charge an arm & a leg - and most are pretty reputable. there are 2 that I will deal with - both independants. I actually prefer one over the other if/when i need to take the car in for something (which doesnt happen often) They did one ball joint on my car and the alignment since I was having a problem getting the pinch bolt out (we broke one on the other half's car, ended up replacing the entire lower control arm & knuckle - didnt want to go thru that again!) I had already done the tierod ends, struts and one ball joint - I provided the part, they did the work, total bill was well under $100 including the alignment (whole car align = $65). Hard to beat that considering.... recently took the car back to them for a diagnostic - had a shake in the steering wheel that would come & go - speed made no difference - the guy couldnt find anything wrong but was impressed with how tight everything is on a 20 year old car! (tries not to break arm patting self on the back! LOL) He did suggest a tire rotation & possibly rebalancing...
-
heartless replied to eppoh's topic in 1990 to Present Legacy, Impreza, Outback, Forester, Baja, WRX&WrxSTI, SVXI dont want to sound like an alarmist or anything, as an actual failure really is not all that common. That said, however, handling characteristics and tire wear ARE an issue if you have one nice tight end, and one loose sloppy end. Same goes for ball joints. And with our current economy - replacing both tierods & getting an alignment is a whole lot cheaper than having to replace tires due to bad wear - especially with the AWD models being so picky about tire diameters...I cant afford to replace all 4 tires all that often, and i know there are others that cant either & tire rotation only goes so far if one is wearing funny. yeah, if you are really strapped for cash, i can understand only doing what you absolutely have to do to get by - been there before - but IMHO it makes much more sense economically to do the job right if you can afford to, get the alignment and be done with it for many, many miles. just my .02 cents. Oh wait, due to inflation it is now only worth .002 cents!
-
heartless replied to eppoh's topic in 1990 to Present Legacy, Impreza, Outback, Forester, Baja, WRX&WrxSTI, SVXIt doesnt really matter which end you loosen first on the outer tierod ends...I also recommend doing both sides at the same time - if one is gone, the other wont be far behind it - safer to do them both and get it over with rather than risk having the old one break on you while driving. personally, i favor breaking the jam nut loose first, then getting the castle nut off - it helps a GREAT deal to soak it several times with a good penetrating oil over a couple of days before hand. (a quick note here - you can mark the jam nut, but it has been my experience that the replacements are NOT the exact same size as the old ones - an alignment is definitely in order after doing this work!) I also use the hammer method when popping the end from the knuckle. remove cotter pin, break nut loose, unthread until top edge of nut is just a hair above the bolt end, whack with a 4lb mini sledge until it pops out (supporting the knuckle with a jackstand or something else solid will help with this), remove nut to let it drop out of knuckle, remove end from tierod, thread on the new one getting it as close as you can to the same location as the old one. (chances are you will not be able to get it EXACTLY to the same distance - Alignment will be needed!!!) thread bolt end into knuckle, screw on castle nut and torque to spec. insert new cotter pin. What most dont tell you however is that once you get it torqued to spec, if the hole for the cotter pin doesnt quite line up - DO NOT loosen the nut to get it lined up - always tighten! Once you get everything buttoned up and the car is back on its tires, take it to a reputable alignment shop to have things fine tuned to prevent unnecessary/unusual tire wear When I do this type of work, I genereally try to do everything needed all at once - ball joints, tierod ends, struts - then go for the alignment - that way I KNOW I am good to go for a long time to come.
-
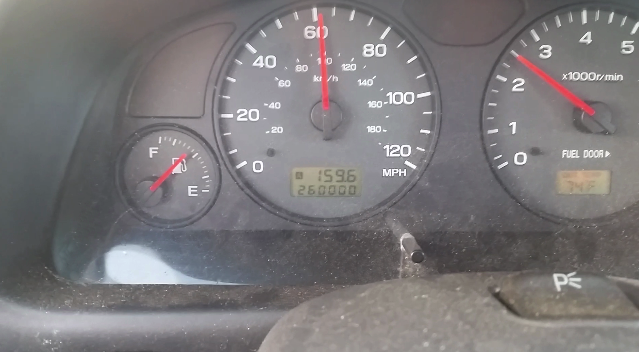
heartless replied to tjxtreme's topic in 1990 to Present Legacy, Impreza, Outback, Forester, Baja, WRX&WrxSTI, SVXsounds rather high to me - BUT - i live in a more rural area - small town living does have some advantages... This may be true in larger metro areas, but here in rural Wisconsin, well... Just took my car in for a diagnostic inspection - had a shake in the steering wheel that I just couldnt figure out (ball joints, outer tierods & struts relatvely new with alignment right after)...local shop spent a 1/2 hour checking things over - test drive & on the lift - only charged me for said 1/2 hour - total bill was (i am almost afraid to admit this...) $26.00 - had I had the cash on me it would have been even cheaper! turns out all i needed was to rotate my tires (they could stand to be re-balanced, too, when i have the time) The mechanic that did the inspection is pretty fussy about front end stuff and he was impressed with how tight everything was (i do 98% of my own work) he did point out a couple of minor issues for me, but no major problems (aside from massive oil leakage).
-
heartless replied to Dannomanno's topic in 1990 to Present Legacy, Impreza, Outback, Forester, Baja, WRX&WrxSTI, SVXget someone with smaller hands to get them started for you?? is it possible to raise the motor up a little bit more maybe? (without causing problems that is) other than that, what Rooster2 suggested
-
heartless replied to crazyman03's topic in 1990 to Present Legacy, Impreza, Outback, Forester, Baja, WRX&WrxSTI, SVXwhen watching the CE light, the pause between codes is VERY obvious - several seconds long the difference between the long & short flashes should be fairly obvious as well I used this writeup when i had CEL issues recently - nice and easy to understand/follow. it is very possible it has a knock sensor code @ that mileage if that has never been replaced
-
hey, we have that same crane - still in HF red tho - like the custom paint job! ours sits in a corner collecting dust more than it gets used, but still nice to have it - ya just never know... it may be getting a workout soon - need to pull my motor for a reseal - got some SERIOUS oil leaks. we did use it to turn an 1100cc motorcycle up-side-down once for some tranny work LOL that poor bike, it looked so pathetic laying on it's back...
-
a canopy for painting would be ok, but plan on enclosing as much as possible with either tarps or plastic (large roll of 2-3 mil clear plastic would be a good choice) - will help to keep the dust & bugs out. Scoobywagon gave good advice on wetting things down first. And do your "blasting" as far away from where you will painting as possible to prevent contamination. Humidity will definitely affect your drying time - again - ask the paint dealer about all of that - the more info you can get the better off you will be. Good luck!
-
heartless replied to crazyman03's topic in 1990 to Present Legacy, Impreza, Outback, Forester, Baja, WRX&WrxSTI, SVXROFLMAO - that is too funny! for the most part, the early Lego's are pretty reliable, easy to work on - Similar to the older GL's but with MPFI rather than SPFI. first things to check are the basic stuff really - plugs, wires (spark),fluids, filters (air, oil, fuel) oil change... and of course, check for stored codes!! pretty much the same basic procedures as the older GL's, but wires are up under the dash, just to the outside of the steering column - and watch the CEL for the flashed codes - black plugs for reading, green plugs for Dealer check - both for clearing (there is a VERY clear and concise writeup for Lego codes at Legacy777's site. was a HUGE help when trying to diagnose my car recently) linky If the car is really stumbling if/when you start it - first thing to check, obviously, is spark. Had a wire go bad on my car - was arcing out the side of the plug end boot - car ran like crap! with the car running, carefully pull each wire off it's plug one at a time to a) see if there is any change in the way it idles, and see/hear the spark and where it is going to (spark on these babies should be very strong and easily visible, even during the day as long as it isnt in direct bright sunlight - also bites pretty hard if you get too close to the spark!) turn the wire so you can check all sides of the boot side note - if you do find one that is arcing funny, it can be wrapped w/electrical tape temporarily - several good tight overlapping wraps should correct the arcing for a short time. Timing light would be the next step - if it is off time there is an excellent write up on doing these in the USRM. Just remember to go slowly when compressing the tensioner - snug, let rest, snug, let rest - takes several minutes to get it completely compressed - DON"T rush it! I cant really say anything about this one - havent had an issue with it - BUT - did have a problem with the knock sensor - housing was horribly cracked - ordered a new one (not terribly expensive, $20 or so) and it was fairly easy to change (getting to the wire connector was the hardest part!) No problems since. So when are you going to get the darn thing & get it home???
-
heartless replied to crazyman03's topic in 1990 to Present Legacy, Impreza, Outback, Forester, Baja, WRX&WrxSTI, SVXHeck yeah - any free car is a good car!! the 4 EAT's are a WORLD apart from the old 3 spds - very nice actually. the only thing that bothers me about it (i am getting used to it) - and it IS perfectly normal from what I understand - in cold weather it will not shift to 4th until it is fully warmed up. Summer time, no problem. my average fuel mileage is 28 to just over 30 mpg - mostly country 2 lane driving - an occasionaly freeway trip, but not often. the other half has a 5spd FWD sedan that consistently gets 33-34 - same type of roads, about 60 miles a day round trip for work & back. not a huge difference, considering the differences in the 2 cars: FWD -vs- AWD, Auto -vs- Manual, also wagon -vs- sedan (weight difference). If it really is an AWD model, make sure the tires are all the same - make, style, size and wear - and inflated properly - the AWD system is finnicky about this - I have a known slow leaky tire on mine and have to check every few days to keep it happy, but so far so good - no torque bind yet. *knocks on wood*
-
heartless replied to 1-3-2-4's topic in 1990 to Present Legacy, Impreza, Outback, Forester, Baja, WRX&WrxSTI, SVXsoak the bejeezus outta that pinch bolt! seriously - and be very careful with an impact wrench - the other half ended up breaking the bolt on one of his - we ended up replacing both the knuckle AND the control arm. (dont ask!) I would be more inclined to use a little carefully placed heat and more PB myself...heating the area will cause it to "suck in" the pb and help break any rust loose. never used a pickle fork on one of these cars - once you get the castle nut loose leave it threaded on the stud just to the edge (edge of nut & stud should be flush) and give it a good whack with a mini-sledge -should pop it right out getting the big end of the ball joint out is usually the bigger problem & no pickle fork will help with that. Once you have the pinch bolt out - very gently pry in the gap to help facilitate removal - either a large screwdriver or a small prybar work - just dont over do it.
-
Oooo - sign me up for a 1st gen Lego wagon (LS would be awesome), 5spd, AWD!!!
-
Oh how i hate you guys on the west coast!! one nice, clean, rust-free car after another!! it is SOOooo frustrating! ok, rant over... Nice looking little hatch!
-
First thing you need to understand is these cars are NOT powerhouses - lowend power is not something you are going to get out of them. next - "power band" (and i use the term loosly here) on this car is around 3000-3500 rpms - below that, not much happening. they like the higher rpms. is this a manual, or auto tranny? the 3spd autos are notoriously sluggish at low rpms. and lastly - find out what that check engine light was about - seriously. there are directions to read the stored codes posted somewhere here - a quick search should turn them up.
-
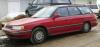
heartless replied to TheLoyale's topic in 1990 to Present Legacy, Impreza, Outback, Forester, Baja, WRX&WrxSTI, SVXhere's what my Lego looked like when we first got her home - blown air struts and all... Dont really have a good pic of her as she is right now, but about the only changes - aside from the struts - is a different rear hatch (the original was rusted thru just below the glass) and the tinted windows. Sadly, mine isnat all that pretty (gotta love the rust belt) but she is pretty reliable and runs great - and that is the important part!
-
heartless replied to TheLoyale's topic in 1990 to Present Legacy, Impreza, Outback, Forester, Baja, WRX&WrxSTI, SVXnow THAT is a Great Subaru picture!!
-
heartless replied to Dannomanno's topic in 1990 to Present Legacy, Impreza, Outback, Forester, Baja, WRX&WrxSTI, SVXgood to hear you got it sorted out. Check in the USRM - there should be a good write-up in there.
-
well, technically speaking, my Legacy had air shocks when i got it - Blown! the po was driving it that way! talk about your lowrider! blown air struts got removed and standard coilovers installed - easy-peasy. will never own another unibody car with air shocks/struts!! kind of hate to say it, but seeing what happened to that poor Camaro...was a sad day. (and i'm not even a chevy fan!)
-
heartless replied to 1-3-2-4's topic in 1990 to Present Legacy, Impreza, Outback, Forester, Baja, WRX&WrxSTI, SVXDefinitely use PB Blaster - GENEROUSLY - before you even start the job!! mine were a bit problematic as well (rusty) I started soaking everything with the PB a couple of days ahead of the actual job - crank the wheel all the way to one side - squirt everything down; pinchbolt, in the gap of the knuckle where the ball joint sits, the ball joint nut, the sway bar bolts (IIRC we removed the upper one to disconnect the sway bar from the A-arm), etc. - crank wheel opposite way & squirt the other side. do this several times over a couple of days - will make the job MUCH easier. You dont actually have to support the knuckle when doing the ball joints as long as everything else is still connected. But - a small floor jack with a block of wood (to protect/cushion the brake rotor) is very useful for raising the hub back up when trying to line up the new joint with the a-arm (i installed new joint in knuckle first, then lined up & installed end in a-arm) and most definitely make an appointment for an alignment asap! no matter how careful you are putting on the new stuff, it will be out of alignment and will eat up tires in no time.
-
hehe - a 69 Dart, huh? yeah, that will take ya back! my ex-hubby had a 1970 Camaro with the air shocks, and traction bars, when we first met - the traction bars killed that car when the airshocks developed a leak - caught one of them on the lid of an underground fuel tank @ a gas station one day - stretched that car out a couple of inches! wasnt going very fast, but the darn thing stopped it dead in its tracks with major structural damage. I do not plan on tinting the front windows (driver door & front passenger) - that would get me a big ticket around here, but the back ones - oh yeah! No different than the factory tinted windows on minivans and the like. as for visibility at night - thats what the side mirrors are for
-
heartless replied to crazyman03's topic in 1990 to Present Legacy, Impreza, Outback, Forester, Baja, WRX&WrxSTI, SVXyou are gonna like the Legacy - a bit more elbow room, much nicer ride and a little more hp than the old GL/Loyale models. and the 4EAT is a MUCH nicer tranny than the old 3spd 'spastics. I do kind of miss my old GL wagon, but I really like my Lego for longer trips - much more comfy! I'm with johnc - from the description, sounds like the timing is a tad off - take a few tools and get it set right and drive it home! (and watch the guy drop his jaw in amazement)
-
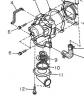
heartless replied to Dannomanno's topic in 1990 to Present Legacy, Impreza, Outback, Forester, Baja, WRX&WrxSTI, SVXnot a dumb question at all - it happens... the spring goes up according to the parts diagram. (cant actually remember from doing mine)
-
That is one sweet looking, super clean Turbo Wagon!! (not sure i like the turd brown color tho! LOL) having every scrap of paper on it's maintenance history is a BIG bonus - I think you did just fine price wise for what you got. Take good care of her & enjoy!!
-
Big difference between Blain's Farm & Fleet and Mill's Fleet Farm - the latter is the better of the two. They used to sell cheapo junk mufflers with only a few of the Cherry Bomb glasspaks in stock - but this year they have made the switch over to almost all Cherry Bomb products - even the clamps & misc fittings have the CB logo - and a much better selection of mufflers now.
-
Durania - that is a nice looking wagon, hope she treats you right for many years to come. And congrats on the upcoming graduation! Keep up the good work! HA! my first one (Hildy, the 89 GL wagon) only cost me $150 and the Lego (90 LS wagon, AWD) only cost $200! and i would sell an RS for an STI!!

