wagonist
Members
-
Joined
-
Last visited
Everything posted by wagonist
-
ANIM_Hooneru, As L series rear disc brakes bolt onto an MY, the spline count is the same. These hubs that are being done up aren't Liberty stuff, they're XT6, which has the same spline as the L series, and therefore MY. And so these just fit directly onto the existing stub axle inside the trailing arm. dfoyl, how long is the wheel locater, you haven't shown a side on pic? (yes, I'm hung up on this ) And I'd also recommend going with EJ wheel studs. Easier to find for everybody, newer even on wrecks, etc
-
The biggest difference I've seen is that early (series 1, 84-87.5) rear shafts had floating CVs on both ends, whereas later ones only had a floating CV on the diff end. These are interchangeable.
-
Your mean for the front end or the rear? These hubs would replace the rear ones onto your existings shafts. No need to modify the rear end drivetrain. The front however is a different story as you need to change the steering knuckle and everything attached (strut, driveshaft, lower ball joint) to EJ stuff.
-
Considering we're doing this to fit an EJ rotor onto the earlier cars, and the EJ rotor isn't located by screws, any point making those threaded holes? And like I said earlier, the ABS sensor sits underneath the hub on an XT6, right where the handbrake cable comes in on an EJ backing plate, so I'd probably suggest not bothering about those either? Might want to double check whether ABS was offered on US spec XT6s, but I've heard it wasn't.
-
So how do you access these holes? When the hub is on the car, the brake rotor (which has it's own holes, I used them to pull the rotors off my mate's car) is on the outside in the way, and if you pull the hubs off complete with rotors, the ABS tone wheel is on the inside in the way. The only hubs I've seen (my Elantra has them) with threaded holes is where a locating screw is used to hold the rotor to the hub. IMHO, it's just extra unnecessary work that would add cost, ditto the ABS holes.
-
No, the thread holes are on the brake disc itself, not on the hub. You wind the bolt into the rotor & it pushes against the hub to wind itself off. The threaded holes in the XT6 hubs don't line up with those on the EJ rotors. I'm not sure if the XT6 rear rotors are held on with screws to the hub. My mate's XT6 is currently in at the panel shop getting a respray to go check. But I do know that the ABS ring uses the other 5 holes (JDM had ABS as an option, USDM didn't). But, basically, don't need them, nor the 5 extra holes for the ABS. Tone wheel & sensor don't fit in there with the handbrake mech.
-
How can your nuts be coming undone if the split pin is inserted? If you've already stripped something, then you'll need to replace some parts
-
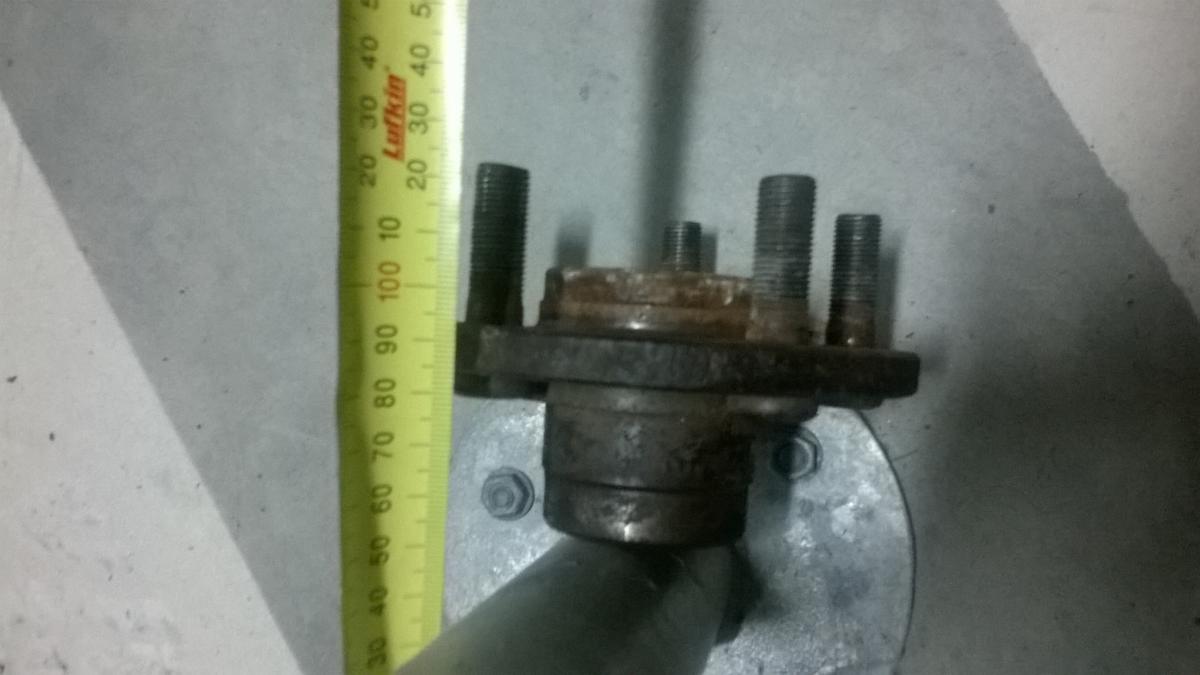
Pic of XT6 hub with measurement (sorry, I've lost my vernier calipers). As you can see, the measurement for the wheel locator, which sticks out from the brake rotor locator) is at least 5mm

-
You haven't thought about a redrill for 4x114.3? Search JesZek's (Loyale 2.7 turbo), he did a write up on this. This pattern fits on the existing hubs, and doesn't interfere with the 4 bolts that locate the front brake rotors, and has a lot more options for wheel sizes. 17s on a Loyale look comical. Got a Vortex (XT) out the front I'm stripping for a mate which has 17s & 5 lug swap. It looks better (but not low enough )
-
Well then you'll either have to find a set of factory 4wd XT6 rear hubs (getting rarer & more expensive), or get some made up (also expensive). It's probably easier to find the factory 4x140 disc rear end & then redrill the hubs to 4x114.3 like JesZek
-
As long as your replacement headunit doesn't require a CD or cassette, then they can fit into the Loyale dash.
-
I've got my mate's "spare" Vortex at home which due to rust we're going to just strip & scrap. It's got 5 stud conversion on it using original XT6 rear hubs. Will try to pull them out ASAP & get a pic & measurements.
-
I also would like some similar advice for the 4EAT to manual swap. There's a lot more wiring in the harness than for the 3AT, but I can't just swap looms because of the digi dash & other JDM goodness that wasn't available on local cars.
-
too slow . it has been known for the solder joints inside to go dry, so do as above.
-
I like 3crows ideas, but you don't need to pull both the engine & gearbox out. My opinion is just to do the engine, because: 1. you don't need to get under the car except to undo the exhaust & engine mounts 2. you don't need to muck around with trying to remove driveshafts, gearshift linkages I've done a rear main seal (which if you are going to pull the flywheel off for machining, I'd highly recommend. $20 or $30 part but takes hours to get at, and the same time to get back in) in about 4 hours with 2 people, a sturdy wooden roof bema & a rope. Engine crane or block & tackle, it's a single person job. disconnect battery 1. drain & remove radiator 2. remove fan belts 3. if you have air con, unbolt the compressor from the engine with the lines attached and swing off to the side 4. same for the power steering (you can undo the lines at the rack or pump, but sometimes they're hard to line up 5. unclip charcoal canister & swing over top of engine 6. unplug engine electrical connectors for the engine on left & right sides 7. unplug distributor from the coil 8. label and remove the 3 "fuel" lines on the left side 9. if you have a hill-holder cable, you'll need to undo the nuts on the end, unclip it from it's bracket, and pull it through. hang it off to the side 10. remove the starter motor 11. hook up the engine to whatever you're going to lift with 12. support the front of the gearbox with a jack or something (it will drop when you remove the engine otherwise) 13. unbolt engine from gearbox (2 bolts top, 2 nuts on studs bottom) 14. undo exhaust from heads underneath (except turbos, which you need to unbolt the dump from the turbo instead) 15. undo 2 nuts underneath engine crossmember for engine mounts 16. lift engine until mounts are clear of the crossmember, then wiggle, lever, whatever is needed to separate the engine from the gearbox sounds like a lot, but most of these steps are minutes long only & far easier to access than anything underneath
-
Or you could pull the inside cover off the lights & follow the wires. Then you could tell us
-
front end: get the steering knuckles, lower ball joints, struts & tie rods ends from any EJ powered car. driveshafts from Impreza where the lower ball joint fits into the Leone's lower control arms, have the hole machined out larger to fit the ball joint from the EJ steering knuckle (it's bigger). this is a tapered hole so you'll probably need a machine shop. rear end: get the caliper, brake rotor, backing plate from EJ powered car (suggest the same as the front end parts) the backing plate has 4 holes instead of 3 & has a larger centre hole so you need something else to hold it in. make up a plate from 3 or 4mm plate that is the shape of the trailing arm including all the holes sit the EJ backing plate onto the arm & find a suitable position (remember that a handbrake cable also needs to fit past so none of the holes will line up. mark up & drill the 3 bolt holes. weld this plate to the inside (hand brake side) of the backing plate so that now they are one piece. watch out for the rear most bolt. It may interfere with the handbrake mechanism. If so, you may need to weld this bolt in (it's got a nut on the other side anyway) & then grind down the head for the hub: you haven't said whether your car is FWD or 4WD, or disc brake or drum, so this may change. this is quite a dodgy method: get a rear drum that suits your car, knock out the wheel studs machine down the diameter and the face so that the EJ rear rotor fits over it (use the inside of the rotor to locate onto the outside of the hub) drill 5x100 stud pattern as required for wheel studs. to get the caliper to line up with the brake rotor, you will probably need to make up more spacers to fit between the backing plate & trailing arm handbrake: There are different options. My preferred is to make up custom ones that fit to the original lever. These need to be quite long as they need to go forward first & then loop back around in the transmission tunnel.
-
Great write up. Another way to make the tool for removing the inside "nut" is to get some flat pieces of metal & weld them to a longer piece. If you notice, the grooves line up across each side (I've lost mine so I'll need to get a picture). Then you can use the longer piece as the lever to break through the folded over lip. Also, I never notice any mention of folding back over into the groove on the inside so the nut doesn't undo itself. Might not be a problem in areas where you get lots of rust problems underneath, but in dry areas like here with dirt roads in the country, those things will undo themselves no problem...
-
the switch in the RH radiator tank tend to stop working after a while. This earths out the fan when it's hot enough, causing the fan to turn on. To test it, take the switch out, connect some wires, put a multimeter or testlight across the wires, low into some hot water and see if the 2 terminals become "connected" If not, replace it. later model ones have different wiring, but can be adapted, the switch fits the same. You can also install a switch inside the cabin to turn it on manually. find the earth wire for the fan, extend it into the cabin, put a switch onto it, and connect it back to earth.
-
No, he's talking about the engine crossmember lift blocks. Those things have vertical load on them. When you offset something to the side, it introduces a twist as well. No good without extra bracing. I wouldn't just triangle brace them, I'd plate the entire end. Rectangles are also not good at resisting twisting, no matter how thick the steel (just look at how easy it is to crush a cardboard box once the bottom is folded in). weld the nuts in so they become captive first, then you won't have to worry about accessing them. plate 1 side of the radius rod brackets too.
-
Nico, these suited only the floating rear calipers (although if you got the relevant backing plate from the fixed calipers, they would go on). The biggest problem we had with this kit is that he was trying to get ADR approval of some such & trying to sell the kit as a whole. Because most of us have other mods that needed engineering approval, this was an extra cost that wasn't necessary. Most who wanted it, only wanted the rear hubs & the adaptor to hold on the backing plate. Also, the full kit was meant to fit both MY & L models, including the rear rubber brake lines. Which were useless if you already had rear discs, because the lines are different... IMHO, there was also a problem with the wheel locater being nowhere near long enough.
-
If Toonga's design came from C...........d Performance, then I can see where the discrepancy came from. I had a pair of hubs from him, and was told that they were the same as the XT6. Except they weren't in the measurement I've mentioned (which I complained about). I sold those hubs, so I have no reference now. A mate has an XT6 and also a pair of XT6 rear hubs, and they looked different to the aftermarket ones. When you get the Brumby back, please check how far the locater protrudes from the face of the brake rotor. I'll try to get a measurement off my mate, but he's moving house at the moment, so they're probably packed up somewhere. Maybe someone else on here can contribute?
-
I'm seeing a bit of a problem with the design. The 2.7mm lip that's sticking out into where the wheel goes, is that the wheel locater? And high high is the locater for the brake disc? I'm guessing that's the 58mm dia? If you've assumed that this bit sticking out is the locater for both the brake disc and the wheel, then this is wrong for an EJ style brake. They actually step out a bit. ie the brake disc centre bore is larger than that for wheels. And 2.7mm isn't sufficient to locate a wheel on. Most rims have a chamfer on that inside edge. Ok, we've got the wheel studs, but in heavy duty offroad (or racing), that's not sufficient. If this is being designed from scratch, then why not have a proper locater built in? (This was a big problem with the previous hubs built by someone else in this country)
-
You should be able to buy the pins. I wouldn't cut and solder those wires, most of the car is running through them. Just pull the pins out of the plug, cut them off and crimp new pins on. You don't want the same problem again
-
Those relays are used for many different things in Subarus. Can't tell by the looks of them.