All Activity
- Past hour
-
Local Girls for Sex Dating – No Signup Needed https://privateladyescorts.com [url=https://privateladyescorts.com/girls.html] discreet erotic dating [/URL]
- Today
-

1987 GL-10 Wagon Throttle Position Sensor Issues
OCDan replied to OCDan's topic in Old Gen.: 80's GL/DL/XT/Loyales...
My electronics skills are pretty basic. So I really appreciate the suggestions. I just checked for continuity across all possible pairings of the R, G and B tabs, on the inside of the module. It's open on all of them. As expected, when the contact on the idle switch is closed, LG to B shows continuity. I'll go ahead and open it up and let you know what I find. Crossing my fingers that the SERA484-10 can be adapted for our application! - Yesterday
-

1987 GL-10 Wagon Throttle Position Sensor Issues
azdave replied to OCDan's topic in Old Gen.: 80's GL/DL/XT/Loyales...
I offered to help, not knowing your electronics skills but maybe you can figure it out with careful inspection. I would basically take it apart and find out if it failed due to a mechanical issue (like a hidden crack across the carbon path) or if it failed due to somehow suffering from an over-current condition. Your test results seem to indicate it failed in more than one way. I would be looking very closely for any hint of heat damage or circuit board burns. Also look for cold solder joints and micro cracks in any circuit traces. I will sometimes heat and cool a circuit to look for failures caused by expansion and contraction. You say you get no continuity on any of the pins after the new TPS failed. Using the diagrams immediately above as reference, it does not make sense that you read nothing across R-B, nor across R-G or G-B. One or two of those paths should still be reading some type of resistance whether the part overheated or cracked. Very unusual to read an open circuit on any combination across the R,G, or B wires. That would have to mean the carbon path failed as well as the wiper on the G-wire. The connection between the B-LG wires we don't care about right now because it is a simple on/off switch and you can physically see if that contact is working at idle. I had TPS issues when I first got my EA82 SPFI 87 wagon 3 years ago, but I was able to clean it up and make it work. I'm really temped to buy one of the cheap SERA484-10 TPS modules on Amazon, just to learn if it can be configured to work in our application. I see one example online where a person said it worked on their EA82 but yet another where they said it did not. I think I will order one and find out for myself. It would be good to know the answer and have a spare for myself if it is possible. I'm not concerned with connectors being plug-n-play of course. Update: I went ahead and ordered one of the SERA484-10 TPS modules off eBay and should have it by the weekend to check out. -
1987 GL-10 Wagon Throttle Position Sensor Issues
OCDan replied to OCDan's topic in Old Gen.: 80's GL/DL/XT/Loyales...
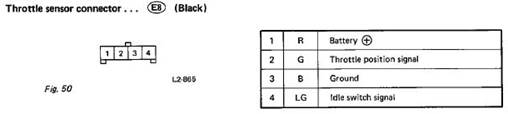
Thanks for your reply azdave! No, the connection stays open through the whole sweep. Thanks for the offer to bench test it. What would that involve? Just wondering if, with guidance, it's something I could do. The FSM Fuel Pump Circuit diagram contains this section on the TPS. Presumably, the new TPS circuit is the same... I do have a good multimeter. Thanks again!
-
1987 GL-10 Wagon Throttle Position Sensor Issues
azdave replied to OCDan's topic in Old Gen.: 80's GL/DL/XT/Loyales...
I don't see what you could have done wrong if all your readings were as you say. It a simple potentiometer setup with an on/off switch on the side to let the ECU positively know when the throttle is in the full idle position. If you currently have no continuity between pins B&D, unlike when you tested it new, that would indicate that the carbon trace on the board had burned in half or was separated somehow. If you now connect the Ohm meter between pins B &C and then turn the shaft from stop to stop, do you ever measure anything but an open connection as the wiper sweeps around the carbon trace? The 5 volt signal should not be able to supply enough current to damage the sensor. Even if that supply wire measured 12 volts, it would barely generate 0.003 amps (0.04 watts) which should easily be handled by the carbon wiper. I don't know what kind of time schedule you are under but I can offer to bench test the TPS and see if I can determine what failed. Not much to lose except for the time to mail it back and forth and the postage cost. I myself would not risk another new TPS until I had a better idea what failed. -

Saving rust seized EA rear axle stubs & CVs
SuspiciousPizza replied to czny's topic in Old Gen.: 80's GL/DL/XT/Loyales...
I've been reading some more and it sounds like a BFH is the way to go with this. So I made a drawing of what my idea is. I'd need to source some hardwood or some polypropylene sheets (thick maybe 3/8") to absorb the hammering and transfer the forces to the CV cup rather than into the brittle hardened bearing surfaces. Also the grooves in the boards/sheets would have to be perfectly sized to fit around the axle, but not let the bands fit through. I'd also need to figure out how to prevent the axle from articulating as I'm beating it up for lunch money. Here's my idea, though if anyone has experience doing this without damaging any of the axle components then please share.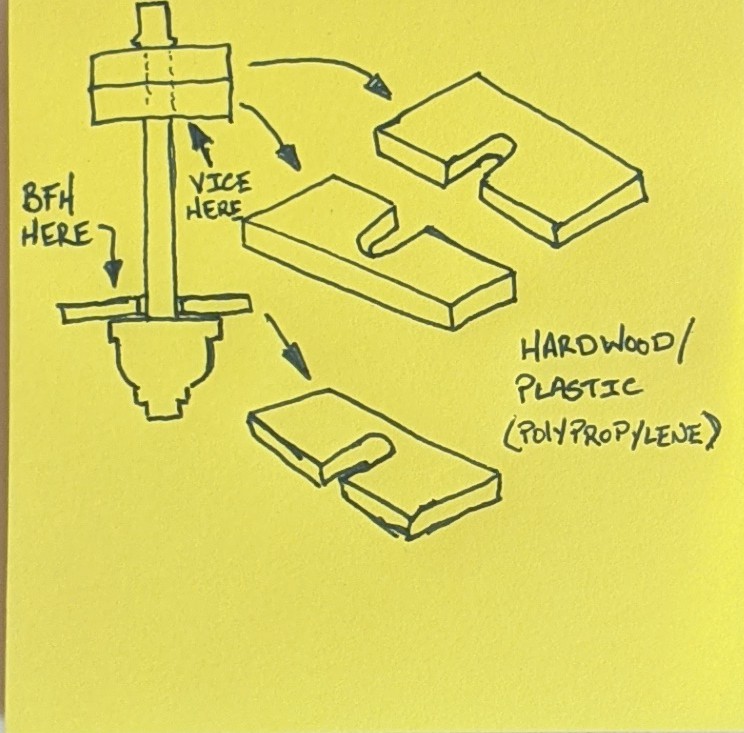
-
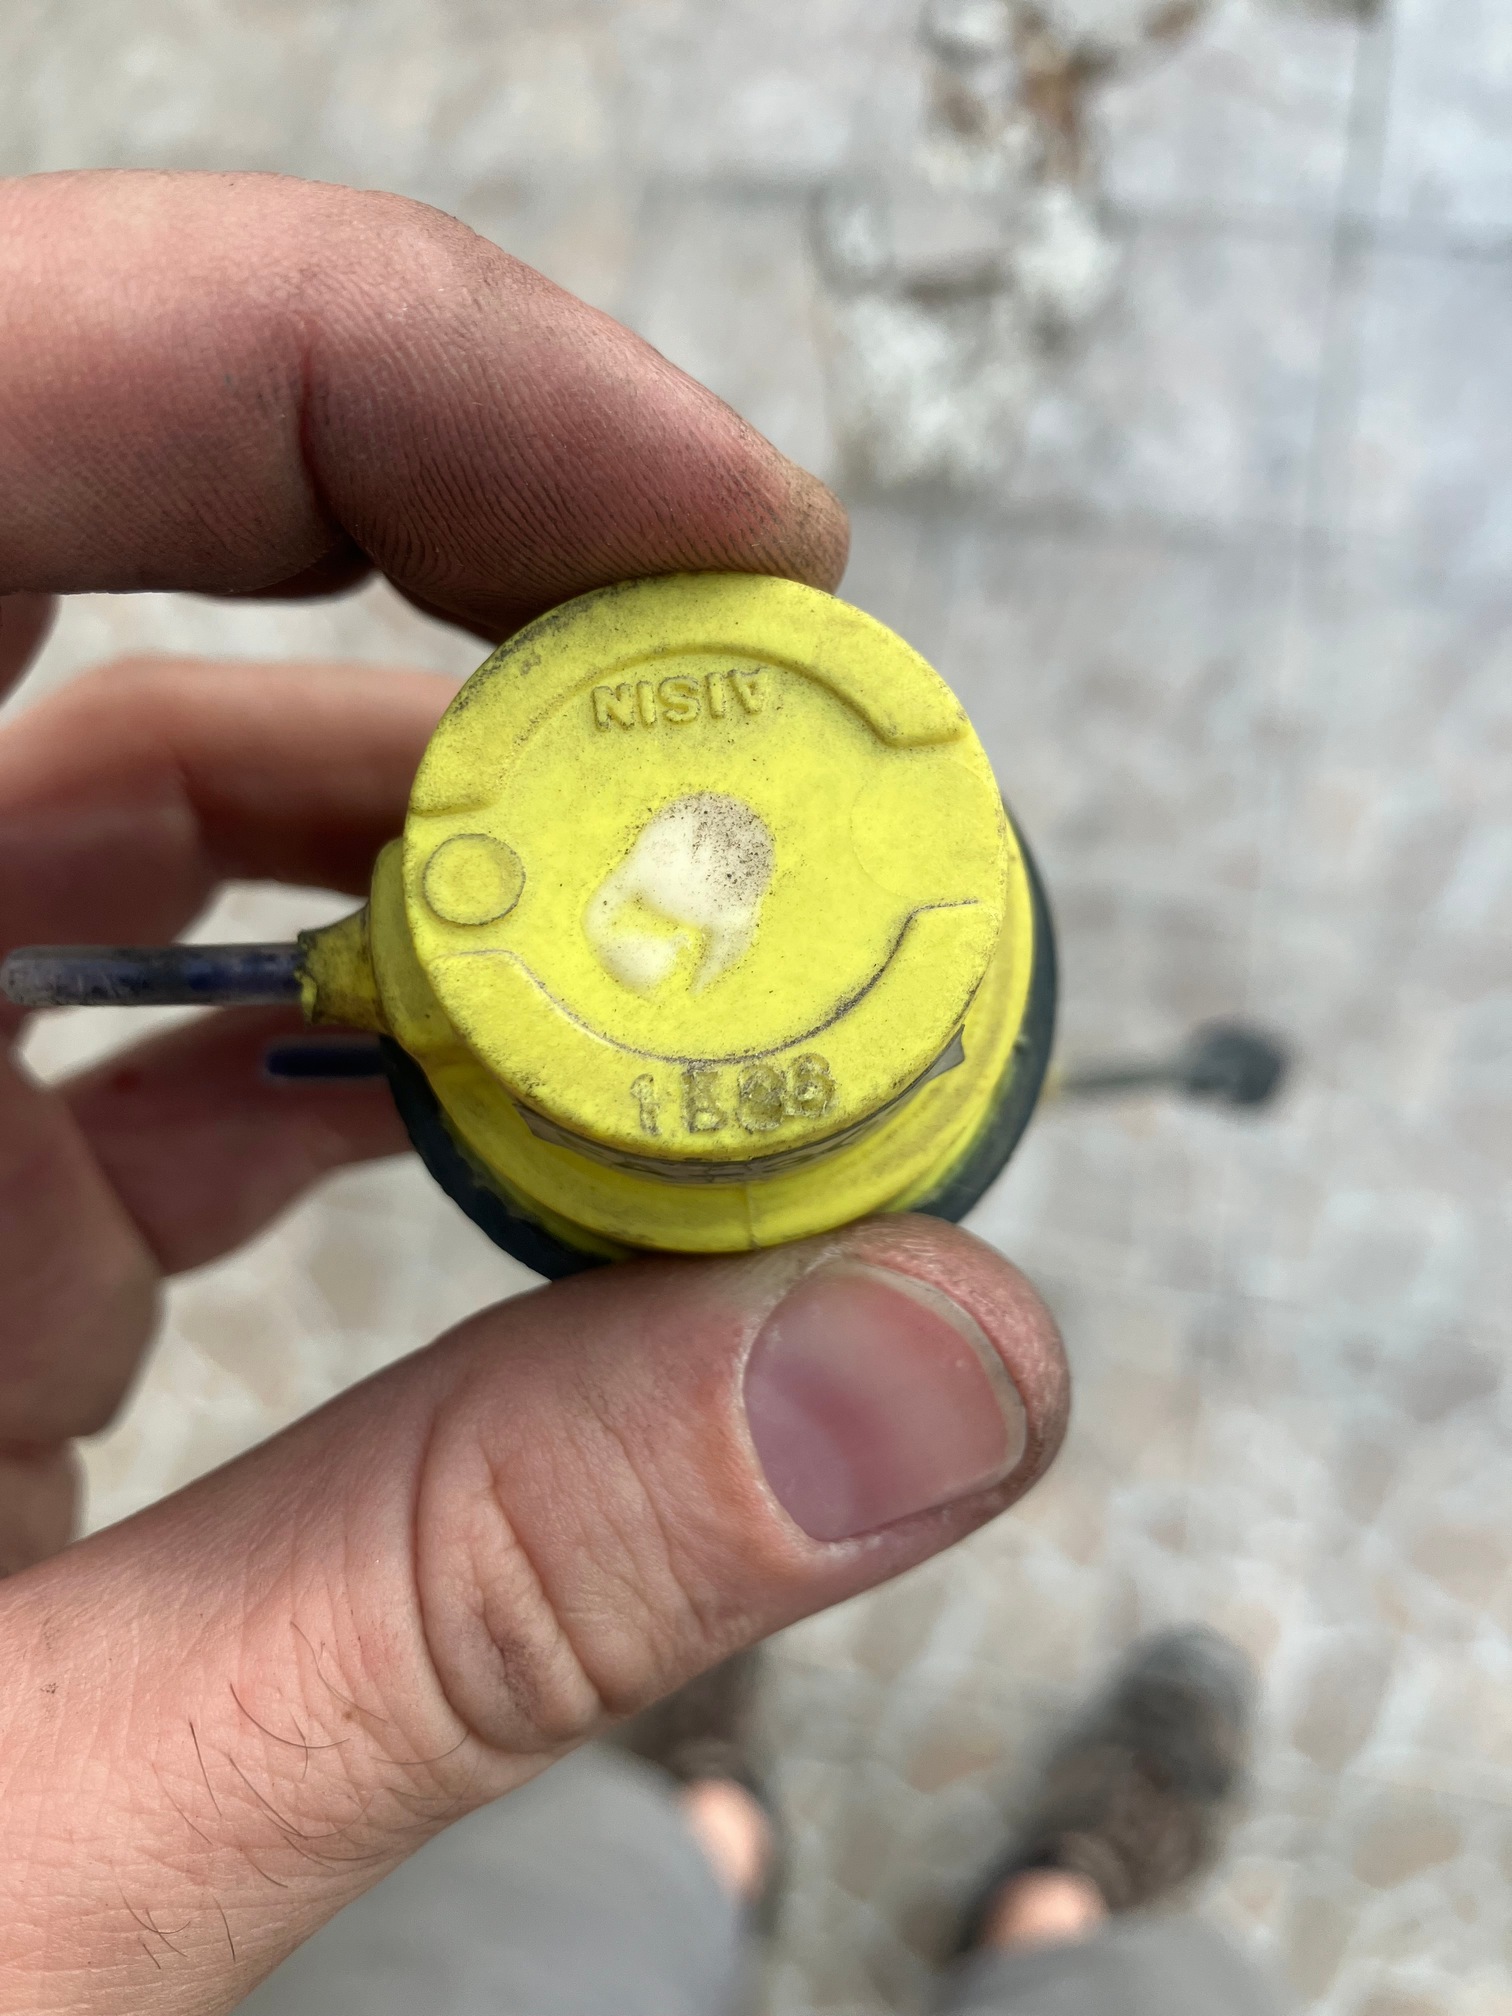
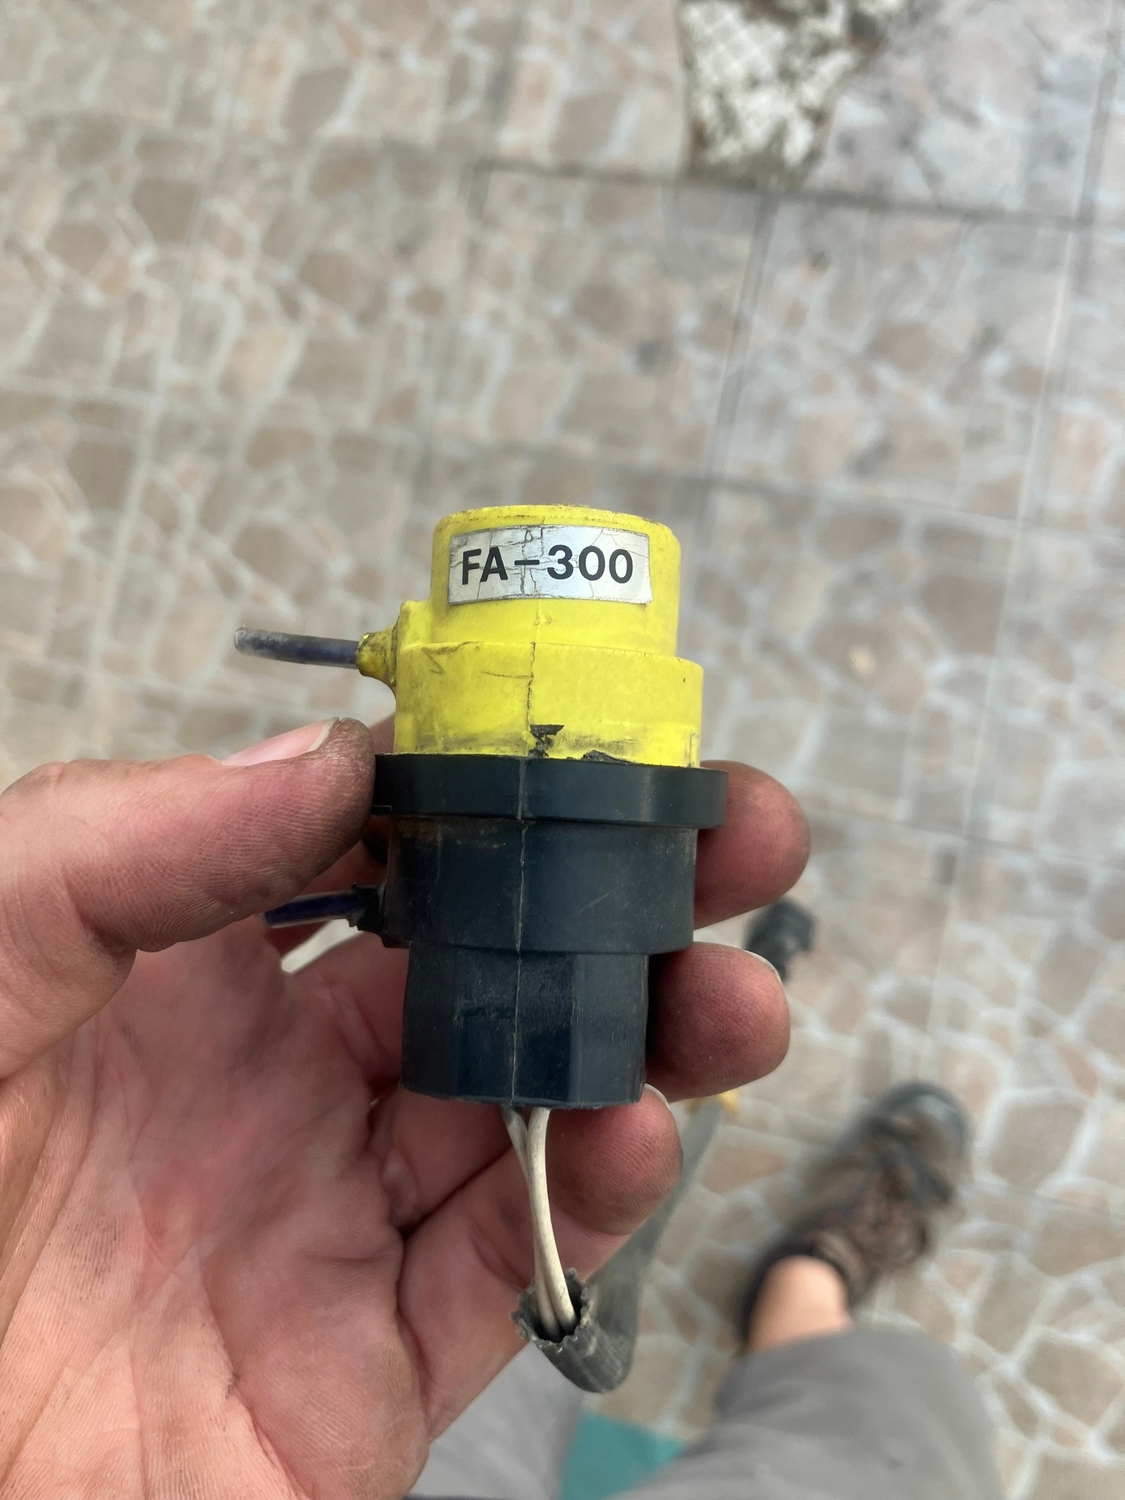
 Hi all! I'm new here, thanks for taking me in, happy to see a community like this! I have some problems that I couldn't overcome with the google+chatgpt+youtube trinity so far. I have a 1989 E12 Libero, KJ8 engine code, carbed. Can anyone point me in the direction of this part? I am looking for a replacement. I managed to work out that its a vacuum switch/solenoid, but I cannot find the part on amayama or other sites. Searching for brand name/numbers was not successful either. I might see some glue residue inside from previous repair attempt, but the holes are so small that I'm not sure. According to the vacuum diagram it is connected to 2 ports on the carb, marked with "E" & "S" on the switch there are to marks, "S" & "N" If I connect this to the vacuum port to the carb as it is shown on the vacuum diagram, it kills the engine for 0.5 second in every 1 second, as soon as the vacuum reaches to a point where it is supposed to work. Basically making it undriveable at 2000rpm. If I disconnect, engine seems to misfire at every rpm slightly, not bad, but not driveable on the long run. The previous attempt was to keep the switch's electric plug connected, but the 2 vacuum ports were disconnected from it, and simply plugged into each other, making constant conncention between the to ports of the carb. I am thinking about replacing to some random "EVAP Evaporative Emissions Vacuum Solenoid Switching Valve" as I found they work in a similar mater, and give it a go. Any ideas or help is much appreciated! Thanks!
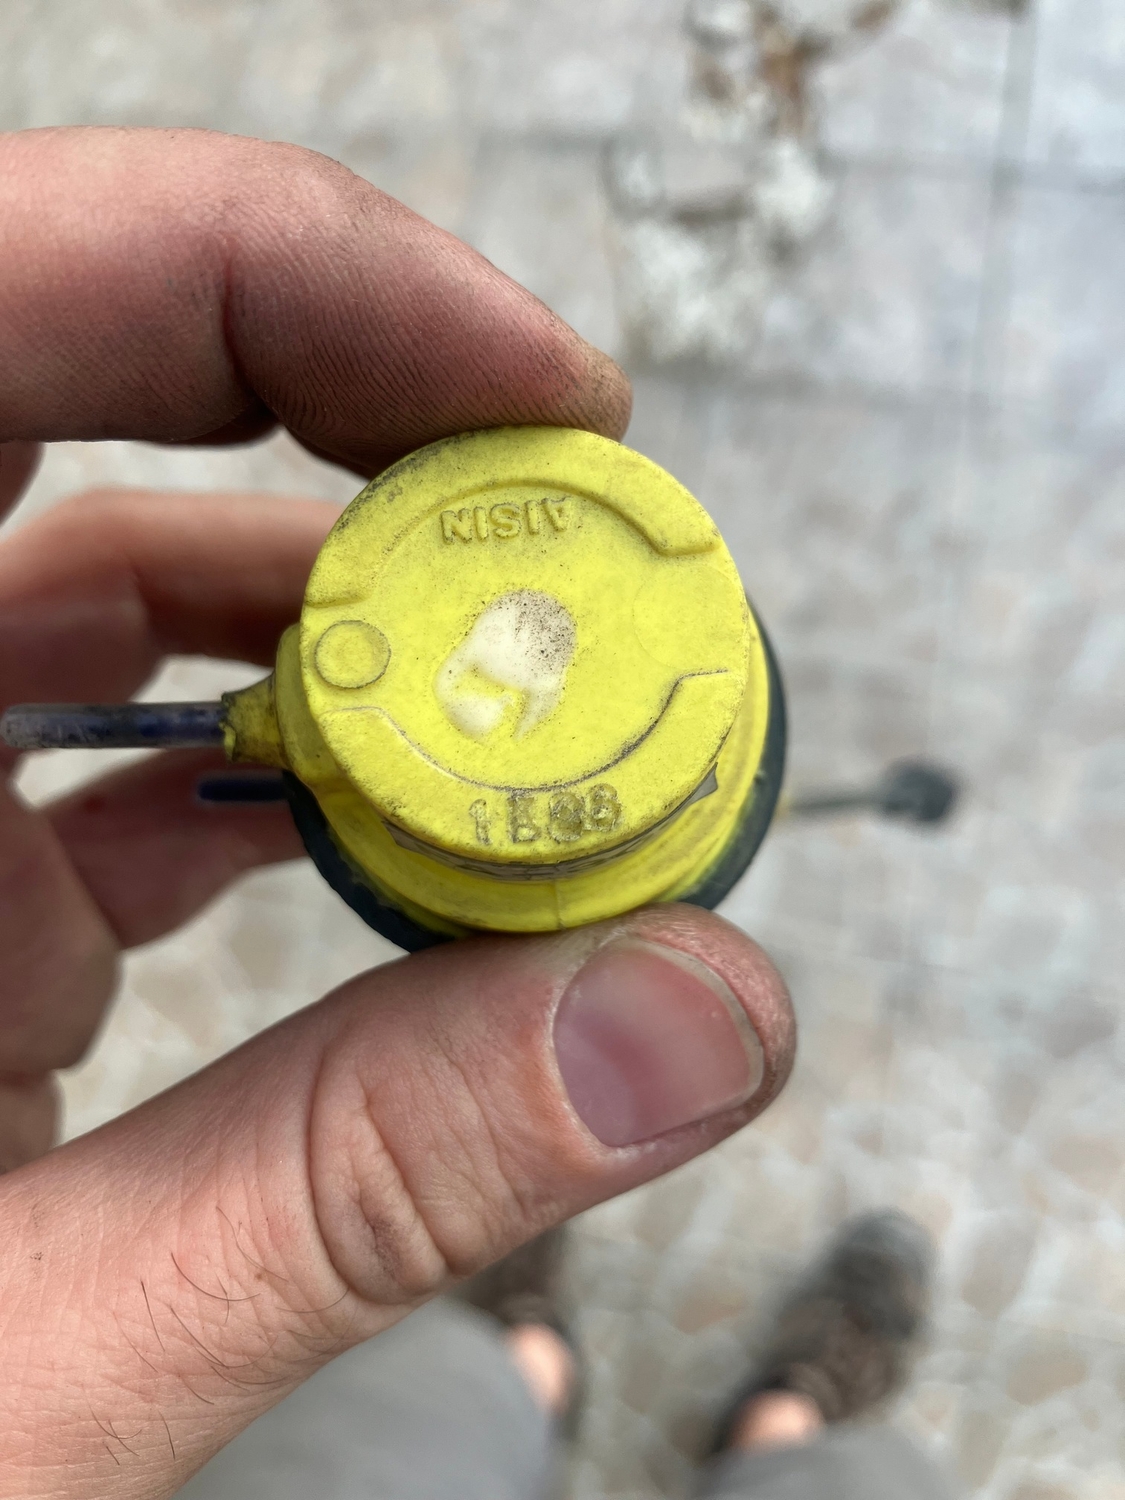

-
Saving rust seized EA rear axle stubs & CVs
SuspiciousPizza replied to czny's topic in Old Gen.: 80's GL/DL/XT/Loyales...
I've got a seized rear stub. I'm lost as to how the shaft is removed from the CV joint. From what I've read on here it is technically possible to remove the shaft from the CV joint, as is shown above, but this takes some finesse. I do not have a press and I don't want to wallop on the joint since the hardened steel is brittle. Does anyone have any pointers on how to remove the shaft? Is it possible to angle the joint with the shaft still in place, then use a brass punch to shift the cage enough to remove the balls without removing the shaft? Isn't all that retains the shaft is a circlip, similar to the DOJ retaining clip but smaller in diameter? Thanks :] P.S. I'm trying to remove the stub since I'm doing my rear wheel bearings. Technically I can reinstall the axle without removing the stub and get everything lined up. But in the future if I need to replace the stub (sheared splines, etc) then I'm basically SOL and have to replace the entire axle. -
 1991 Loyale Wagon SPFI FWD had new cats put on 6 years ago after CA smog fail. New cats then passed CA smog with flying colors. HC (ppm) meas was 6 (six) @15mph and 3 (three) @25 mph. CO% meas was 0.01 @15mph and 0.00 !!!. @25mph. NO (ppm) meas was 58 @15mph and 32 @25mph. I could not have been happier. Engine had 340k miles on it. After the engine overheated to death, I swapped in an EA82 long block (a pro rebuild that is now going on 6k happy miles - I got lucky on a Craigs List find. All good work, from cams to main bearings to new oil pump. Probably rebuilt around 2009 when machining and parts were still available). Jump ahead to 2021 and 2023 when the CA smog tests measured crazy high. HC (ppm) meas was 118 @15mph and NO (ppm) meas was 788!!! @15mph. BUT NO (ppm) meas was only 64 @25mph. I am not sure as to WHY. My DIY guesses range from my having messed up the EGR setup, ignition timing, to a low performing fuel pump (lean fuel mix) , to a slightly higher compression ratio after heads resurfaced (although there has never been any knocking sound). Any ideas? Thanks to all you guys for still being here.- Ricky
 - Last week
-
New to the Subaru Sambar, looking for help with a recent import.
-
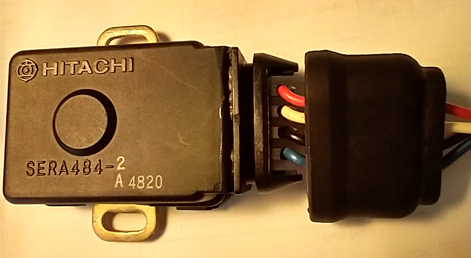
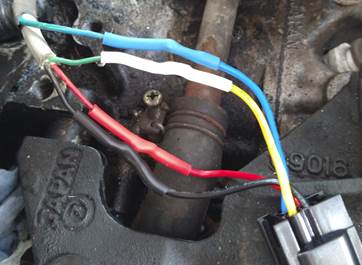
I have a 1987 GL-10 which I haven’t been using and decided to gift it to a friend in need of an inexpensive vehicle. I’m helping him resolve some issues with it. It’s getting a 31 code. The TPS is the 4-wire type. Without going into detail, the original TPS was irreparably damaged during removal. Based on information posted here https://www.ultimatesubaru.org/forum/topic/153231-1987-subaru-gl-throttle-position-sensor-help/?do=findComment&comment=1283981 I located and purchased this: https://www.partsgeek.com/dpq5225-isuzu-i-mark-throttle-position-sensor.html with part description “Throttle Position Sensor - 1989 Isuzu i Mark - Walker 1272-06053178” This is what it looks like: And internally: Box label: Prior to cutting any wires, I checked resistance as described in the EA82 FSM: And measurements were within specs. So, I took a leap of faith and cut the wires on this new TPS and on the engine side connectors and soldered in a new connector on each side. I installed the TPS and double-checked the resistance on the TPS pins and everything was still within specs. So, I went ahead and connected the TPS to the engine side connector, reinstalled the components and belts which had been removed to gain access to the TPS screws. The engine started on the first attempt and was running smoothly. After it had been running for a few minutes, the RPMs suddenly jumped from around 1000 to around 2000. At some point, the CEL came on. I looked at the ECM light to see that it was blinking 31 again. I pulled the connector to check the resistance on the TPS. There was no longer any continuity at all on any of the pins, regardless of the throttle position. At this point, I don’t know if the part just failed due to some defect, or if it was somehow damaged by some condition when the engine was running. Regardless, it can’t be returned to PartsGeek, due to my having cut off the original connector. I’m fairly certain that I matched wires correctly between the 2 sides. The engine side harness wires have the following functions: I measured the voltage on the red and it is 5 volts. Red goes to red, black to black, green on the engine side to white on the TPS side and blue/green to blue, for the idle switch. I’m hoping someone might have some ideas on how I can troubleshoot this. Can you think of any scenario which could have caused the new TPS to fail? Without knowing, I’m reluctant to plunk down another $210. If I do go that route, I’ll temporarily use its existing connector with alligator clips on its tabs. That way, if it doesn’t work, I could return it. I would appreciate any advice!


-
 I would bet externally interchangeable. Definitely different internals, but I suspect due to different assist amounts. I know the pumps have different volume and pressure specs. I'd try it. YMMV
 -

Doh! Chipped a Shoe
bushytails replied to SuspiciousPizza's topic in Old Gen.: 80's GL/DL/XT/Loyales...
Time for a disc brake conversion! -
Doh! Chipped a Shoe
SuspiciousPizza replied to SuspiciousPizza's topic in Old Gen.: 80's GL/DL/XT/Loyales...
Sounds good. I have replacement shoes that I got for a steal so I'll carry them around just in case. Should get some replacement axle washers too. They're ceramic shoes, are those more brittle than the organic shoes? I wasn't being rough at all and it chipped. It wasn't chipped beforehand, I definitely did it but I was shocked at how easily it happened. Thanks :] -
 These were useful for decoding https://www.nhtsa.gov/vin-decoder https://www.scoobynet.com/vindecoder.php?vin=4S3BE646535210368
 -
You will be perfectly fine.
-

Doh! Chipped a Shoe
el_freddo replied to SuspiciousPizza's topic in Old Gen.: 80's GL/DL/XT/Loyales...
Personally I’d run it as it’s a small area - and you’re aware of it. That said, I’m no brake expert and others may disagree. -
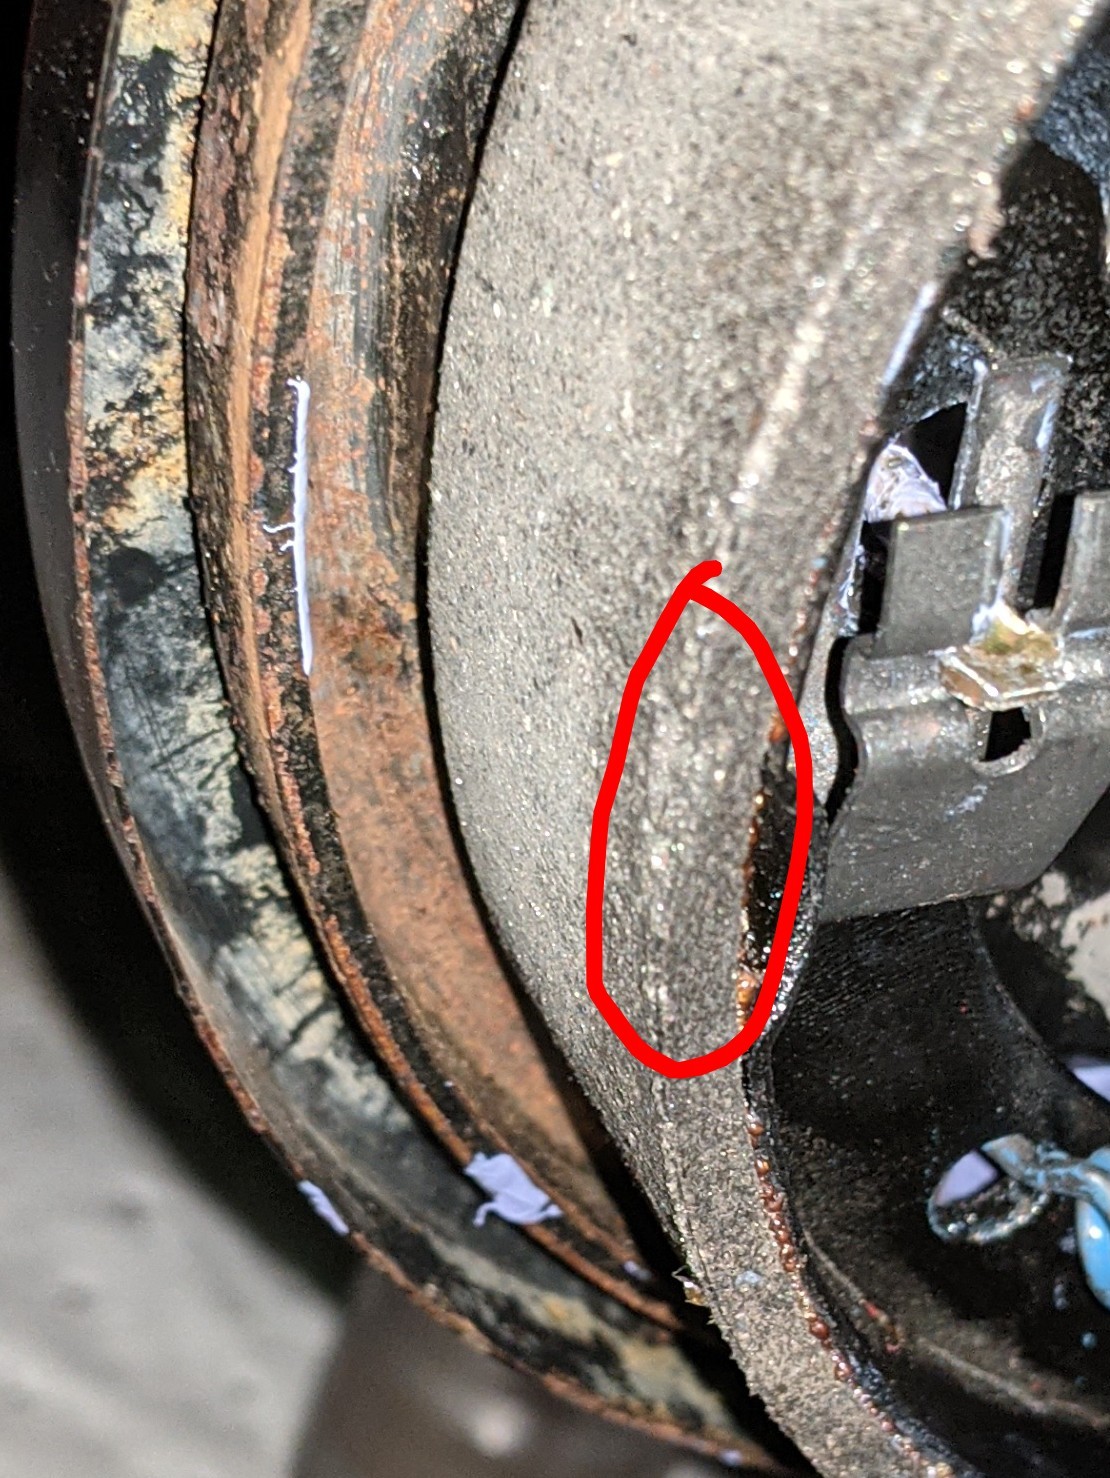
I've been redoing all my wheel bearings, seals, and brakes. While pulling a late one (tonight, literally minutes ago) as I was putting on my new drum I chipped a shoe. I didn't have the auto adjuster fully backed out, only 2 or 3 teeth until it was fully backed out and the shoe must not have been sitting perfectly concentric with the drum. Either way, it's about the size of a grain of rice. Should I replace my mistake or let it go? This is my first time fully redoing drum brakes. Don't worry, I cleaned up the excess brake lube. That stuff's like anti seize. One drop can paint a house.
-

Something happened to the engine
oczuk32 replied to oczuk32's topic in Old Gen.: 80's GL/DL/XT/Loyales...
Thanks, I'm in California I could just imagine shipping cost. The radiator shop I found has good reputation on repairing fuel tanks. From low budget to high end customize fuel tanks. And I'm going for the low budget repair. -
 Things are moving well but could be doing better making space faster. Another call out to the masses. If you can make it by Milford CT you’d do well. Other guys have driven over 11 1/2 hours to get here in the past. This is IT. We are ending our involvement with that stage and devoting all efforts to 1972-77 stage one. Lots of 1977 stage two through 1979 parts and Gen One Brat.
 -
Brand new Subaru owner, 2016 Subaru Impreza
moosens replied to streible's topic in Meet n' Greet. Your USMB Welcome Center
Welcome. All I can say is my friend has a 2017 same as yours and he loves it. Took a deer strike with bad damage and they made it like new. He and I are long time Subaru owners going back decades. We’ve have them all, pretty much. And of the current later models we don’t see ourselves jumping into a Legacy. -
Something happened to the engine
moosens replied to oczuk32's topic in Old Gen.: 80's GL/DL/XT/Loyales...
Just a suggestion for the tank if you take it serious and want it around for maybe the next generation or so. Moyer in PA does an awesome job. If I could post pics easily I’d show you. They blast is rust free inside and out, do repairs if necessary, and treat it with their own patented formula which is NOT epoxy and good for all fuels. Tank looks ready for another 50 years. Good luck with it. -
Something happened to the engine
oczuk32 replied to oczuk32's topic in Old Gen.: 80's GL/DL/XT/Loyales...
Updates... Was able to get it started again. Yes it's the old varnish gasoline that created that slick coating on the cylinder. Reason I know is cause I drain the 4 gallons of gasoline and filter it back to my Suzuki Samurai to burn it off. The next day I went to start my Suzuki. I got the same slick no start issue. Took some starting fluid to crank the engine on. Crazy that fuel would cause that. Gave me reason to take a trip to the mountains to completely burn off the fuel. The Subaru fuel tank has come out and discover a huge layer of sludge and rust. Drop it off at a radiator shop and see if it could be saved.Updates… I managed to get it started again. Turns out the old varnished gasoline was creating a slick coating on the cylinder. I figured it out after draining 4 gallons and filtering it into my Suzuki Samurai to burn off. The next day, when I tried starting the Suzuki, I ran into the same slick no-start issue. A little starting fluid finally got the engine to crank. Crazy that the fuel I added just days prior could varnish so quickly! At least it gave me an excuse to take a mountain trip to burn it off completely. As for the Subaru, I pulled the fuel tank and found a thick layer of sludge and rust, so I dropped it off at a radiator shop to see if it can be saved. Bushytails you were smack on on the that issue. -
 I ended up with a brand new 00-04 Outback H6 power steering rack, part number 34110AE20A. Curious to know if I would run into any issues installing this into my 4-cyl 2003 Outback, as I found a bit of steering fluid pooled up in my rack bellow when I went to swap an end link out. If I could just throw this rack in and align the thing, that would be awesome. Thanks for any/all help!
 -
Fair enough if the maintenance work is becoming a challenge for you, can’t stay young and nimble forever! Thanks for verifying what was done.