TheLoyale
Members
-
Joined
-
Last visited
Everything posted by TheLoyale
-
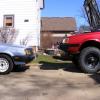
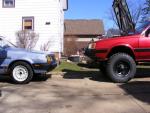
Pure History! Gotta get some fresh pics!
-
That has a nice stance. Outback strut and Forester spring setup? Nice Impreza man! -Tom
-
Does anyone have a nice chrome trim peice for the Lift gate? My chrome piece is nice, but the plastic seal is half missing and broke. And I bet when I go to remove it, I'll break studs off since they are rotted.
-
If I had a flat templete and a CNC, I would make my own as well lol I could probably make my own, but then again, I paid for one, and I didn't get it... $.50 part, give it to me... :cool:
-
Just wow!
-
So I found a post by JesZek, which helps with the PCV hose routing. I think this is the way I am going to go. GD said that if you do not reduce the size of the fittings used, the suction will be to great, and will start sucking oil up from the heads. But I have a decent idea what I'm gonna do. The rest of that thread: http://www.ultimatesubaru.org/forum/showthread.php?t=98693
-
Huh, ok. This is getting simple lol.
-
Thats a good idea, I may do that later on. I just want to get this thing running again. Plus I already put the adapter on and sealed the gasket with RVT Black. I did connect that Coolant hose, we'll see if I get any leaks. So, The only thing I didn't get with my kit, was the throttle cable bracket. Shows it in the picture, but I didn't get it. So I contacted the seller about it. You cannot use the stock cable bracket that is on the manifold, as the cable will barely reach even at WOT. The Weber bracket will work perfect once I get it! Now for some questions: Should I follow what this says? Connect the EGR and Disty Advance to the front ports of the carb? I do not have the Idle Cut-Off valve (Anti-Dieseling Valve?) Do I need to get one? I also don't have the barb for the Vapor vent to canister. Mine has a gapping hole where it would go..? As you can see in this picture. Where is my wire/connector for the Electronic Choke? I no longer have the old Hitachi. The big line is my Supply, and small one my fingers are on is my return? Where would the return run to? The instrctions do say anything about it. The Adapter!
-
Maxima grill eh? lets see this!
-
Alright, that sounds good Mick. I am going to use the thick gasket Redline supplies and I am also going to use High-Temp RTV for extra protection (Like you would with a Waterpump) I figure I should never have to take the adaptor off the intake ever. Also, should I use some blue locktite on the plate mounting screws? I don't want them backing off, if that is an issue? This is a really nice solid looking carb, Can't wait to get it fired up!
-
Check out what I got today! Got the correct adapter first time. And the adapter clears the butterflies plates just fine.
-
You could indeed rivit sheet metal in there too, and then seal it with Fiberglass and Rubberized undercoating. See how extensive the rust is in that area, take a wire wheel on the drill and go over the solid surface rust, you could then brush on a rust converter, and then continue with the sheet metal and fiberglass. Cheers!Alright. So, since the Weber is not liquid cooled, I can cap off this coolant line which used to run to the intake, correct? I see no point in having it run to the intake, if the adaptor plate is going to cover it.I would cut away as much of the rust as possible, and then remake the areas with 18ga sheet metal (Stainless if you want) riviting it on if you don't have a welder. Just covering up the rust is just going to make it rust more behind the fiberglass. These areas really aren't to bad, and everything is lots easier if you have a basic Wirefeed welder, and stitch welding experience. I agree with getting better fenders, it'll look much nicer than trying to patch them. As for the hole in the Wheel well, that should be addressed asap, this is where these cars love to rot out, check were the coilover bolts to the body mount, most of the time, this area will fail over time and the coilover will be pushed through the wheel well lol. You can go for the fiberglass idea, but its not going to last very long. About a year if you drive it in the salted winter roads. Good luck though! I am interested in seeing what you do to this thing -Tom PS: #955 would be the correct color. If I remember correctly, the #280 was for the 80s GL (Same body)Wind noise isn't a factory option Mine is quiet in thw wind noise area. But one of the roof support bars must had came unglued, and it rattles going over bumps (So does the rear cargo shade) I too seem to have a bearing moan right around 25mph which I never had before, I don't think it is the tires as I rotated them, so I guess time will tell, or the 10hrs RT drive time to MI LMAO! What wheels are you running on this thing? Stock EA82 steelies?Getting my carb tomorrow. Will the jets that are already in it be correct? What size jets do they put in the DGEV from the factory?Matt, 30" tire under the Impreza! That is pushing it, with out hacking the hell out of the wheel wells/fenders. The front might not be as hard to trim accordingly, but the rear is gonna be a biotch with the rear doors getting in the way. Stress on the axles and tierods is gonna off the chart. MickBrat had to trim the hell out of his body with 31s iirc, and he was running solid yota axles and a Nissan T-case. I would totally dig to see an Impreza with 30" tires, even a Legacy would do!You stole my idea!! Ah well, typical 80's car with the big yellow driving lights under the bumper, we all dig it :cool:Yeah I did that a once, oops! Has anyone ever left there hood popped (Safety latch holding it) while you drive 75mph down the freeway and are watching it bobbing up and down, lol not the best thing to watch.Jon, that turned out Great and looks awesome! Those tires look pretty grippy and a hard compound. I like the idea of the center cap templet, and I think it would work just fine, I see no real issue with it.I inspected the wires in the engine bay, they all look factory from 1983. I can't really see anything linking both sets of bulbs together, as the wires for both sts of lights run right into the main harness and is covered with that plastic protector, tape even looks tight and factory. So I dunno? Here is what I did today, I put a battery charger on the batt (12v 6amp) I then turned the head lights on, all four are on, if I turn the brights on, all four are on, but the outers become dim, and the inners become brighter. SO, I unplugged the inners, and turned the high beams on again, the outers still become dim, even with no extra draw on them, WTF? I found the High-beam relay, it is the one labled "White" on the passenger side tower. It clicks, so I assume it is working correctly. I don't know what to make of the dimming situation? Why would low-beams become dim when you turn the high-beams on, if the high-beams are not connected, there shouldn't be any extra draw...? I think if it were a short, the fuse would have blown, unless I'm not pushing enough amps into the system. Perhaps I'll wait till I get it running again, so I have the alt to charge the system. The alt on these are what, 50amp? Ben, thanks for the Sylvania part numbers.Cosworth is for Men, SVT is for boys.Inners are indeed Highbeams, but why are they on with the other headlights? If I use the Highbeam switch, the Highbeams get brighter. IDK.Get the lift kit? Storm trooper FTW!