
All Activity
- Today
-

2.2 OBD2 swap into ‘85 Brat
el_freddo replied to Greentractorfarmer's topic in Old Gen.: 80's GL/DL/XT/Loyales...
So no change or updates since your last post of the same content? Since there is no reply to your proposed variable switch I’m guessing it’s not a common thing to do. Why not just replace the knock sensor and be done with it? -

Cobb accesstuner Race downloads available.
rgtrust7 replied to machineica's topic in Turbo Engine Tech ('91 and newer)
I have accessport manager 3.1.9 and a bunch of different tunes available. Not sure if there is one for secondary air pump delete. Below are some of the tunes Filename Vehicle Economy Mode v350.ptm 2006 USDM Imprez Economy Mode v400.ptm 2006 USDM Imprez Stage v400.ptm 2006 USDM Impreza Stage 91 v350.ptm 2006 USDM Impreza Stage1 91 v350.ptm 2006 USDM Impreza Stage1 91 v400.ptm 2006 USDM Impreza Stage1 91 v400.ptm 2006 USDM Impreza Stage1 93 v350.ptm 2006 USDM Impreza Stage1 93 v350.ptm 2006 USDM Impreza Stage1 93 v400.ptm 2006 USDM Impreza Stage1 93 v400.ptm 2006 USDM Impreza Stage1 ACN91 v350.ptm 2006 USDM Impreza Stage1 ACN91 v350.ptm 2006 USDM Impreza Stage ACN91 v400.ptm 2006 USDM Impreza Stage ACN91 v400.ptm 2006 USDM Impreza Stage1 +EBCS 91 v350.ptm 2006 USDM Impreza V Stage1+EBCS 91 v400.ptm 2006 USDM Impreza V Stage1+EBCS 93 v350.ptm 2006 USDM Impreza V Stage1+EBCS 93 v400.ptm 2006 USDM Impreza V •Stage1+EBCS ACN91 v350.p... 2006 USDM Impreza V Stage1+EBCS ACN91 v400.p... 2006 USDM Impreza V Stage 91 v350.ptm 2006 USDM Impreza W Stage 91 v350.ptm 2006 USDM Impreza W Stage2 91 v400.ptm 2006 USDM Impreza W Stage 93 v350.ptm 2006 USDM Impreza W •Stage 93 v350.ptm 2006 USDM Impreza W Stage 93 v400.ptm 2006 USDM Impreza WI Stage2 ACN91 v350.ptm 2006 USDM Impreza WI Stage ACN91 v350.ptm Stage2 ACN91 v400.ptm 2006 USDM Impreza WF 2006 USDM Impreza WF Stage+EBCS 91 1050x v35... 2006 USDM Impreza W -
rgtrust7 joined the community
-

2.2 OBD2 swap into ‘85 Brat
Greentractorfarmer replied to Greentractorfarmer's topic in Old Gen.: 80's GL/DL/XT/Loyales...
The 560k resistor in place of the knock sensor seems to confirm the knock sensor as my problem. The on / off cut-out bucking is gone, only a significant flat spot in the low rpm range, feels like a fail-safe scenario or similar sensation. I only drove a couple of miles before parking at the shop for the mechanic to get data while driving, he has a really nice tool for that. I’m hoping he gets the time to work on this soon. Meantime, I’ve been reading a conversation on this forum where Blitz has responded to the topic “hesitation” with a solution to the nock sensor involving a variable switch to add resistance manually to the circuit. He also had removed to knock sensor . I’ve been curious if anyone has solved the knock sensor issue with a combination of a resistor in series with the knock sensor. My mechanic says that might be something to consider. Thanks for any thoughts -
EA82 Cleaning & Assembly Questions
el_freddo replied to SuspiciousPizza's topic in Old Gen.: 80's GL/DL/XT/Loyales...
I was a long time ago that I did an EA82 headgasket job - I don’t recall there being instructions to back off the head bolts in the process! Just use engine oil, nothing special required. If you dip the first 5mm of thread that should give you heaps of oil to play with. If you can use an engine stand with the cylinders vertical (engine 90° rotated), this will help keep the oil in the holes and not on your new head gasket. Oil pan, drain it. Then pull it off to clean it out. Reseal with quality sealant. Cooling passages - you’d probably be better off hitting any passages you can with a high pressure washer before starting any real work on the rebuild side of things. Just running water once the work is done won’t move anything. If it’s looking really nasty, getting a rod or a screw driver in there to remove scale can be effective. Ensure you get this crud out. When putting everything back together, clean all mating surfaces then wipe with methylated spirits or some alcohol wipe that completely evaporates without leaving a residue. Then apply your goo or gaskets etc and torque to spec. After about six months of continuous driving, it should develop an oil leak if you’ve done things right (joke! It should last longer than this!). EA82s always leak oil! On that note, they usually leak from the cam box where the sealant is the only barrier between the engine internal environment and the rest of the world. I hated this seal! Best method I found was to clean as described above, apply silicone to fill the channel and the edges of the mating surface. Then sit the cam box on the sealant and leave it to harden a bit before torquing the cam box down properly. And the VERY BEST method I found for EA82 oil leaks was to EJ it. The only EAs I tinker with now are EA81 units 😎 - Yesterday
-
Forgot to mention checking your wheel nuts are done up tight. This is a quick and easy check that could save a lot of headache!
-
 I'm doing a top end rebuild and reseal on an EA82 that'd been sitting in a car in the woods for 20+ years. The heads need resurfacing but once they're ready to go back on, I'm curious about oiling the head bolts. What's your preferred method and oil/lube? My first thought was engine oil but how best to apply? Use an oiler bottle? Just dunk the threads and shake off a bit of the excess? Tangentially, for the Felpro head gaskets (they're what I had laying around from a reseal kit I bought) they say they're 'permatorque' do they REALLY not need to be retorqued? Would going through the FSM -60°, oil threads, retorque, repeat really not make a difference? I find that hard to believe. The engine was stored with oil in the pan, I'd like to fully clean out the pan to get all the old oil and crud out of there. Should I use something like diesel to flush out the pan? Any preferred methods? I'd like to flush out the coolant passages with distilled water once the engine is back together (before installing). I was thinking of using an aquarium pump in a 5 gallon bucket with some sort of filter/strainer system, removing the thermostat, and letting it run overnight to get all the old nasties out of there. Or would it be just worth flushing the system with a chemical flush while driving around? Any thoughts are appreciated, y'all have more experience than I do. Thanks :]
 -

88 GL - Distributor not sparking.
LaMamelle replied to Yarlissa's topic in Old Gen.: 80's GL/DL/XT/Loyales...
If I'm not mistaken, the ignition coil should be getting 12v when cranking. According to the manual, there should 10 ohms of resistance or more between the "primary terminal" and the case of the ignition coil. Anything less indicates a short. I assume the primary terminal is the terminal that connects the distributor. Test that and see if it could be the issue. Issue could also be a poor connection between the ignition coil and the ignition switch. But I wouldn't advise hooking the coil right up to the battery, it sounds like it would cook something. Also, I don't think there's an exciter in the sense that an electric field needs to be created in order to start the engine. If anything, that would refer to the alternator, and there isn't anything about an exciter in the manual. Btw, something that might help you: Index of /Auto/Japan/Subaru/--Old Models--. These are a bunch of pdfs for older Subaru manuals. They have wiring diagrams and troubleshooting information. I really like the Subaru Factory Service manuals, since they have actual flow charts for troubleshooting.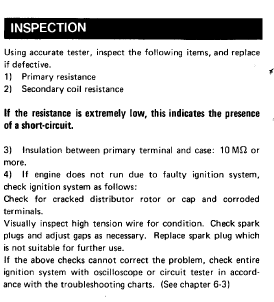
-

88 GL - Distributor not sparking.
Yarlissa replied to Yarlissa's topic in Old Gen.: 80's GL/DL/XT/Loyales...
So we tested it and the coil is reading 6 volts and when trying to crank it still reads 6v. There is supposed to be a exciter? We check the distributor and the green black wire has 12v. Green yellow and black white has 5v. The black wire is ground with 43ohms of resistance. And does the coil supposed to have 6 or 12v? And if 12v can we run a hot from positive from the battery to the coil without a ballest resistor? We tried another coil and its the same 6v. -
 Do you feel it under the seat when the vibration occurs. Something similar in mine turned out to be drive shaft. Got an aftermarket since the u-joint was not replaceable and all was good.
 -
Check your tyres for a bubble or something odd. I went through a process of eliminating parts from the back of my L series including removing the rear diff and driveshafts! Turned out one rear wheel developed a small bubble/egg on one side of the tread. Swapped the wheel and happy days!
- Last week
-
Air Struts: Repair, Replace, or Swap?
LaMamelle replied to LaMamelle's topic in Old Gen.: 80's GL/DL/XT/Loyales...
Small update, I was able to find some conventional struts at a yard in my area and they went on just fine! At least, the rear ones did, I haven't done the front ones because I wanted to try out a little experiment. What I have learned, is that you can have the front air suspension independently from the rear, as long as your plug up the rear. I used the solenoids from the rear air struts and plugged them into the airline and just left the power unplugged, which leaves them in a closed state. Not exactly a revelation, but still fun to know. This wont be long term of course, but I did drive it around my neighborhood, and it didn't explode so that's a win in my book. It does lead to a somewhat silly look on the car when the front struts are deflated. The attached picture doesn't do it justice, but hopefully my MS-Paint art shows what I mean. It basically has a very aggressive attack angle which really made me laugh when I first saw it.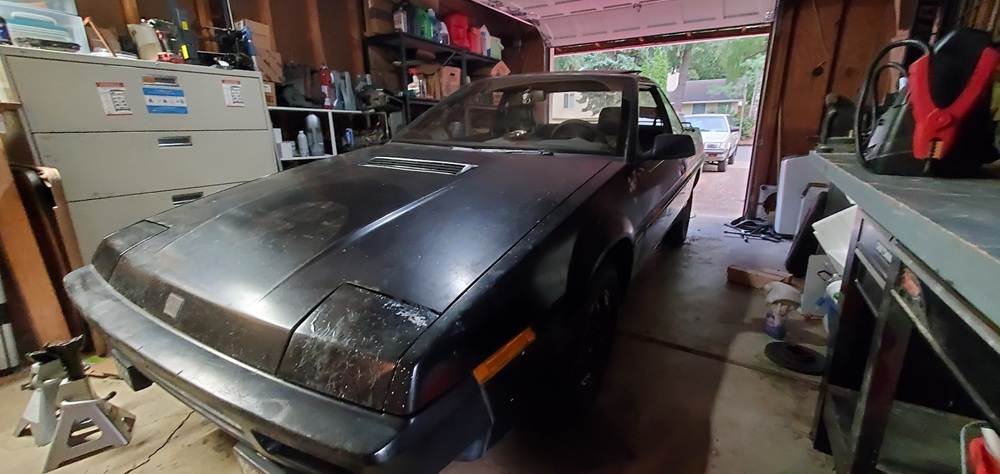
-

88 GL - Distributor not sparking.
88SubGL replied to Yarlissa's topic in Old Gen.: 80's GL/DL/XT/Loyales...
You may have to backtrace your wiring to find out where you are loosing power to the distributor or coil. Check the fusible links, both ends, power going in power going out. -
 Just so you know – popping it free from the knuckle won't be your problem. As mentioned, the pinch bolt is often seized and can shear off, you will need to drill that out if it happens. Use a longer replacement bolt with a lock washer and nut. The real issue will be getting the joint to release after the pinch bolt is removed. They sell an expensive tool to pull them out, however, with some steel pipe fittings and a welder, you can make your own for under ten bucks.
 -
 Put the FWD fuse in and see if it makes a difference.
 -
 '84 wagon here. I did a 2" lift about a decade ago. I have an OBX and a Torqlocker waiting to install. 5spd d/r with two-part driveshaft. Rear disc brakes and an EJ22, though neither of those matter much for offroading. Spec stage 1 clutch.
 -
 2000 Outback 130k new to me. It didn't have vibration when I boguht it 500 miles ago, now it does. It feels like judder from 25-35, but there's also vibration at highway speeds.Also, it lightly 'clunks' (that I can feel more than hear) when the gas pedal is let off of then put back on. The highway vibration is getting worse. I added the magic goo (Lubegard 19610 Instant Shudder Fix) to the tranny 100 miles ago - no improvement in the vibration from 25-35 mph. I'm thinking it may be the driveshaft carrier bearing or its rubber mount (but 130k is kinda low for that I'd think). My question is: how to diagnose that without pulling the driveshaft. I had the car up and crawled under and pushed up and down on the driveshaft and it moved rather easily - I don't know if the rubber mount should alllow easy movement or if it should be stiffer, it just seemed rather soft to me. The tranny mount just got replaced by a competent mcechanic. Any see-through-brick-walls folk out ther who can diagnose from a distance? : -) Thanks!
 -
88 GL - Distributor not sparking.
LaMamelle replied to Yarlissa's topic in Old Gen.: 80's GL/DL/XT/Loyales...
The basic stuff I would check if you haven't already: - Check the ignition coil if you haven't already, make sure it's getting power. If you have a spare, swap that in and see if there's any change - Could also be the wires, not 100% confident since they should be okay even if it's been sitting for a while, but you never know. Just make sure they aren't damaged, and the plugs are actually making contact with the distributor head and the spark plugs. - Also check fuses if you haven't already, could just be a broken ignition fuse. As for your wiring problem, I'm not too sure. Honestly, my recommendation would be seeing if you could get a used one online, for an 88, since the 85-87 and 88-91 used different kinds of distributors as far as I can tell. I was able to find some used ones on ebay. But, I just ordered a 1986 service manual, which should have some information on the wiring for the distributor, when it arrives, I'll take a look and see if I can find some information that can help you. -
The most basic upgrades are a lift kit and tyres. From there the world of mods is your oyster - and it depends on what sort of offroading you want to do. My L series - Ruby Scoo - is built for some tough offroading with touring in mind while still a good daily if I need to do that again. So my list of mods: - EJ22 - 3 inch lift - lifted springs (need replacing now as they’re no longer lifted) - 27 inch diameter offroad tyres ^ this setup did me well for a long time. - Tricked up gearbox: — L series AWD locking centre diff gearbox with: — 4.111:1 diffs — front OBX LSD — Best factory low range: 1.59:1 — auxiliary oil feeders over low range for extended steep hill climbs - dual battery setup - rear cargo frame for fridge slide, bush kitchen & personal gear storage - safari snorkel - roof racks for recovery gear and maybe a swag depending on what I’m sleeping in - UHF radio mounted on the cab roof in front of the rear view mirror. Best location in my book with speaker closest to the driver and passenger’s head. Still have more plans in the wings. Looking at a 5 stud brake upgrade and 15 inch rims for more offroad tyre size choices. Got an auto locker to throw in too. Hope this helps show what’s possible out there. Not all of these mods are needed to make them really capable offroad. One of the best bang for buck mods I did in the early days was a welded rear diff. Drive around in 2wd with a rear shaft removed. Arrive where you want to 4wd, jack up rear end, slip shaft back in then point and shoot - tyres and lift clearances are the bits that hold you back. Now there’s an auto locker available (which is what I’ll be trying out). I used the welded rear diff without lift and tyres, I don’t recommend this! I inverted my floor pans as a result. They’re all good now as I hammered them back to where they should be.
-
I had a really hard time finding these, I got lucky and found some good condition ones at a scrap yard in my area, but that was the only place I could find them. I'd recommend searching around there. I believe that any 85-89 front struts will work, but someone else can contactant me. If you're on the west coast, I've seen Pick-n-Pull have some in their lots, might be a good place to start.
-
 Did you still have the back plastic cover on? Guessing a pebble wedged in somewhere for a bit then got spit out. The plastic cover can flex around while the pebble was wedged.
 -
88 GL - Distributor not sparking.
Yarlissa replied to Yarlissa's topic in Old Gen.: 80's GL/DL/XT/Loyales...
So i took the cap off and it does spin. -
88 GL - Distributor not sparking.
Yarlissa replied to Yarlissa's topic in Old Gen.: 80's GL/DL/XT/Loyales...
It's been sitting for so long because my grandfather let someone else borrow the distributor and never brought it back. Sadly I can't ask my grandfather who took it since he passed away. But I'll definitely take the cap off and see. -
 Check archives or unfortunately go on FB and look at the Subaru groups.
 -
Lift kits. SJR - is the main man who builds these kits. There are others but for sure we elder folks here know Scott - SJR - from this board. Scott may have stopped making kits for the older Subarus but he may still have a kit in stock or be able to break out the out templates etc. Naturally that market has dried up and the latest focus is on newer vehicles. There may be more involvement needed beyond the simple suspension swap like axle length and camber adjustments so be aware before you start. Basic rule - others have done it - you can too. Just step on the rocks as you cross the river. Wink Check archives. And sadly there’s FB too where you’ll find Scott - SJR - these days.
-
 Thanks guy. The tensioner does look suspect - the small pin that pushes against the bracket to create tension looks somewhat mis-marked like it's not contacting evenly. I'll go ahead and replace that. It's OEM - I'm about to restart it with a new belt, I'll see if I can see the tensioner flopping around at all. I had a 1997 EJ22 tensioner (same one piece style) do that - I guess lost hydraulic pressure and was slapping a bit until it warmed up. Though I don't recall it wearing the belt weird. I'll try to post a pic. It's very odd - like a worm ate through the top of the belt in spots...I'm exaggerating the car was still driving but it seems like anything pulley related would simply be straight not curved and wiggling across the surface.

