Uberoo
Members
-
Joined
-
Last visited
Everything posted by Uberoo
-
funny thing was the oil was actually pretty clean,no water that I could find.. weird.
-
My rear diff no longer differentiates..:banana:Took it all apart and welded it with a stick welder,at a bajaion amps.It was an old school welder but it was hot enough to melt the teeth right into the weld,So that has to be good..That and after I welded the spiders together I jammed a plate in there so it was touching all four spiders,on both sides,then burned those in there as well.It should hold pretty good. BTW it turns out the diff really was broke.Two teeth somehow got sheered off one of the spiders.. other than having a oil pan explode in my face(I'm fine,scared the hell out of me though).it all worked pretty good.Now I need to somehow get the axles broken loose from the diff so I can pull an axle for the street. That and I also built a front bumper and a new radiator support bar.Pics latter today.
-
I blew up reverse on the old 4 speed I had by doing that.Of course there wouldn't have been as much strain on the transmission if I had 4wd instead of just RWD,but if I had 4wd to begin with,I probably would have even gotten stuck in the first place.with 4wd I would've just drove right out... I have also been able to drive out of something just by rocking it as well..
-
think I figured it out. Bent tie rods come from a side load impact to the wheel,and bent radius rods come from a rearward loading on the front wheel. so car slides sideways in rut and slaps wheel-bent tie rod if big enough impact hit some obstacle with front tire- bent radius rods if big enough impact.. just different loading.
-
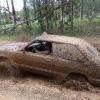
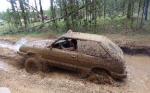
it does have a hood on it now.I maintain it.Sorta.I clean it off after each outing,I change the fluids when they need it,I fix parts when they break.How is that not maintaining it? as for the picture,I like it,its a personal best for me.A car so throughly caked in that it musta weighed a 100-150lbs more than normal.Until I can do better (with my new hood included) then it will stay. I never said I was going to weld the carb to the intake.I was thinking more like drilling and tapping new holes in the intake to make it fit.
-
-
you know thats why manuals recommend you wear safety glasses when working on cars...Not that I ever have the glasses around when I need to work on anything but yea...
-
Im just wondering if anyone has ever modified the intake manifold to get a weber to fit rather than just buying the adapter plate?Ive done similar things on demolition derby cars or what not to get carbs to fit,they work just don't look pretty... Im asking because mostly im cheap/poor but I really don't want to modify the hood to fit the air cleaner because then I would need to build some sort of bulge or scoop to keep the air cleaner from getting coated in mud first time out.
-
IIRC "that guy" is called MME axles or something to that tune.
-
yea just PM me sometime.
-
"when in doubt gas 'er hard" ok you might not want to do that,because that causes broken parts.However,sometimes going slow really isnt an option. Go into a hole at whatever throttle you like.when/if you feel the car getting stuck,GENTLY rock it back and forth.You do not want wheel spin here.Eventually you will make a big track to follow to help you get unstuck or you may get stuck altogether. Above all if you feel the car getting stuck don't just lose your mind and floor it.
-
that is the cleanest engine bay I have ever seen.
-
thats no fun. Im just wondering about it because it seems like you all are bending the radius rods,and im bending the tie rods...
-
do you still have to hold down the clutch when the hill holder is disabled?
-
There is a reason I changed my signature from "subaru master" to "subaru wheeler".Im just some guy who goes and beats on my subaru in the woods.There is lots of "little" things I don't know about them...
-
no wheel cylinder.
-
83 GL wagon,2" lift,235's as far as the terrain,um muddy trails winding through trees,with some hills thrown in for good measure?
-
F**K S*** ******** went to go bleed the left rear and the F****ing bleeder broke Off!!*S***T Now What.Tried the other one but it seems just as stuck so I down want to mess with it.Crap.
-
how do you bleed the MC? Never mind found the screw...
-
Ok now I can't seem to get the brakes bled. The brakes have pressure when I pump it up,but if I let off then press again the pedal sinks to floor.Ive checked for leaks, but I can't seem to find any.I dunno I only touched the front brakes,so Ive only bled the front brakes.I wonder if I should bleed the rears? Any ideas on how to get my brakes back?It sucks trying to stop right now.To stop I have to down shift and pull the E brake, while squeezing what little braking power I can get from the brakes..
-
I got an 88 mitsubishi mighty max that im trying to convert to diesel.Right now it seems like the easiest option is to run the RWD diesel transmission,hooked to a divorced transfer case...
-
I always heard that the legacies even with the EJ in there doesn't like to spin 30"+ tires with a single range.but thats just what Ive heard.Ive also heard that a 4EAT is a decent transmission... *both rumors may be heresy and should be treated as such*
-
Yes I know what universal joints are.I wasn't aware that they tolerated much of an angle for very long.
-
How do you not bend tie rods ends while out wheeling?I haven't bent the radius rods yet but BOTH of my tie rods are bent at the threaded section.I just found that out today as I tried to align my wheeler so it would at least drive down the road in a reasonably straight and controlled manner.Is there any way to reinforce the tie rods threaded area?I can reinforce the non threaded area but...
-
So im going wheeling on sunday.Anyone local want to head down and play or at the very least sit in the passenger seat and take pics?