All Activity
- Today
-
Evil02outback started following I’m at a loss.
-
97 legacy Outback, twin cam 2.5 recently swapped an engine into said car, Got it running, ran like a sewing machine sounded beautiful all of the sudden I heard a sizzling and the engine slowly stopped and won’t restart. no spark, but I have fuel and I believe the injectors are firing, I have a bunch of spare parts laying around that are known good so so I started changing them out one by one, including coil pack, igniter, plug wires I did a visual on the ecu no burn marks. im at a loss I heard the noise that something burned up but no smoke and to visual indicators my next step will be to remove the intake to see if anything under it got pinched but i figured I’d see if anyone else has had a similar situation first before I start tearing things off
-
One other, often overlooked, maintenance item: Change oil in rear-differential. First, check for oil leaking from the differential, especially from around the input-shaft, and from around the left and right output shafts. Ideally, the differential case should appear dry and not oily. If there is evidence of oil leakage, then the oil-level should be checked, and it's not much extra work to drain and replace the oil. However, if the diff-case is dry, with no apparent oil-leakage, you might be tempted to leave well-alone; but it's really not difficult to drain and change the oil. There should be 2 plugs on the the rear face of the diff. Use a 1/2"-square male driver to release the plugs. Always remove the top (filler) plug first, in case the plug is seized. On most Subarus, the rear diff takes about 1L of 75W-90 gear oil. The trick to filling the fresh oil, is to buy a cheap 'turkey baster' (squeezy-bulb type), and use that to get the fresh oil in through the upper fill-plug; fill until the oil reaches the bottom of the fill-plug. And you're done.
-
Thanks for all the responses. I'll track down this vapor hose and replace it. Good idea to do the fuel filter. I guess I should do the air filter as well. Last summer I changed oil+filter and transmission fluid, and I was pleasantly surprised to find that the torque bind was gone after sitting with new fluid in the transmission for the winter. For the AC, would it be worth replacing O rings before charging the system? Or is that only safe to do after getting it fully evacuated? Are there other things I should proactively do? This car sits at a summer cabin and we'll use it for a couple months each year. It has ~165k miles and got reasonably maintained until about 2016 when it was essentially abandoned (outside in the PNW unfortunately). I just put it in the garage until next year, but could plan work and buy parts before returning next year. Thanks!
-
I swapped out throttle body with another one that may or may not have a good throttle position sensor. The P0638 only shows up after about an hour of highway driving. So I took a trip today and after about an hour the P0638 showed up. So now I would like to try a PCM from a different car to see if that cures the car. Do I need one specifically for a 2005 Outback or are there other Subarus using the same PCM?
- Yesterday
-
Camstick joined the community
- Last week
-
el_freddo started following resurrecting 1996 Legacy 2.2L - what's this vacuum hose
-
kite started following resurrecting 1996 Legacy 2.2L - what's this vacuum hose
-
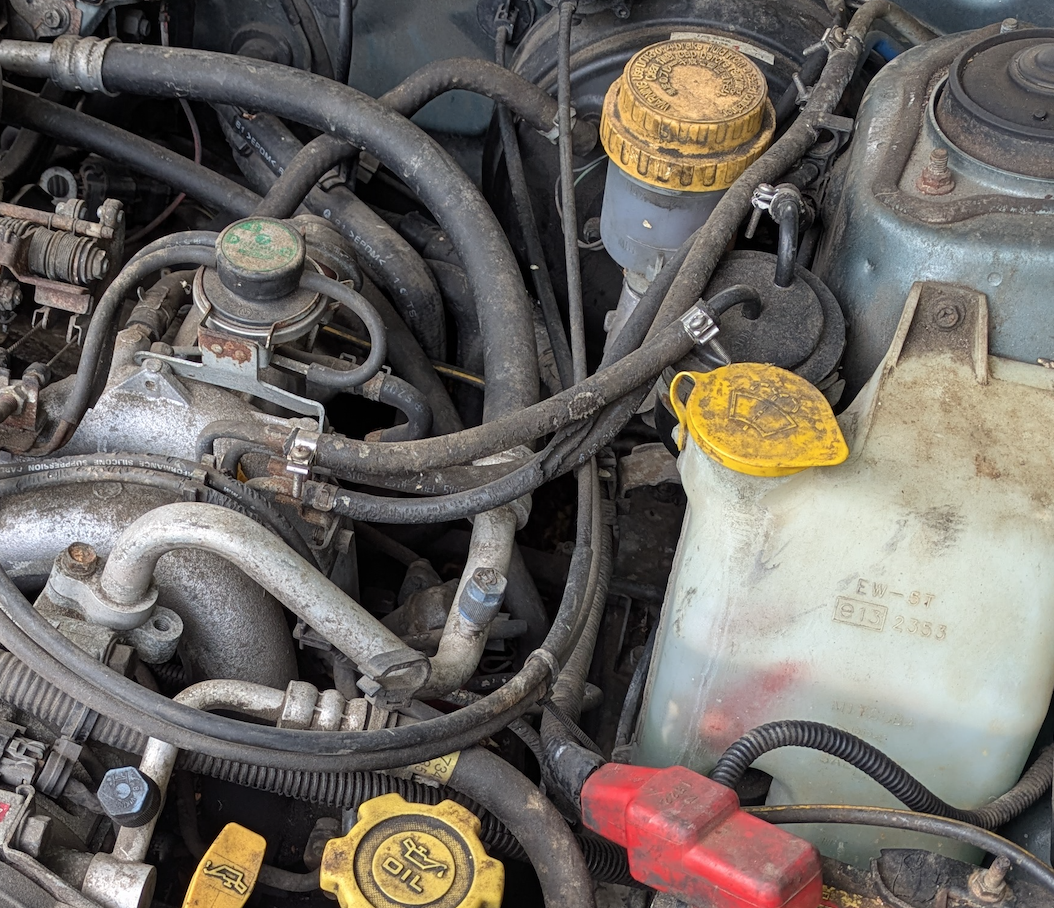
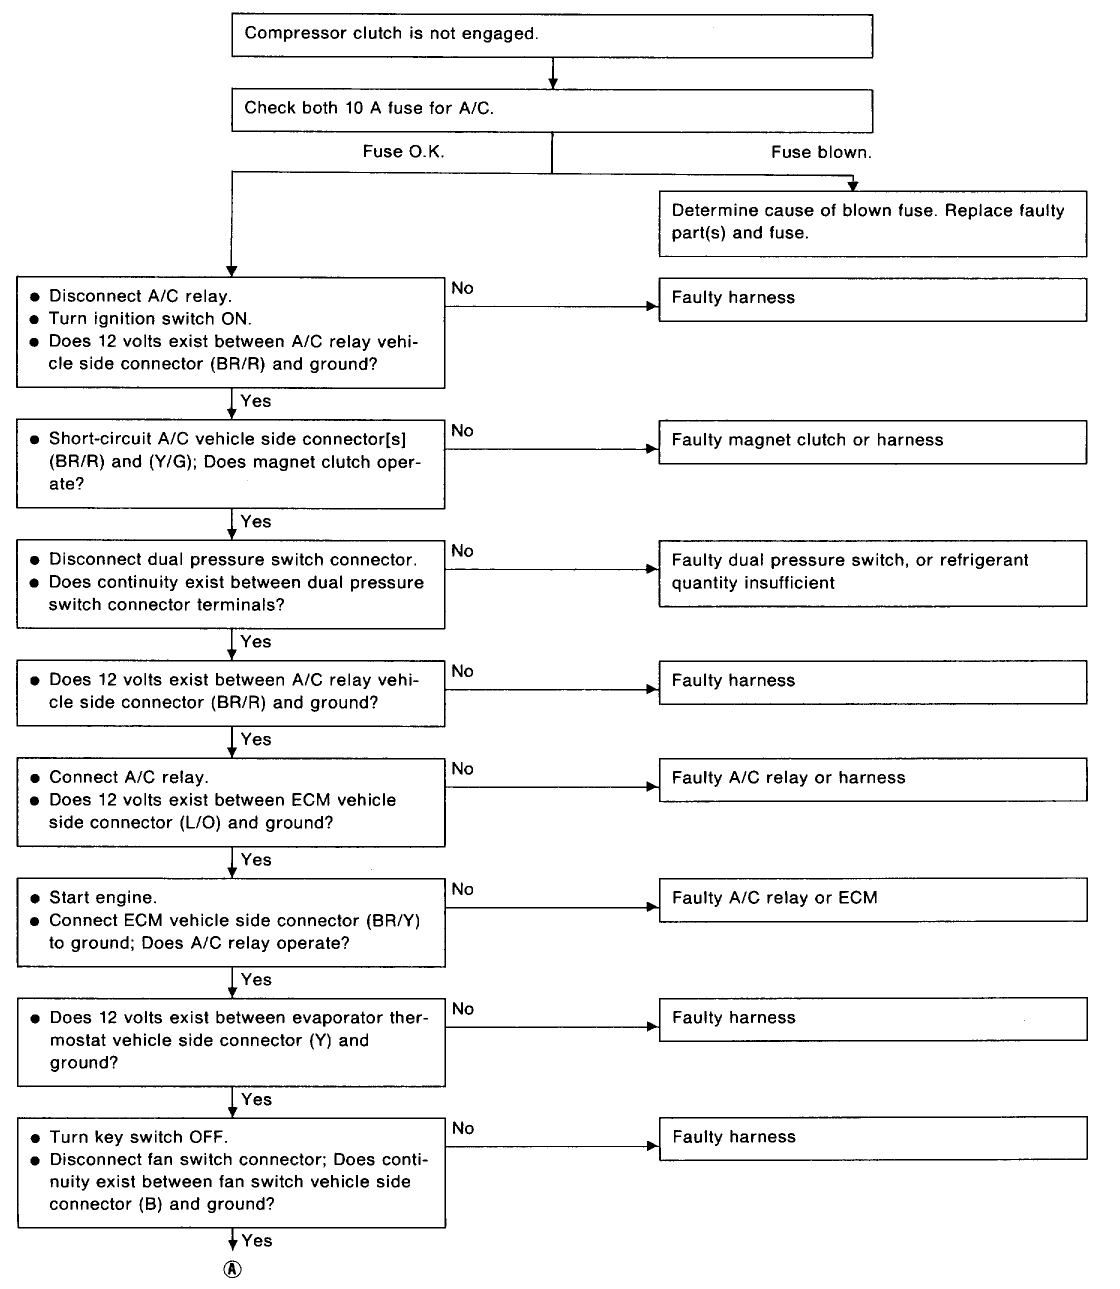
First post, new to Subarus. I've found some useful info here already, thanks! I'm resurrecting a 1996 Legacy 2.2L that was sitting for most of the last decade in my wife's grandma's garage. I've got it running and driving seemingly as it should, with only two known issues at the moment. 1) rodent chewed vacuum hose (I think), what is it? It hissed with vacuum when running. see pic 2) AC not working. The dash button doesn't light up when pressed. I don't have a full grasp of the system yet, most of my knowledge is from this thread. Here's what I've learned: Fuses: 10A Fuse in engine compartment good. 12V is delivered to AC relay can’t find second fuse that is supposedly in the interior fuse box, don't see anything related to heat or AC AC relay functions AC compressor spins when the relay is jumped Air does not get cold. I ran the compressor for longer than I should have if there’s no refrigerant, something I subsequently learned. oops dual pressure sensor switch on the drier is open circuit conclusion Faulty dual pressure sensor switch or refrigerant quantity insufficient” Makes sense that refrigerant is low because it didn’t blow cold when i ran the compressor for a while but since the light on the dash doesn't turn on, is there another problem also? or is there a string of sensors/switches in series, which must all be closed in order to power that dash light? Thanks for the help!
-
el_freddo started following Mystery Dash/Steering Column Ground Wire
-

Mystery Dash/Steering Column Ground Wire
el_freddo replied to SuspiciousPizza's topic in Old Gen.: 80's GL/DL/XT/Loyales...
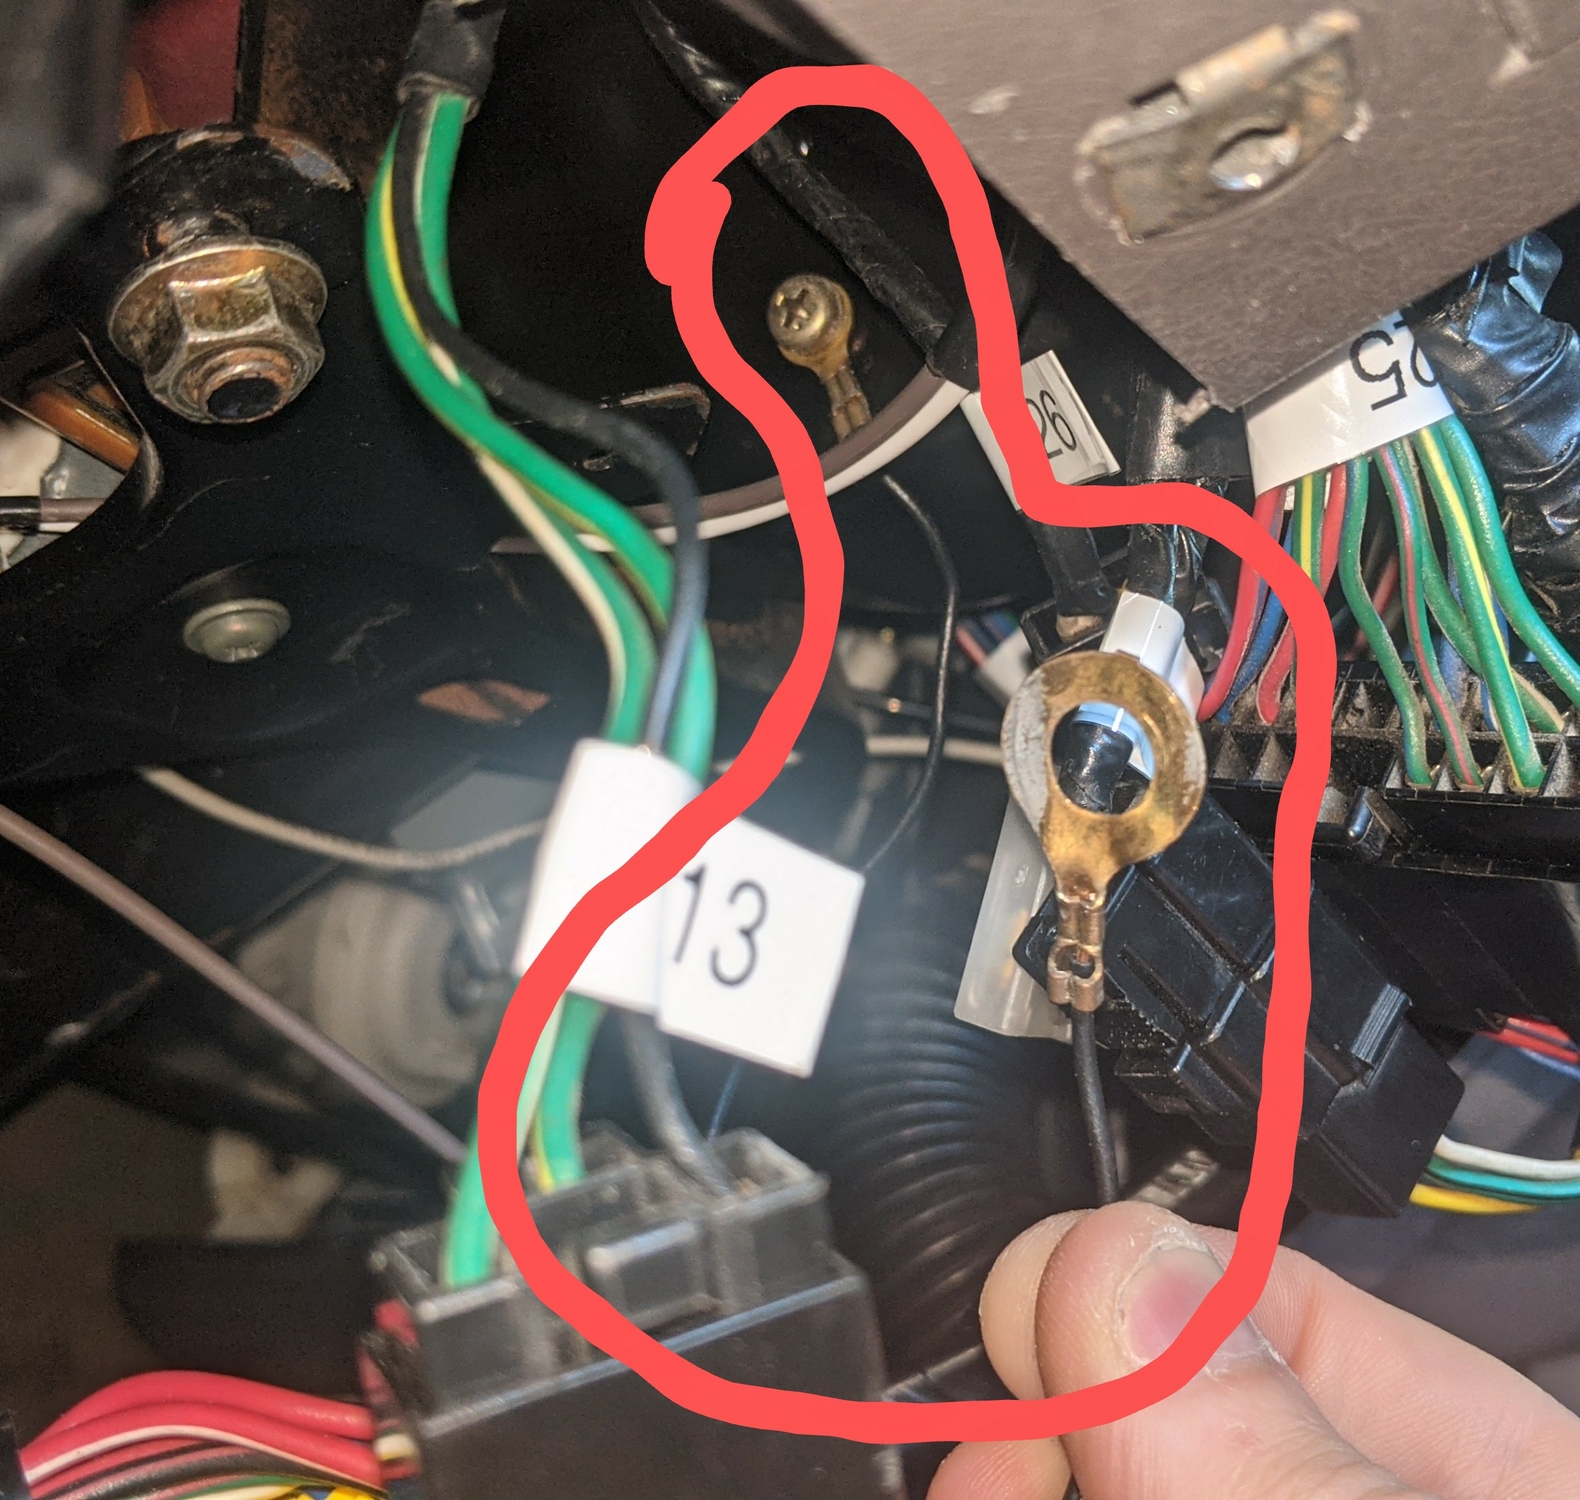
That mounts to the steering column mount bolt. You can see the marks from the flat aluminium/metal plate “washers” that fit in the same area. Cheers Bennie- 1 reply
-
- 1
-

-
Angelo1977 joined the community
-
ToxicSeymour joined the community
-
kite joined the community
-
1989 GL SPFI Been slowly getting my interior back together and I unfortunately forgot to take a photo of this wire's routing before removing it. I cannot find this wire in any diagrams in my parts catalog nor my FSM. It's not the radio ground wire that goes from behind the dash to the mount near the shift boot, that's in place. It's too short to really go anywhere except the ECU mount, but the ECU doesn't ground through the case, or am I incorrect? Also I'm not 100% sure the one end mounts to the steering column, but I remember the wire being located in this general area. Your view is of the ECU mount area from the driver's side. Thanks! :]
-
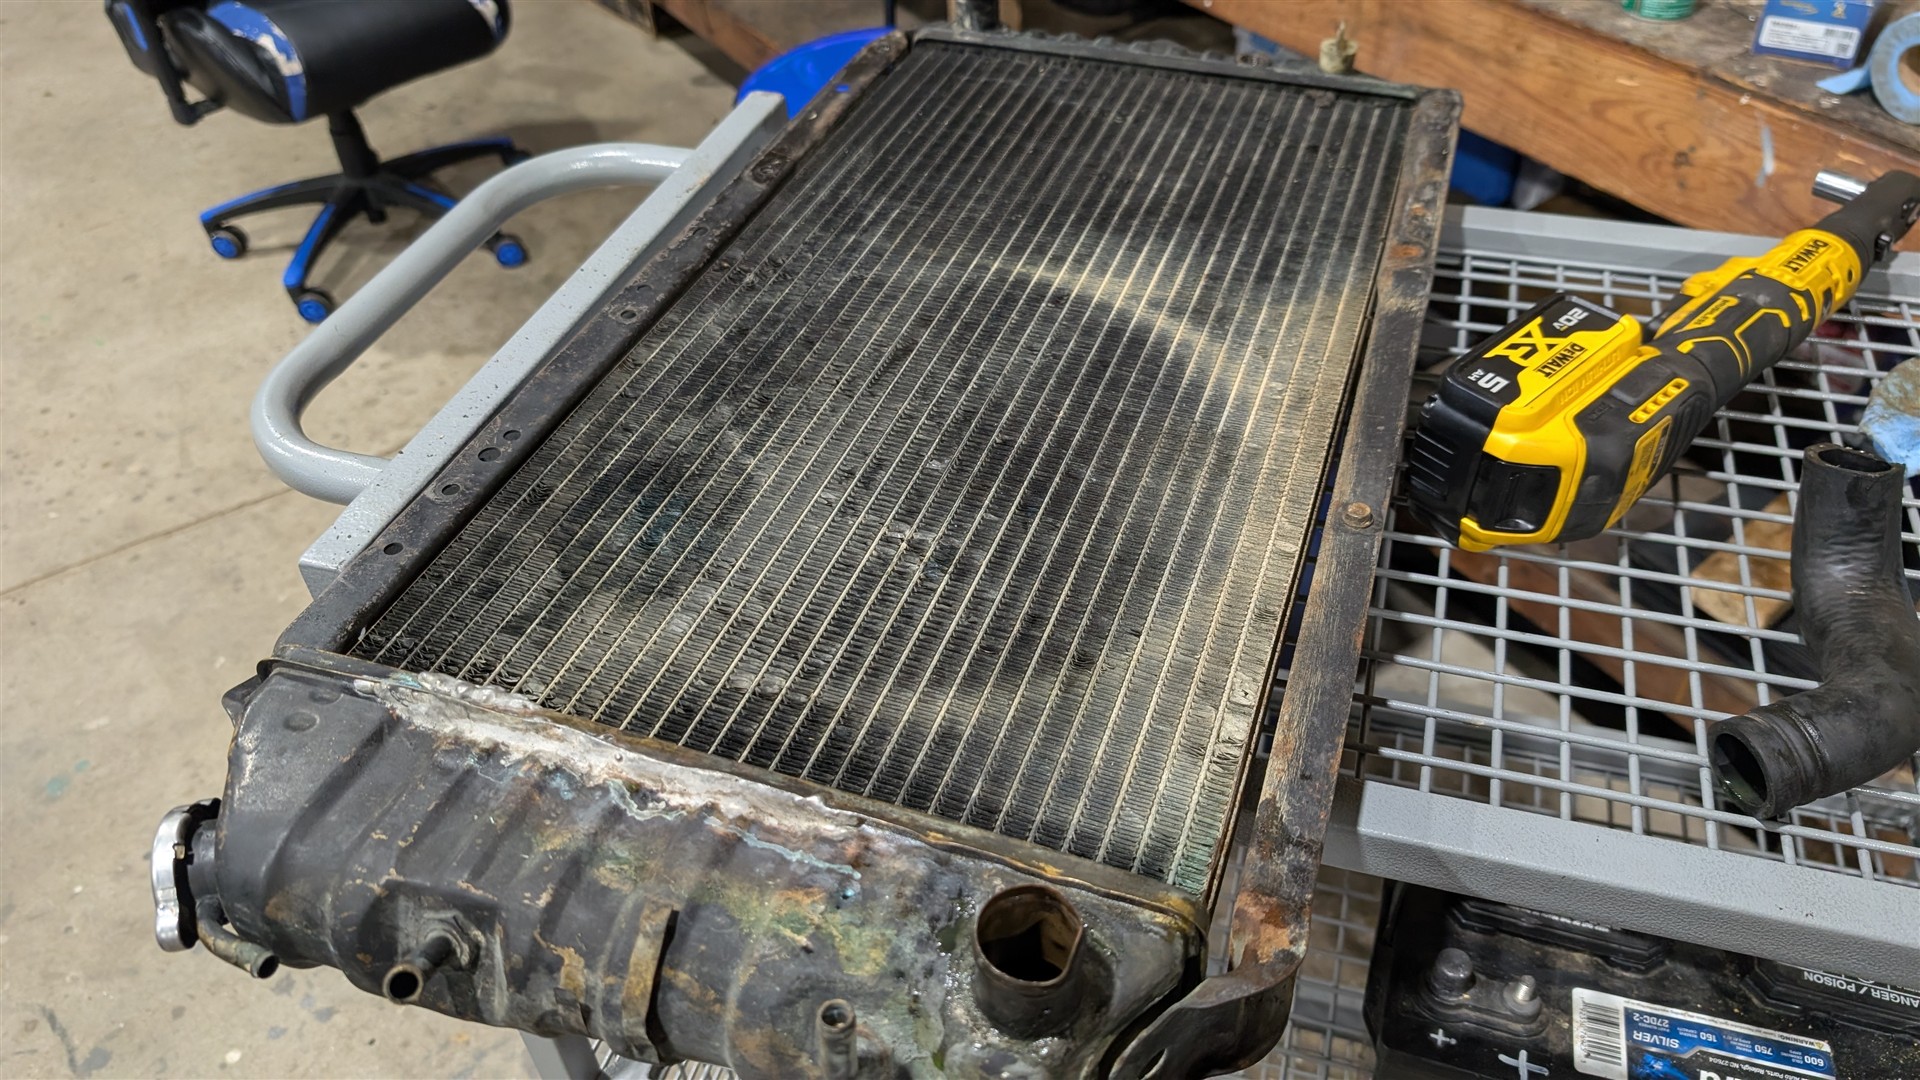
Yeah, that Dewalt ratchet was a birthday gift to myself and that thing is super handy. Love that you can swap between 3/8 and 1/2 drive on it too.
-
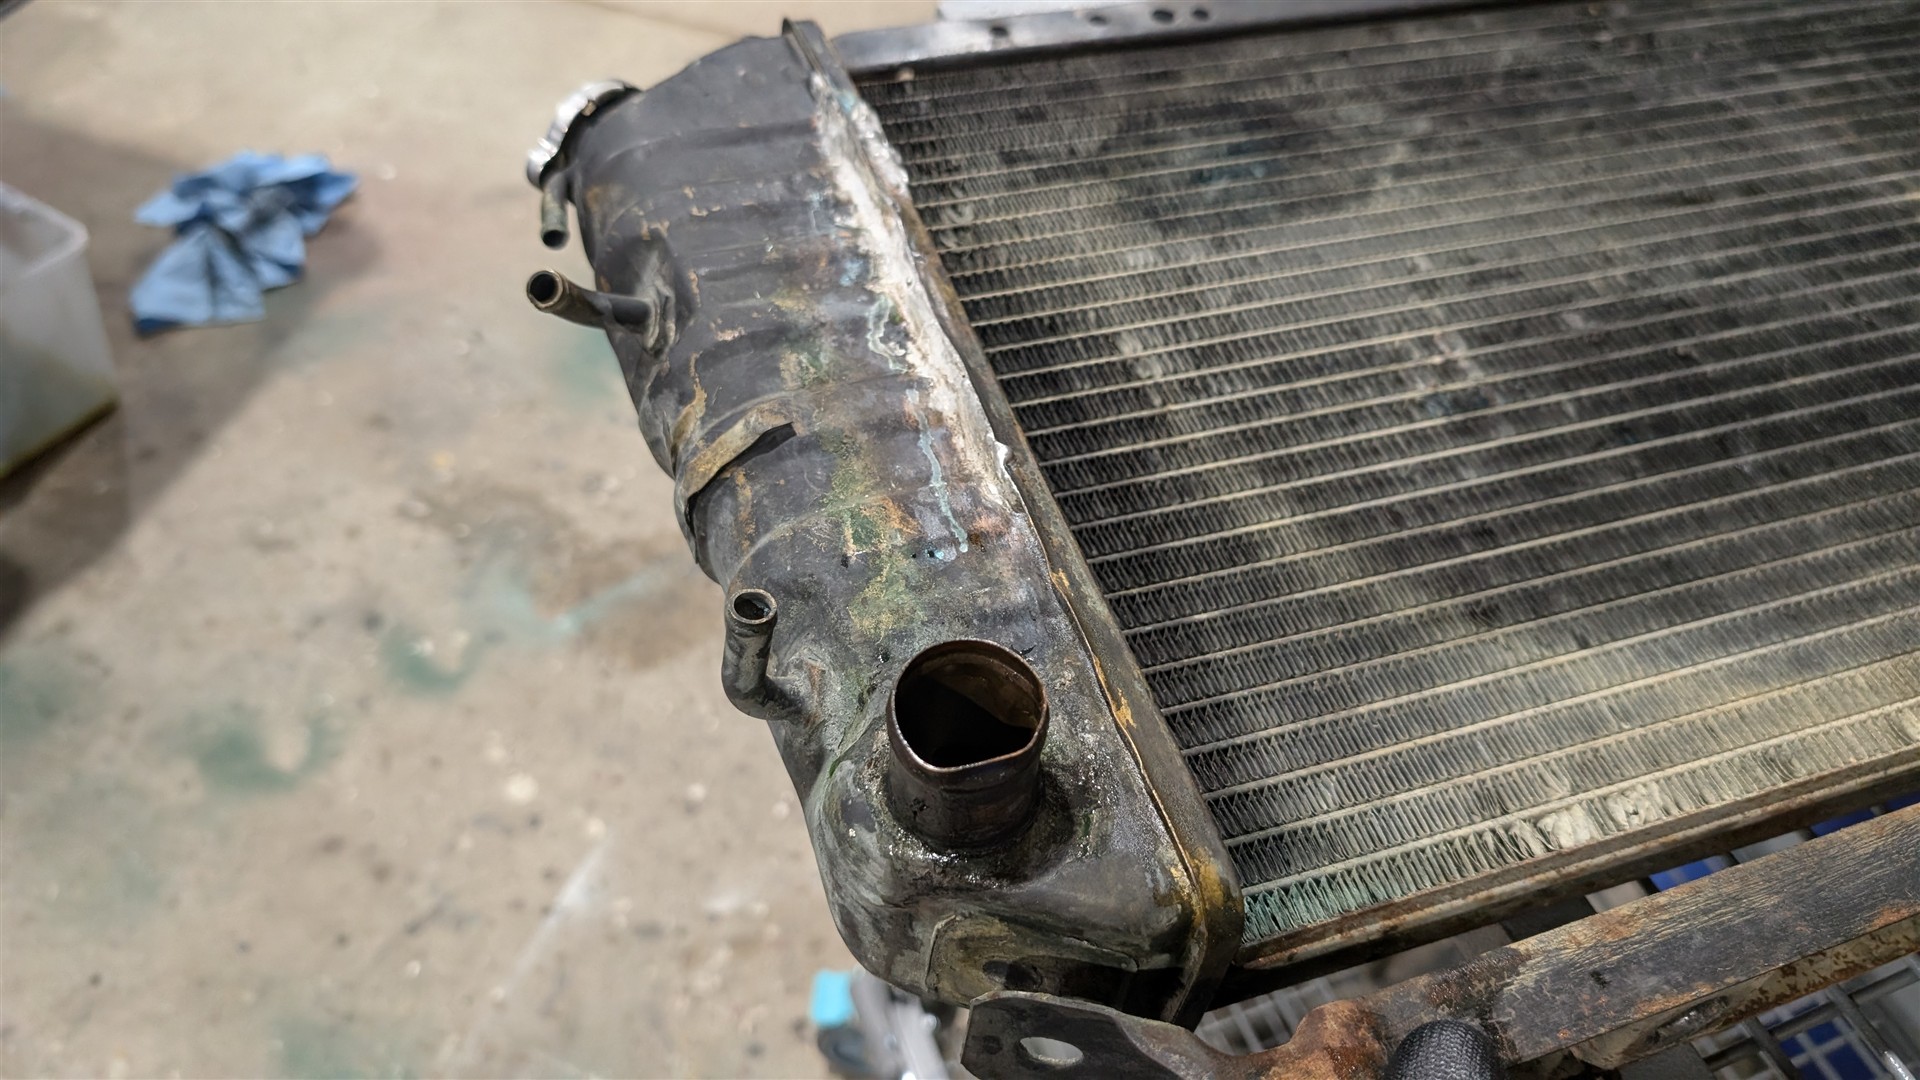
That radiator looks due for replacement. P.S. The little powerstack battery works really well in that ratchet.
-
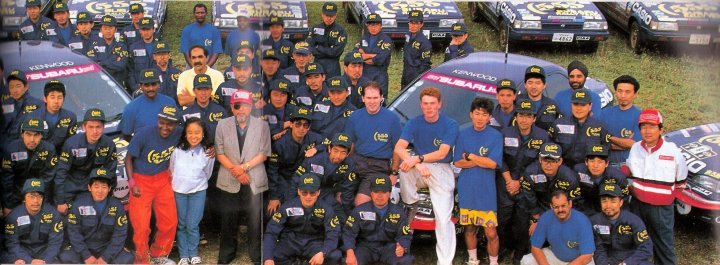
I was just looking at this old rally photo of the Subaru WRC team (I assume in the mid 90s?) and I just noticed that the cars in the back of the photo are Leones/Loyales and not Legacys! I thought it was surprising since all the photos i see from this time are the early Legacys. Does anyone have any or know of any other photos of these 555 Leones. I honestly think it wouldn't look too bad, although I prefer the white blue and gold on the rally Leones.
-
WILSON JR started following Looking for ECU pinout, '97 Legacy, ECU part 22644 AA360
-
Had a few minutes last night to piddle so I got started removing the radiator and hoses. Didn't get the thermostat out but I hope to sometime this week. Someone used a piece of PVC to merge the busted lower hose together at some point and looked to be slightly kinked. And not in a good kind of kink either.
-
itb482 joined the community
-
WILSON JR joined the community
-
subawu joined the community
-
Hey all, as mentioned in a post on FB in the Old school Subaru group or 4x140 or GTFO group that we are absolutely purging our stage two 1977 through 1979 and gen one Brat parts. Pardon the warning shots. But time has come to admit I’m getting old and narrow down the focus of my classics as well as pare down the hoarded stock. Over the years we’ve had numerous parts cars and also bought New Old Stock from aged dealers around 1999-2012 My suggestion to you all would be to take advantage this situation. So to be clear it’s late summer 2025 and we are looking to sell lots of parts for the stage two 1977-79 model cars and Gen One Brat from 1977 through 1981. Only Subaru parts I’d trade for would be for 1972/3 Coupe and maybe 74-77 stage one Coupe parts or solid body, and also stage one 1977,1976, and 1975 FOUR WHEEL drive wagons. Thanks for looking. Remember the name for eBay - cashingmystuffin Currently have some tasty items up and lots more to come. Enjoy !
-
'79 Brat EJ22 Retrofit Build Thread
moosens replied to mka's topic in Historic Subaru Forum: 50's thru 70's
The old “how do you eat an elephant?” dilemma. One bite at a time. -
'79 Brat EJ22 Retrofit Build Thread
mka replied to mka's topic in Historic Subaru Forum: 50's thru 70's
Thanks for the check-in and the compliments, all. In addition to the busted leg, the absurd heat of where I live and some other personal life stuff has held me up more than anticipated. Other paying work also got delayed as a result of the bum leg, so this took a backseat for a bit out of necessity. That being said I'm out of the boot now and I am the proud new owner of a higher-clearance jack I got on sale recently - so I'm hoping to get a couple early-morning sessions in on the rear subframe here in the next week or so. Progress will also likely speed up again around October when temperatures generally start to come down a little and I can do driveway fabrication without cooking myself. Anyways, long story short, I'm dipping back into it - updates of more significance soon. - Earlier
-
Takes about 3 gallons for a full flush this way.
- 7 replies
-
- dexron iii
- outback
-
(and 1 more)
Tagged with:
-
Drain Pull the trans coolant line and put on temp lines into a drain jug. 1- Fill Trans 2- Start it up and let the trans pump all the old fluid out the line you put on the trans coolant into a gallon jug. 3- When the drain jug is 3/4 full - Turn car off. Repeat 1-3 until the fluid is nice and clean. Put the trans radiator coolant lines back on and start it up. Fill to full COLD. Test drive, check fluid Full to HOT.
- 7 replies
-
- 1
-

-
- dexron iii
- outback
-
(and 1 more)
Tagged with:
-
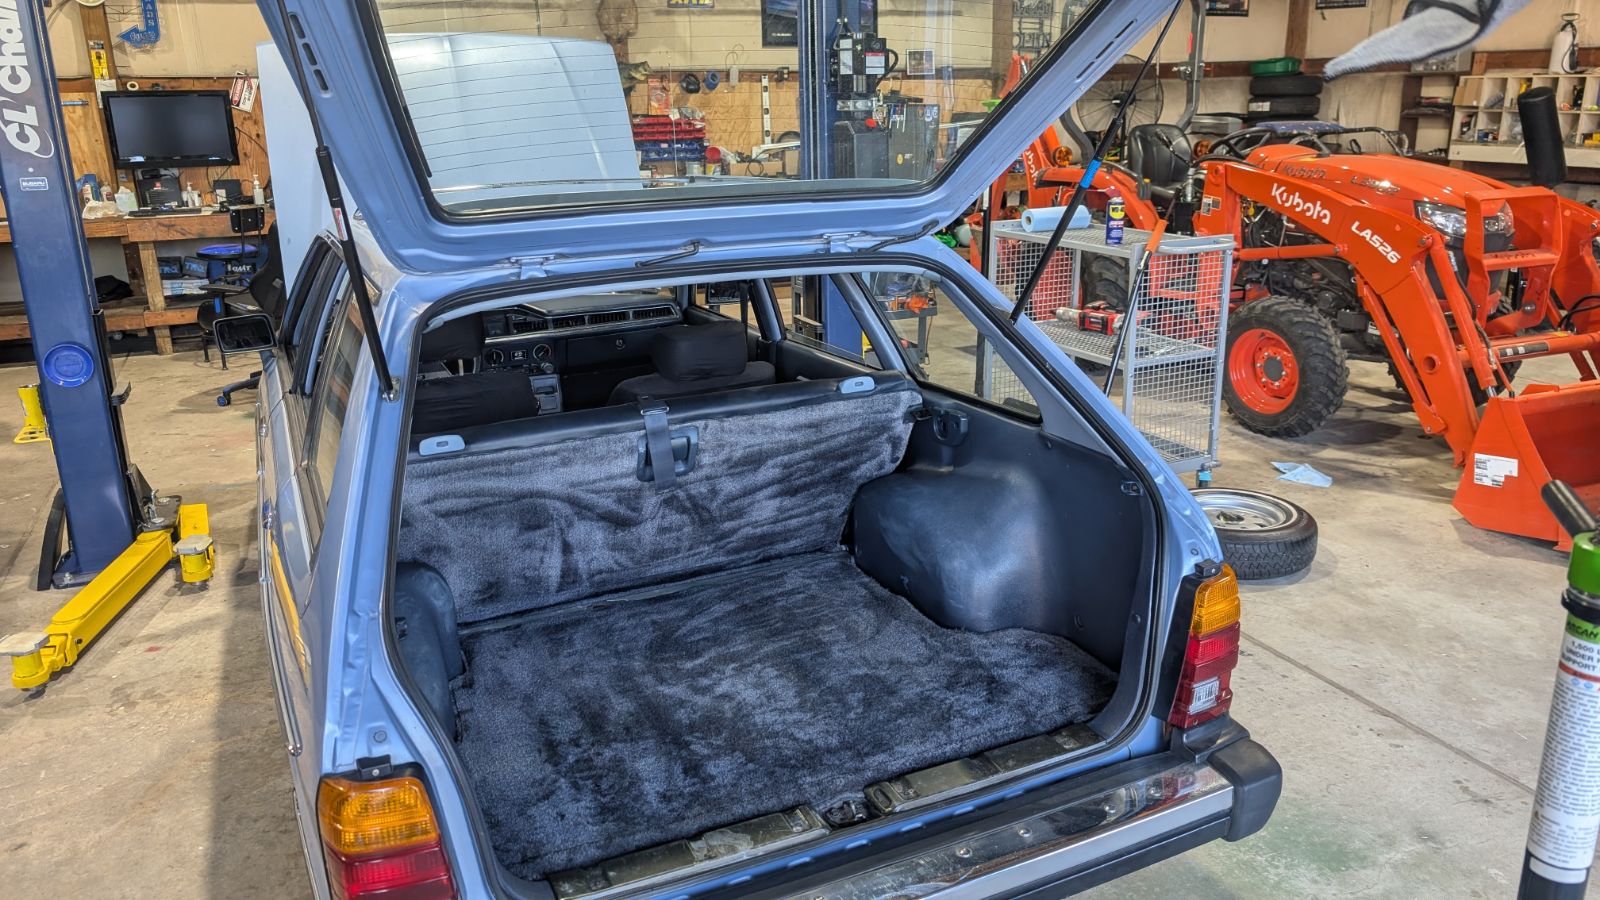
Huge thanks to @2brat82 for shipping me a set of rear hatch struts so that I could use the brackets off of them to complete the hatch replacements.
-
Went to the local dealer. The parts guy said use HP. When I questioned that he went and asked the main mechanic and he said use dex/merc. I guess I will either use Valvoline maxlife or the HP. I use the Amsoil products but their ATF is just so expensive and you need like 12 qts to do a complete change.
- 7 replies
-
- dexron iii
- outback
-
(and 1 more)
Tagged with:
-
Well, it's more complicated than I implied. The current part number, 11044AA610, is steel as far as I can tell. There are 3 older part numbers that were replaced by the 610, I am much less clear what the material of those were, either from my memory or service manuals. So the factory installed ones might have been a different material.


