DaveT
Members
-
Joined
-
Last visited
Everything posted by DaveT
-
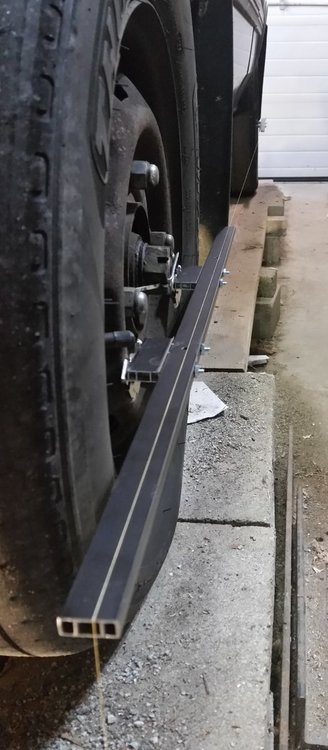
If you remove the rear tire, you can see the trailing arm. Where it bolts to the part with the axle bearings, there are 3 17mm hex head bolts. Loosen them, pull the hub forward to toe in, rearward to toe out. I used a ratchet strap to get enough pull. Tighten the bolts, remove strap, reinstall tire, re check alignment.
-
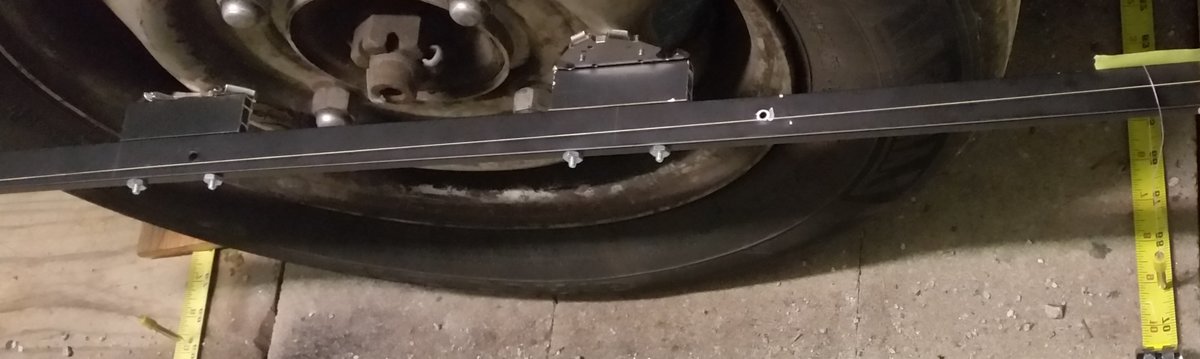
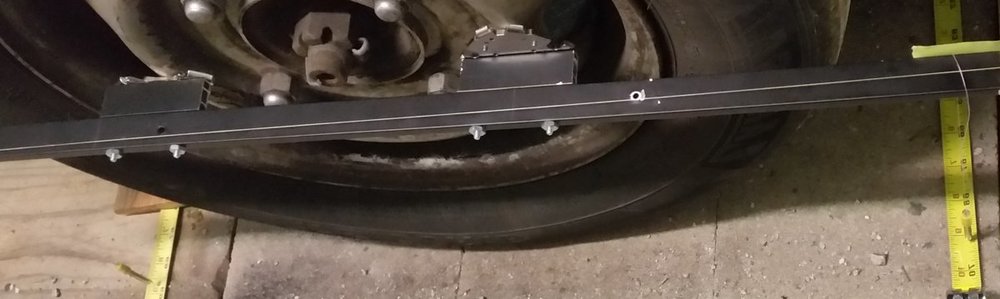
Checked and adjusted the front toe. IT was in a bit close to the max. Picture is of checking the rear toe, it's out past the max, so I adjusted it in. Surprising how little it moved to get close. Big pain is having to remove the tire to get at the bolts.... I made 4 small plumb bobs to get pointers near the tape measures. Want ridged "rulers". Want something less fussy than dangling weights, but for now, it works.
-
No vacuum would make it take a lot of force to stop. Also, a leak that big should make the engine run crummy. Still should replace old hoses anyway.
-
FWD struts will be a little lower ride height. Maybe an inch. I've been driving these since 1988, never had a broken motor mount, so I don't know what kind of noise that would cause if any. Open the hood. Start it. Stomp the brakes down hard. Put it in gear, apply moderate gas pedal, watch the engine. If one is broken, it will move considerably, should make a noise when it hits stops. At least that is what I saw decades ago on a big ol' American car with a broken mount.
-
I can't tell from that angle.... The marks are on the face of the flywheel that faces toward the front of the car. There should be a V [but with one edge vertical] in the opening revealed by removing the rubber plug. That vertical edge is the mark. The degrees and zero are embossed on the flywheel. Depending on the type of engine and fuel delivery, there may be wires or hoses to plug / unplug / connect. to set or check timing.
-
The timing marks are viewed through an opening in the bell housing behind the carb or throttle body. There should be a black rubber plug covering it.
-
Does the noise vary with engine rpm or ground speed? Exhaust leaks vary with rpm and throttle - heavy makes it louder. Other general thing, new after market axles often make noise out of the box, or in very short time frames, from many experiences I have read on here. But it is usually ticking /clicking noise.
-
Sounds about the right tempo for a failing CVJ. Is this a new to you car, or did the noise recently develop? Failing CVJs can make a variety of noises and sensations, come and go with wheel RPM, sometimes hard turning / steering angle - depending on how far gone they are. Are they OEM, or aftermarket? On OEM ones, the outer shells are painted dark green. If the big nut that holds the axle to the hub is loose, it can cause varying noises also.
-
-
It should. You loose 4wd, obviously. I have swapped a few 3AT transmissions around. 86 through 93 are swappable from first hand experience except with the years around 86 (not sure of the exact year) they changed the final drive ratio, which screws up the 4wd unless you also swap the rear diff. You might have to swap the rear mount, and there might be rear drive shaft differences. The internal speed selection parts are the same for the 2WD and the 4wd, but of course the 4wd has the extra extensign and parts for the 4wd.
-
The 1000 is for replacing it with a similar condition and aged operable car. The scrap value is a lot lower, as it is no longer in the same condition due to the accident. But if they total it, the title is marked as such, and it isn't registerable , so driving it isn't an option legally. Figure on hauling it on a trailer or flatbed. That's how it works here, ymmv.
-
It's been a while since I did this, but it should be the scrap value, so it won't be much to buy the totaled car.
-
Yes, I want to check toe, front and rear. By side to side, I mean driver to passenger - to want to know the string on each side are parallel to each other. I'll add scales on the horizontal aluminum bars. I've used simpler setups to adjust the front toe before, just trying to make something a little more accurate / repeatable. Don't want to measure off the sides of the tires.
-
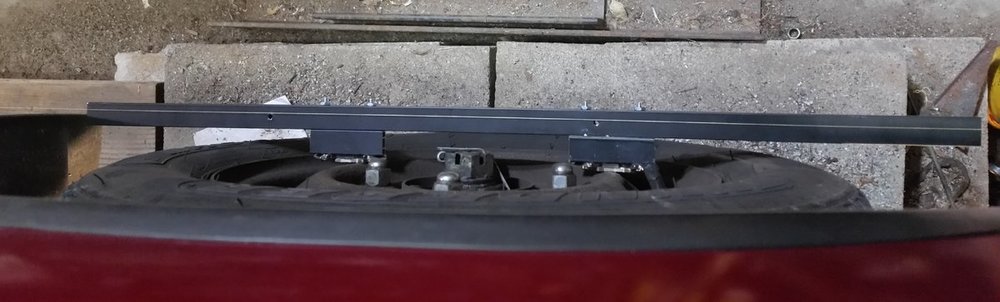
Figuring out a DIY alignment rig. Next to figure out is how to get accurate measurements side to side. Car body and exhaust is in the way of simply using a tape measure. The bars are light weight aluminum attached to Neodymium magnets salvaged from old hard drives. I shimmed them so the height of the magnet face to the outer edge of the bar is within .001" of parallel.
-
Yes, there is a coolant passage in the manifold, directly under the throttle body. There is a special oem o ring that seals it.
-
The ECU 34 code for the EGR is for the solenoid, not the EGR itself. But this is not the cause of the power loss.
-
They won't extend far enough once assembled to unload the spring enough for the perch to float off the studs. Not fitting over the bump at the top edge, that's odd. Maybe grind cut away a little to make the hole big enough? How close is the interference?
-
It looks like it should go together this way - Orient the strut vertically, like it would be in the car. Screw the 2 stud bolts into the nuts on the wing from the top. Set the round perch down onto the studs. Put the cotter pins in the holes on the stud / bolts.
-
I have rebuilt many alternators, never bought a new or reman one. aspwholesale.com has just about every part for them.
-
There is a temperature controlled vacuum valve somewhere - It uses that servo to move a flap to draw air from a duct that goes down to the exhaust pipe to get warmed air to the intake when it is cold outside. The valve is also connected to manifold vacuum. The warm air duct from the exhaust should come up to the underside of the air intake duct, about where that servo is.
-
I found a surprise source.... BJ's wholesale club. Lists a handful of brands even.
-
T in a fuel pressure gauge.
-
Normally, as batteries age, they get higher internal resistance. Not going to cause more current from the alternator. Higher current might accelerate brush eear, but I have no hard data on that. Brush pressure is from a spring, that does not change with current. A very thoroughly discharged but good battery can draw a lot of current. Might be able to fry the regulator or rectifier in a marginally designed alternator.
-
Does sound like fuel starvation, or accelerator pump not working.
-
Only if the battery was so bad as to draw too much current. But it wouldn't likely hold charge for long if it were that bad. How old is the old battery? 5 years under ideal conditions is usually end of life by the specifications for flooded cell lead acid batteries. If the battery is over sized, it can continue to start the car for a year or 2 longer, but it won't have the CCA or reserve it did when new. Btw, ideal conditions are rarely found under the hood of a car. How many miles are.on the alternator? Every one of my OEM EA82 alternators wore out a brush at about 150k miles which reduces output until it won't charge the battery. And this failure mode doesn't light the alternator light on the dash until it is very far along, and then only very dimly. Have to be somewhere dark and look for it faintly glowing at idle.