86 Wonder Wedge
Members
-
Joined
-
Last visited
Everything posted by 86 Wonder Wedge
-
Check resistance on ECT sensor make sure within spec.
-
Nope, you're looking for SPFI (single point or "throttle body" injection) heads. If you pop off the air intake hose and look down, you should see a round pod, and it contains an injector. The EA82 (SOHC) will have have these. 88-94 Loyale, GL or GL-10 (rare in the GL-10s) will work as long as it has the SPFI injection.
-
I was too! Like an "Unsafe at any speed" speech or something.. lol Anyway, the ECU uses the VSS in conjunction with the Neutral Switch to "make sure" the car is in motion. The main feature is for the ECU to cut the injector(s) upon decel (throttle in "idle" position) when the car is in gear to save gas and prevent backfiring/misfiring. The computer has a check-and-balance system in place so the speed has to be greater than 0 and the transmission in gear in order to cut injector pulse. While driving, rev up to about 4-5K, then let off the throttle while in gear and you'll probably hear lots of popping from the exhaust. The ECU won't cut the injector because it doesn't want to stall if you happen to be at idle (since it doesn't know if you're moving or not)
-
Should not be a ball bearing in the pump relief hole. When you unscrew the flanged screw (very bottom of the pump) you should see a spring and a rocket-nose cone shaped cap. Sometimes that thing gets stuck in there, but it has a tapered seat so it seals when the pressure is too low to fight the oil pressure. IIRC, there is a ball bearing in there, but it doesn't belong in that relief passage...
-
Pretty good in the snow, better in the wet, but you can feel the drag/pull when going through standing or deeper puddles at speed.. But she's incredibly stable in light dusting to caked snow on roads at speed. Just crazy. As good as the 9-2x I had with Conti DWS. You can definitely lose grip it low gear and punching it (but mine is just 2WD) but that's normal.. but she plowed right up a 30 degree driveway, from a standstill with wet snow, so... I love em. lol
-
A took about a month looking and talking to owners about 13" tires. Since there are only 4-5 brands available for the OEM tire, General Altimax RT. Cheapest tire, near zero road noise, and a 50K mile warranty. And highest rated on TireRack and of ALL the owners I contacted about them. LOVE THEM.
-
The ECU wants to know when the car is starting so it sends 12V to the ECU AND down to the starter solenoid hence the 2 leads. Granted, I'm not sure why the ECU wants to know when the starting (maybe injector pulse modification or sensor bypass).. but meh.. lol
-
To answer your question, your EA82 (SOHC) has Hydraulic Lash Adjusters meaning they themselves don't necessarily pump up (they do slightly to allow for impulse dampening) or push on the cam, but the wells they sit in do. And sometimes at higher milages, especially in the 3AT, the lower-RPM operation will cause a wear pattern that causes the HLAs to become stuck at some times during higher operation.. but that's a rare occurance. A slightly thicker oil MIGHT help, but a more permanent fix would be to reseal/replace the oil pump. It could also be the oil pump relief spring or the oil galley O-ring on the cam tower(s) that has failed, but more than 75% of the TOD is caused by an internally bypassing oil pump or cavitation. The "mickey mouse" seal is usually the culprit and can be had at Advance Auto Parts for approx 15 (kit, so you can replace the oil pump shaft seal and the pump body seal as well) or online at numerous places. Look for Oil pump seal kit.
-
Well, the dreaded happened the other day. I went to go check the fluids and this is what I ended up with! So I ordered the new cable online (Park Suabru, ordered it Sun night and arrived Tuesday morn. $14.23. :rock: ) Hood Release Cable, part number 57331GA122 But there was a major problem. How the *%&^ do I open the hood w/o destroying the grille, hood or other stuff. (If your hood is open, then skip ahead to the cable replacement part) Well, for those of us with large hands, an A/C condenser or want to just make it easy, the ever useful slim-jim to the rescue! It was as if this tool was made for this job.. Available at ANY auto parts stores, can be had for around 7 bucks and has helped me and MANY stranded people. (Disclaimer: Never use this tool for malicious use. With a great tool comes great responsibility) Coming from up under the bumper using the notched spade-head side (not the fishtail side), on the driver's side, in front of the A/C condenser, angle the slim-jim at a ~45 degree angle and starting just below the assembly, slide up behind the latch mechanism. Now while flexing the tool toward the grille and dragging it outward toward the headlight, you should feel it catch. This is the latch release. Continue to pull the tool horizontally (toward the headlight, not down toward the marker light/ground) until the hood releases. Viola! Here are some images once I felt the slim-jim catch the release lever. (grille removed for clarity) Under car, looking up. Now that the hood is open, we can get to work! So I started by releasing the 4 plastic anchor clips that hold the cable to the inner fender and core support. Remove the 3 bolts that hold the latch to the core support (you will need to do this if part of the cable is still attached AND to hook the new anchor into the mechanism when installing the new cable) backside with the cable anchor attached Remove the 2 screws holding the cable shield to the latch and the core support. (Set aside the latch) Near the cable end, remove the tear-drop bracket attached to the old cable (you will need to re-use this). Be gentle, it will butterfly apart and then set aside. With patience, work the cable through the pass-through in the core support, around the battery and under the strut tower support plate. Now feed the old cable through the rubber grommet on the driver's side firewall until approx 6-8" are left in the engine bay. Move to the inside. Using a phillips screwdriver, Undo the 2 screws holding the hood release cable bracket to the bulkhead. Once free, take the head of the new cable and tape to the old cable. Wrap several times so the head will not catch on any wires or insulation. Back into the engine bay. Gently peel back the rubber rectangle grommet and pull the old cable up through the grommet until the new cable attached to the old cable is visible. Undo the new cable from the old. Push the old cable back through the grommet completely. Push the new cable through the open hole in the grommet. Push the grommet back into place on the firewall. Make sure to massage the edges well to get a good seal. Water DOES like to nest up there... Back inside. Attach the new cable/bracket assembly back to the bulkhead. The screw holes were very easy to find. Back outside. Feed the new cable following the route the old one took (Under the strut tower support plate, along the inner fender, UNDER the body grounding cable, UNDER the coolant resevoir feed tube and back through the hole in the core support) Be sure to put the protective grommet back around the cable BEFORE you attach the cable anchor to the latch assembly. With the anchor in the cradle of the latch, attach the latch to the core support. Replace screws to the cable shield. Finally, anchor cable to sheetmetal with the plastic retainers. DO THIS STEP LAST. Once the cable has the plastic anchors on, it becomes NEARLY impossible to slide the cable in the retainers. Test pull a few times checking for binding, lack of return or general badness (yeah, it's a word. ) BEFORE closing the hood. If all is good, close the hood to check for binding or excessive force. Grab a beer and enjoy the luxury of having a cable operated hood latch once again!
-
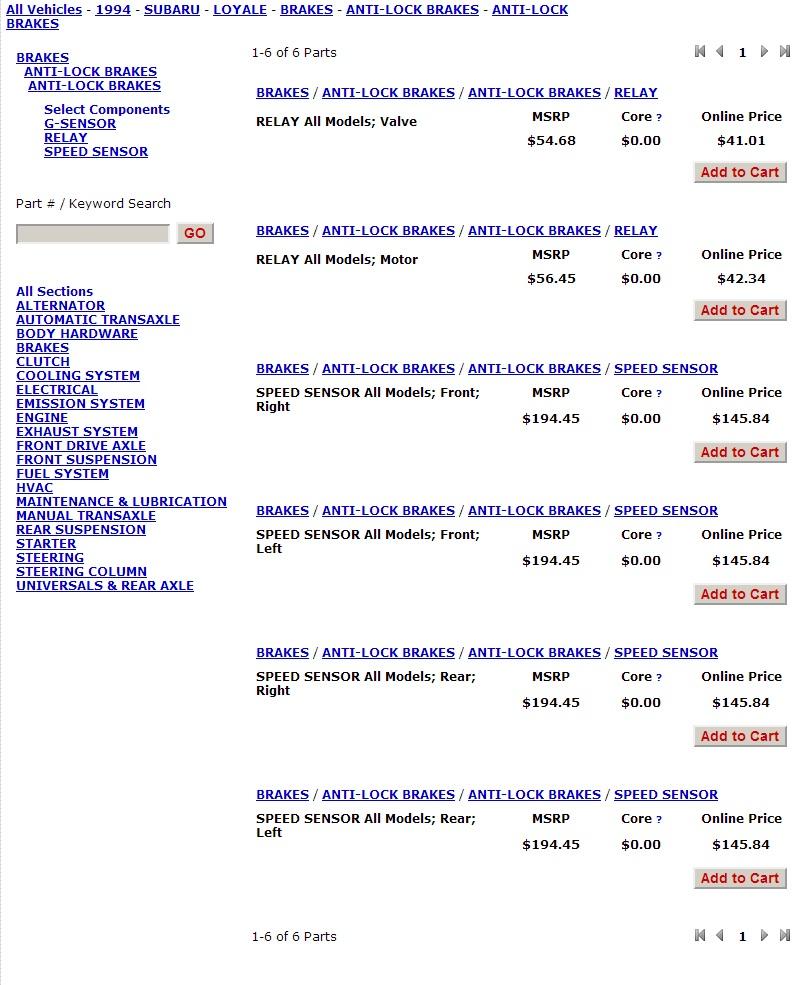
While pa-rusing around my dealer's online catalog, I decided to go into the 94 section looking to see if they listed thing there that my 91 didn't have listed.. And I found an ABS section. With subcategories of speed sensors, relays and G-sensors. What the what? I know the Legacy had an ABS option in 94, but when looking at the legacy parts in the same catalog, the part prices (no part numbers listed) were different implying different parts... Has ANYONE ever seen an ABS system on a Loyale before? And I went back into the 93 and below catalogs and the ABS line exists with the same parts... now, IDK where they would've put the sensors (Since the Impreza/Legacy spindles have provisions for them..) but...? Ideas?
-
Yeah, leave the 'FWD" fuse holder alone unless being towed or spare. And on the pass side, near the white vac canister near the firewall there will be a small black fuse holder (like the FWD one) labeled A/C. Make sure there is a fuse in there. Also, make sure the pressure switches are hooked up (near the radiator on the pass side) so the system knows when to cycle/not cycle. Also, you'll have the old R12 setup. Normal R134a equipment and refrigerent will NOT work. (You can use a hi/lo gauge set if you convert the ports over to R134a, but DO NOT put in R134a refrigerant.)
-
-
Yep, has got a small, Philips head screw opposite side (IIRC) of the rotor tip. Using a stuby helps and use a high quality one. Mine was REALLY in there (original), maybe even loc-tited in and you DO NOT want to strip that screw... Still have the 50+ shimmy/vibration... Thinking it might have to do with the sloppy inner CV (the cup-to-output stub with the roll pin, not the shaft-to-cup).. MUST fix that.. And eying a low mileage EJ20... but since some $)(*#)(% SAT on my hood while parked for a concert in Cleveland, I've now got a slight crease by the driver's headlight.. (Not that the hood was perfect, some dings and stuff, but rust free damnit!) I'm thinking an EJ22 (since I can snag one at the pull-a-part for 150) but with an M62 on top. And that middle part of the hood is in the way..
-
87 was a weird year for the distros IIRC (at least in the MPFI). There was a late and early Nippondenso and the HItachi styles.. Is that the original distro/motor in that car? The Nippon styles had the clip on cap and push-on rotor while the HItachi had the bolt on cap and push-on (with a set screw) rotor.. PICS!
-
IIRC, there is a sticker on the pass side bellhousing, just above the CV axle output spline with a model designation (TYxxxxxx) or something of that nature. Now, with the turbo there, IDk.. but it's there on my EA82 5MT.. And if it's from an RX, it'll full time 4wd so you'd just keep it in Hi for normal driving..
-
well, we all have pasts we can't escape.. and is the system still working/connected?
-
If the axles are the OEM, KEEP THEM (unless they are terribly worm, broken or otherwise unusable). Take it out, sterilize both axle sockets and grab new boots and fill with new grease. I grabbed Beck/Arnley boot kits as they are OE replacement styles (not the Dorman Uni-Fit or similar designs) as they are inner/outer specific, come with new moly grease for the balls/sockets and fit, work, and look great. However, IF you need a new axle, EMPI axles are the only ones that are close enough to the OEM and not cause problems/fail. Or you can grab OEM for 440 a piece. A torn boot SHOULDN'T cause your wobble problem.. I'd pop off the center cap and/or wheel and inspect for looseness in the hub. IF brake work has been done recently, sometimes the conical washer is installed wrong, the cone seat is warn or the axle nut needs to be retorqued. EDIT: you could also have a warn radius rod bushing (by the firewall/footwell) which will show under turning as the LCA will try to rotate with the wheel!
-
86 Wonder Wedge replied to dssenne's topic in 1990 to Present Legacy, Impreza, Outback, Forester, Baja, WRX&WrxSTI, SVXIf you want the BEST price (you can use auto on manual cars, you just won't hook-up the trans cooler) Rockauto.com 71.99, ~8 shipping. 90 day warr. Now, if you want some security in a warranty/known mfg, Vista-pro and Spectra do a nice job, ~84 with a 2 year warr on the spectra. Or if you want lifetime warr, AdvanceAutoParts.com has 15% off, free shipping @ 140 (without the 15%). I use rockauto.com for ALL my stuff (besides cheap maint items I get from OEM suppliers/online dealers). THEY have the best prices (95% of the time)
-
86 Wonder Wedge replied to legend01's topic in 1990 to Present Legacy, Impreza, Outback, Forester, Baja, WRX&WrxSTI, SVXHow's the intercooler? Fins all look good, no impact/rock/crap from scoop damage? Not wondering if intake gasket could be bad as well.. You can take a can of brake cleaner (I prefer a can of propane, like a torch of some sort, unignited of course) and lightly spray around hose connections, metal to metal connections, welds on the intercooler, ect and see it the idle picks up. If so, there's your vacuum leak. You could also try limiting the vacuum lines off the manifold by unplugging them and capping the manifold ports (go one by one) and watching the vac gauge. Also, you could have jumped a tooth on the belt and the belt stay in the new position on the cam. I've seen them do that several times (when people drive 2x the miles on an interval) and run like crap until they change the belt.
-
86 Wonder Wedge replied to gritle's topic in 1990 to Present Legacy, Impreza, Outback, Forester, Baja, WRX&WrxSTI, SVXAs he is a body man, his inability to decide which sensor is reasonable. However, with a CEL on, ANY auto part chain can plug in their OBDII scanner and retrieve the current codes for you. This code will tell you (if it IS a sensor and not a lean/rich code, EVAP or any other that are commonly blamed on a bad O2 sensor) which O2 sensor is bad. Also, (assuming you have a 2.5) there are only 2 sensors. One on the passenger side exhaust before the converter and another after the converter. Sensors 1 and 2, respectively. There will only be a "Bank 1". Since this problem was present before the accident, it is a safe bet that the wiring to the sensor is intact, but I have seen several that have had corroded sockets, frayed wires, ect.. so either you or your trusted mechanic should inspect those first. But chances are (if it throws an "O2 heater circuit" or "O2 unresponsive/unchanging" code) the sensor itself is bad, rockauto.com is THE best place to go for cheap, good stuff. I'd look for either a Denso or NTK replacement (NTK I BELIEVE is OEM on our cars). For your grinding noise, find a large, open (flat, deserted) area and do some large and tight circles in both directions maintaining a constant speed with the windows down and radio off. (May help to have a second person in the middle of the circle listening as well) Listen for the noise to get worse/better/different with the different directions. If so, you probably have bad bearing in the side OPPOSITE of your turning direction (puts higher load on outside bearing making it louder). Sometimes a bad bearing will also present itself as loose/wobbly wheel when that corner is lifter and shaken with hands at the 12 and 6, 3 and 9, and 10 and 4 positions. The bearing issue, depending on the wear, can become dangerous. If the bearing fails and separates, there is nothing but the CV axle holding your wheel on. And those don't generally hold on.
-
Good lord! That had some serious electricity moving through it... Besides it being a non-original link in the first place.. Before you fully power up that system, I'd run an ammeter across it to make sure you don't have a large short (and keep blowing links or worse...) And what's that large power wire in the upper left corner for?
-
Since it's an EA82, it should be the green and white/clear connectors by the fuel filter (engine bay, between firewall and driver's side strut tower). Connect the green ones and hit the ignition on, engine off and then count the long and short pulses from the small, red LED on the side of the computer (under the kick panel and steering column) will flash any codes the computer is throwing out. And short of it is, only the Subaru Select Monitor can read/test/ talk to the ECM on these... and being an 87, I think it has slightly different ECM/protocols than the 88-94 SPFI.
-
IIRC, I stuffed a cherry bomb/thrust glasspack on my 86XT (exhaust from an 88 turbo wagon) and the 2" ID glasspack fit PERFECTLY over the OEM pipe just before the muffler inlet. No adapter or anything needed. (I DID have to ghetto rig some hangers since I was too lazy to weld some rod steel for hangers.. some hole steel, two bolts and the rubber isolators worked pretty well! XD and it was just a 24hr Lemons car, so I felt less guilty about the poor hanger quality )
-
Somewhat OT, but did you/do you have an annoying (almost nasty) vibration/wheel shake at highway speeds? I do have the shaking problem and my original PS pump started to leak in the back and chirp (although the fluid never really dropped?) at 129K miles.. so I grabbed a like new, 86K mile unit with NO visible leaks or even wetness, and 1 week later, the chirping is back and now this one is wet around the back as well... I'm not wondering if there's a problem down stream, since I can't imagine that TWO copper gasketed pumps just start leaking... But, back to topic, my local Subaru dealer says since it's and Atsugi pump, you'll have to call them... and NO ONE sells/makes a rebuild kit for these things, let alone single parts..
-
The wiring can be bad as well at the IAC plug/harness (right there by the TB), that was my IAC problem. And it sounds like the ECM is trying to compensate/stabilize the idle.. Is/Was your A/C OR defrost on in that video? Does it make a difference if you hit the A/C or defrost? Does yours work/ do you have it still installed and hooked up? Also, check for corrosion in/around the coil terminals.. could be getting a bad tach signal to the ECM.. Also, have someone do a charging system test/alternator test to make sure the diodes are still good (little to no AC voltage ripple). "Pulsing" voltage can wreck havoc on the system, especially the MAF since it's wired right to the IGN circuit (not powered from the ECM) Or just trying unplugging the CTS, TPS and MAF sensors.. it'll still run, and should run pretty well (since it's "flying blind") or atleast more stable.