DaveT
Members
-
Joined
-
Last visited
Everything posted by DaveT
-
DaveT replied to pianobrooks's topic in 1990 to Present Legacy, Impreza, Outback, Forester, Baja, WRX&WrxSTI, SVXDouble check for leaks. Even a small hole cracked gasket will throw it off.
-
Not alternator. . Maybe grounding.
-
I think it was 90. I figured it's a 20 year part, why mess around?
-
I've only bought 1 new one, from a dealer.
-
DaveT replied to dierabbitdie's topic in 1990 to Present Legacy, Impreza, Outback, Forester, Baja, WRX&WrxSTI, SVXIs the paint intact, or cracked? If it looks like it cracked or chipped, you want to touch up.to keep.water out. Also, rust prevention like Waxoyle from the inside.
-
-
I would think one of those would go in flush. Maybe try to look in through the hole, to be sure it hasn't bottomed?
-
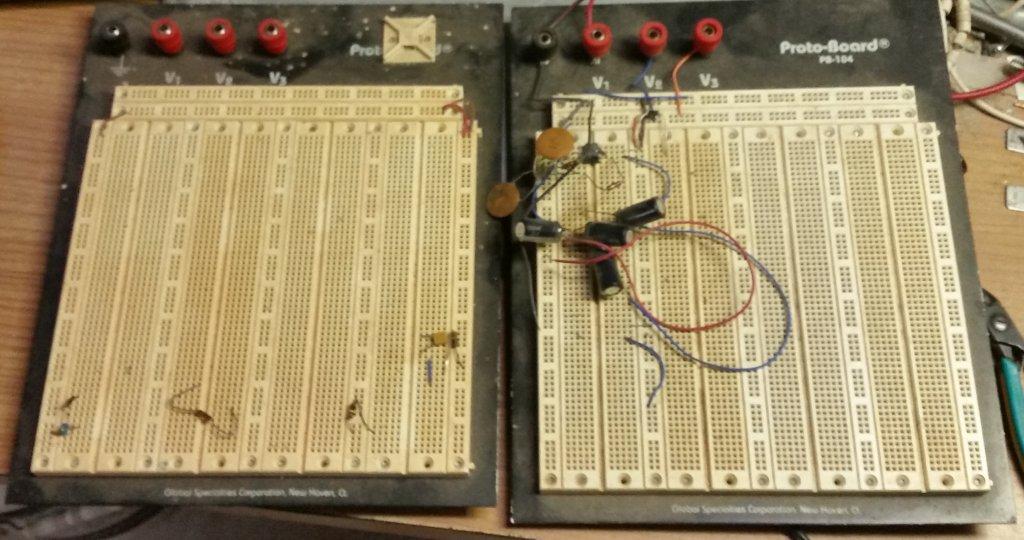
Traced out some of the power supply. +5V to run the CPU comes from the C of T1, the big transistor on it's own heat sink. IC10, the HA1835 is the regulator that drives T1, a 2SB566A PNP Bipolar transistor. Found the switched 12V input to the regulator. Still have to find the constant power feed.
-
The ones I've resealed, the seal face is pretty close to flush with the housing. I do know that some seals are made in different thicknesses, but it's hard to measure that now...
-
It looks like the CPU is in mode 1, if my thinking about the capacitors is correct. But this doesn't match the table 3 in the CPU data sheet, because the address and data are multiplexed from what I have traced so far. According to the wiring traced so far, it's mode 0,2,4, or 6. I can capture the state of those pins once we have determined all the GND & power wiring and I can power the thing up. Getting the logic analyzer close to the car is not very practical.
-
DaveT replied to Wizard's topic in 1990 to Present Legacy, Impreza, Outback, Forester, Baja, WRX&WrxSTI, SVXIf the engine isn't leaking don't touch the gaskets. I don't use anything but oem or Fel Pro for heads, and the others. As above, have space or boxes whatever to put parts in to keep related things together. Non interference refers to the arrangement of the internals. As in, if the timing belt broke, would pistons hit valves. Interference engines ,if the timing belt breaks, pistons hit valves and is very expensive to fix. Non interference, just replace the belt and idlers, and drive.
-
-
-
The buttons are vacuum valves. Vacuum actuators move the doors to rout the air. A lot easier to see when the heater box is out of the car, which unfortunately involves removing the dash. First thing is to see if you can get eyes on those, see if they move.
-
The mounting bolts might snap off. Anti seize the new ones. If you haven't used antisieze before, be aware that it lubes the bolts, and be careful of over toqueing. You're welcome.
-
Excellent. Yeah, those bleeder do that. Lots of anti seize compound, and the rubber cap helps for next time.
-
yes, that characteristic of typical replacement bolts annoys me also. It's the different convention used between Japan made metric and Europe made metric.
-
-
The RAM and EPROM - Address low byte and data are wired parallel. Address high byte also, except the EPROM has one more bit than the RAM. CPU pin 37 wires to IC6 74LS373 pin 8 D4 This is data bit 0. The Q from the latch IC6 is pin 9 This goes to the Address line A0 This makes sense, for a multiplexed address & data bus. It is like the micromint processor systems I've wired up. So port P3 [0-7] on the CPU is multiplexed Address low byte and data.
-
-
-
DaveT replied to idosubaru's topic in 1990 to Present Legacy, Impreza, Outback, Forester, Baja, WRX&WrxSTI, SVXYeah, it had its original exhaust also. I put my all stainless one on it. It weighs less and easier to move if needed for other work.
-
DaveT replied to idosubaru's topic in 1990 to Present Legacy, Impreza, Outback, Forester, Baja, WRX&WrxSTI, SVXProbably weather related. I got a car from California 2 years ago. Just replaced a ball joint a week or 2 ago. Everything just unscrewed and dissasembled. 23 year old car and the bolt still have the yellow zinc anodize on them. All coated with anti seize now, of course.
-
DaveT replied to MrB's topic in 1990 to Present Legacy, Impreza, Outback, Forester, Baja, WRX&WrxSTI, SVXProbably not o2 sensor. Maybe CTS. Maybe an intermittent wire or connection.
-