MR_Loyale
Members
-
Joined
-
Last visited
Everything posted by MR_Loyale
-
And chance you can get a video of it? Have someone else record while you reproduce it.
-
Can you always reproduce it or only on occassion? Does the speed with which you release the clutch affect of the noise happens or not?
-
Here is a diagram of how it is supposed to be setup:
-
Did you check both bolts, the one under the tire well and the one attached to the engine? They need to be really tight because this bar absorbs the initial torque when the engine engages the driveline. Is this a 4WD or FWD, Sedan or wagon? The transaxle also has mounting bolts. Check that they and the motor mount bolts are tight as well. Don't just look at the motor mounts, get under there with a wrench and see if you can snug up the nuts.
-
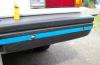
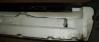
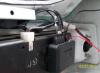
I had that same thing in my car after I put the engine back in following a removal for timing belts and seal refreash. There is a stabilizer bar that if not really tight will allow the engine to sway. Try tightening the bolts. You need to remove the tire from the engine bay as this bar sits under the tire. In the photo below it is the vertical bar running from under where the spare tire sits to the engine. Not to be confused with the horizontal black bar that supports the tire.
-
MR_Loyale replied to jellybean's topic in 1990 to Present Legacy, Impreza, Outback, Forester, Baja, WRX&WrxSTI, SVXI am no professional mechanic either. But I have had Jiffy Lube cross thread the filter. They have 50 cars to do in a day and must hurry hurry hurry. I have only one, my own. No need to hurry. Plus most of those folks working in the "pit" changing the oil were working Mcdonald's the day before and probably know next to nothing about what they are doing, just that they need to do it fast.
-
MR_Loyale replied to jellybean's topic in 1990 to Present Legacy, Impreza, Outback, Forester, Baja, WRX&WrxSTI, SVXI do my own oil changes now. After that experience I decided I couldn't do any worse.
-
-
MR_Loyale replied to TYLER R's topic in 1990 to Present Legacy, Impreza, Outback, Forester, Baja, WRX&WrxSTI, SVXHow do you test the thermostat?
-
MR_Loyale replied to jellybean's topic in 1990 to Present Legacy, Impreza, Outback, Forester, Baja, WRX&WrxSTI, SVXLeave you hanging with the rest of the song or the rest of how I had a dealership screw up an oil change? The rest of the song is online. I just thought that verse applied in this situation. My oil change fiasco was a Dodge dealer - Bremerton Dodge to be exact and as they are no longer in business, I see no reason to hold back. I have a 2002 Dodge Ram 1500 I bought spanky new in 2002. Not many miles on it as I only use it to haul the boat. At 12-15 MPG it could never be my daily driver. I think it was in 2004 or so I took it in for a routine oil change oh and asked for a locking gas cap as gas thefts were going big back then. About an hour later, they tell me the truck is ready and hand me the bill. I pay the cashier and go out to my truck. I start the engine and about 20 seconds later the engine stops and the check light comes on. It won't start again. I grab the manual out of the glove box and try to look upwhat the indicator meant. After about 5 minutes, I give up and walk back into the service desk. I tell the guy what has happened and he rolls his eyes as if he knows what the trouble might be. He walks out and immediately opens the hood of the truck and pulls the dip stick. Yeah, he KNEW what to look for because this had happened before. Keep in mind I didn't have more than 16K miles on this truck. He walked back into the shop and told me what it was. He tried to say there was low oil in the engine that they didn't put enough oil in it. Though I never checked it myself I suspect it was worse than that based upon his shocked look as if "oh crap, not again". Honestly, I was in shock, caught totally off guard that here in the dealership, the factory authorized annointed place where ALL work was to happen, they could make such a mistake as not added oil for a damn oil change (dang it I am getting pissed just writing about it again). All their ASE certs on the wall, Dodge certififcation and feel good posters that the "know" Dodge trucks because they are factory trained etc. So now my truck is in the small lot where they queue cars after the repair work is done. I'd say about 20 yards from the service bay. The service guy assures me he will fix it etc etc. So the next thing I know I see this probably about 17 yr old kid hop into the my truck (you know, the one with no oil) and DRIVE it into the service bay. Yup, you read that right. See why I am angry? I tell the service desk guy they are on the hook if I have ANY engine issues in the future and I want the computerized record annotated with the details of this incident. If it had been me that had done such a thing, who here doesn't think it would be the excuse to deny any and all future warranty service? So I get it back, and this time I check the dip stick. It has oil in there, the correct amount as far as I can tell. A few days later I get a call from the dealership asking "how did you like our service".. Not in a sorry we almost wrecked your engine with such a rookie mistake you might as well have changed your own oil sort of way, this was in a gee I think we did such a wonderful job we are just calling to confirm we are wonderful, sort of way. Ever see in cartoons where a character gets really mad and the steam puffs out of each ear? That was me at this moment. And like Yosemite Sam, I unloaded on them - both barels and then some. How any place on earth could be so incompetent and clueless just added to my anger. They offered me a free detailing to placate me. I told them I wouldn't trust them to check the tire pressure. A detailing might mean I'd get the truck back with holes in the paint as they'd probably try to "clean" it with paint stripper. In 2008 or so I think Bremerton Dodge went out of business. Needless to say I didn't shed a tear. Since then I have learned that dealership service shops tend to run on something called the "Team Concept" where the mechanics are indy hired guns that must supply their own tools and work more like contractors than employees. And the oil changes are done by minimum wage young dumb and full of cum pimply faced kids who wouldn't know a piston rod from a fishing rod. This explains why the service shop kid drove my truck without oil back into the bay to put in oil. He probablly had no idea why oil is important in an engine. Now for all those folks who are going to write that "anyone can make a mistake", yeah that is true. But if I am buying mistakes, I'd be better off paying jiffy lube goobers (don't get me going about how they cross thread the oil filters, my blood pressure is already high just retelling this story) to make them cheaper or perhaps Wal-Mart mistakes than pay dealership rates for my mistakes. I can hire a couple of illegals to make the mistakes cheaper than ASE certified, factory authorized mistake makers.
-
The most important thing is everyone is OK. Cars can be fixed easier than people. Please make sure your wife gets follow up even if she doesn't think it hurt.
-
If it isn't banging really bad, you can employ the factory supplied anti-ticking device. It will be in the middle of the dash.
- 21 replies
-
- Lifter Tick
- Lifter
- Tick
- Loyale
-
Tagged with:
-
-
One super grande mocha.
-
When is it this year?
-
The brake guy told me once he hated that hill holder becuse it is tricky getting the cable adjusted just right. But I was able to do it after I pulled the engine end put it back in. When the cable nut is adjusting wronge either the brakes bind slightly or do not engage correctly when you release the brake while holding the clutch. Once you get used to it though nothing beats this feature on a hill.
-
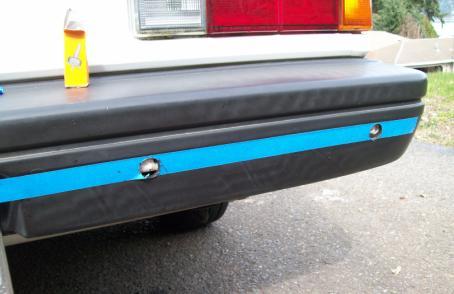
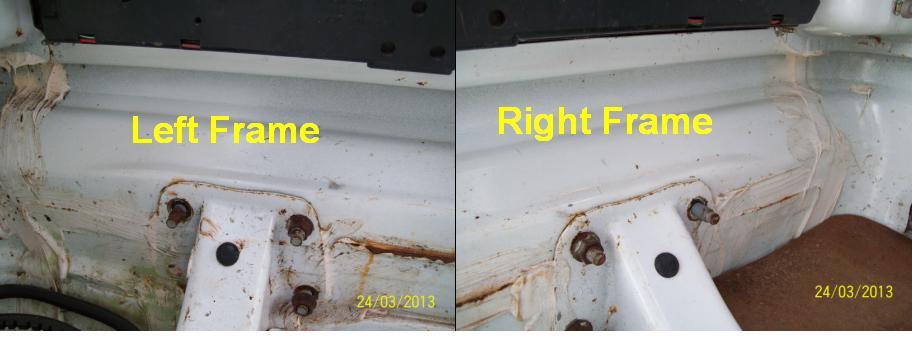
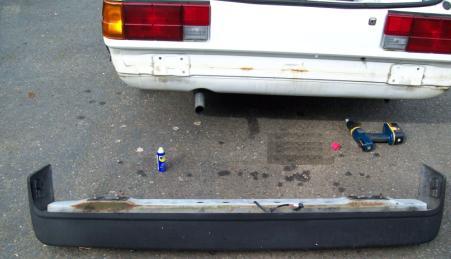
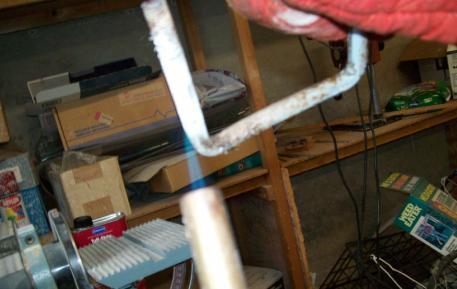
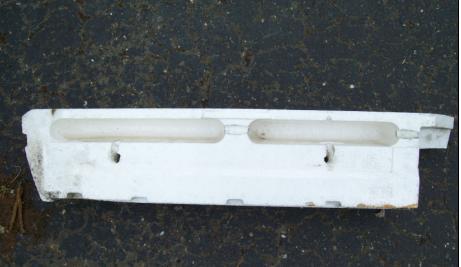
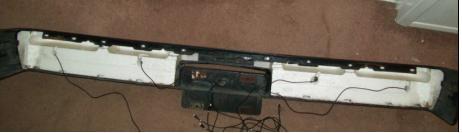
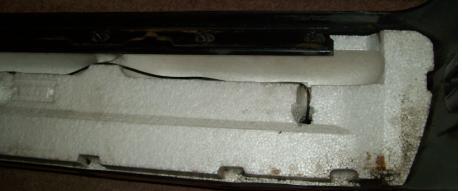
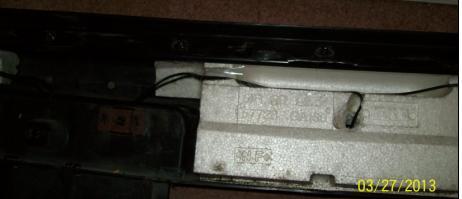
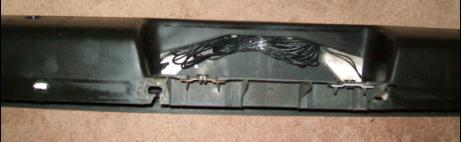
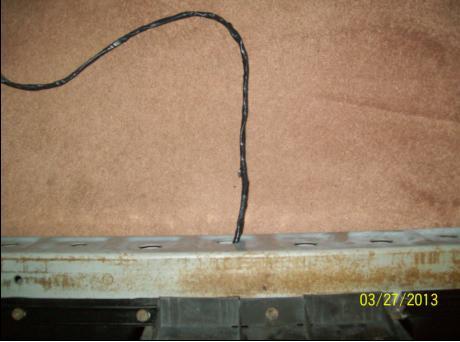
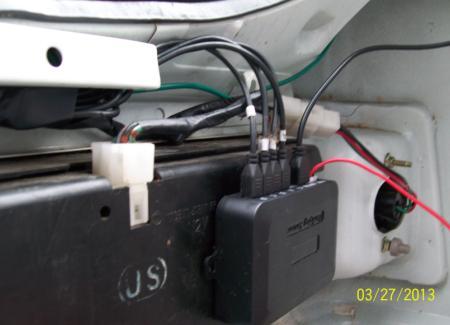
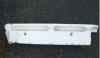
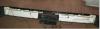
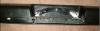
One way to tell is to come to a stop on an uphill. You will have the clutch pushed in and the brake pushed in, Hold the clutch in and release the brake while keeping the clutch held down. If you do not roll backwards, you have a hill holder. Basically the hill holder is an auxillary valve that holds the brake pressure until the clutch is released. Look at your master cylinder. If there is a hill holder, you will see what looks like a metal brake line going from the master cylinder to this hill holder valve and that valve will have a cable that connects to the clutch.Recently while researching backup cameras on Amazon, included in the search list was something called the XD-066 LED Display Car Reverse Backup Radar with 4 Parking Sensors. Intrigued, I clicked the link to learn more about this "backup radar". As it turns out, it is not radar at all, but rather sonar. Radar uses radio waves whereas sonar uses sound waves. The XD-066 Auto sonar uses ultrasonic sound waves via 40Khz transponders (four of them) embedded into the bumper to determine the distance of any object within 2.5 meters (8.2 ft) of the rear bumper. It is activated when the car is put into reverse and an obstruction is within the 8.2 ft (2.5 meter) maximum range. Then as you backup it displays the distance in .1 meter increments. It has a green, yellow, red progressive led display warning system that as you get closer to the object, it begins dinging the bell more rapidly the closer you get. In this way you get both visual and audio clues as to your distance from an object. Since I am planning on a backup camera in the future, a sonar giving the exact distance to an obstruction might be a good compliment to the backup camera. I already had my backseat out for other projects requiring hidden wire runs, so one more wasn't a big deal. And for 24 bucks (available for about $14 now), I could hardly go wrong if it was a dud. What You Get Installation diagram Video of Sonar in Action Drilling the Bumper This project requires you to drill holes in your bumper. Not just teensy holes but darn near quarter sized holes. If you are considering doing this project, you should think long and hard how you feel about holes being drilled in your bumper because once you start drilling, there is no going back. Oh sure, you could put some sort of filler in there, but it would look like hell. Once you have made the mental commitment to drill into your bumper, you need to plan out how to dril it. You don't need a special drill bit, just the one that comes with the kit. It will easily drill through the plastic bumper fascia and into the styrofoam. However unlike professional hole style bits that include vent holes for removing the material that gets stuck in the hole saw, this drill bit will require you to pry the material for each hole frequently as it is a shallow depth hole saw and not deep enough to go all the way through in a single pass. Before you drill, you want to layout where each of the four holes will go. They should be equidistant from the center of the bumper. First, layout masking tape across the bumper at the height you will be drilling. The instructions caution that the sensors should be positioned parallel to the ground so the face of each sensor sits at 90 degrees. You don't want any tilt in the sensors or they will be off in their measurements. Consult the included instructions for more information. On my bumper I chose just below the crease line because it is almost vertical and there is a good reference in the crease line so that it will layout level in the horizontal. The Horizontal spacing begins by finding the center of the bumper and marking that on the masking tape. Now you need to position the mark for one of the outer sensors. It should be around 4-6 inches from the end of the bumper so there is good coverage. Too far towards the center and you won't be able to detect objects near the edge of the bumper. Too close to the end of the bumper and you will always detect things on the side rear of the car. Once you have made the mark for one of the end sensors, the rest are easy. The other end sensor is placed at the same distance from the center as the first end sensor you just mark. Then the remaining two sensors are simply put at half that distance on each side of the center mark. Once you have the holes drilled, you will need to remove the bumper and disassemble in order to properly route the wires. This is because it is necessary to create channels in the styrofoam behind the plastic of the bumper. Disconnect the license plate light wire from the connector inside the sedan trunk. Pull the grommet and wire out of the trunk gently so you don't damage the wire. Then remove the three bolts on the left and right side frame mounts that hold the bumper on as shown: Slide the bumper back off the car. It might be helpful to have someone else help you with this. Disassemble the bumper by removing the two screws holding on the lamp assembly (5 in fig 1). Remove screws on the lower holder (6 in fig 1). Remove nuts on the upper holder (2 in fig 1). Remove the rear beam (1 in fig 1). Lift the lip holding the upper holder against the E/A forms and lift them out. Figure 1. Loyale Sedan Rear Bumper You need to create channels in the E/A form (styrofoam halves) so the wires are not pinching on the rear beam. I used a U bolt that I heated with a propane torch and then pushed into the styrofoam as if branding them. Create channels that guide the wires towards the center of the bumper. Mount the E/A form back to the bumper face and tuck it under the upper holder to keep it in place. feed the sensors through the bumper face and route the wires into the chanels you create. Tape over the channels to keep the sensor wires from getting pinched when mounting the beam. Gather the wires and tuck away under license plate mount to keep them from being pinched. Mount the beam and run sensor wires through hole in beam where the lamp assembly wire was routed. Tape the sensor wires using electrical tape to keep them together. Mount the lamp assembly and mount the bumper on the car. You will need someplace to pass the sensor wires into the trunk. I used the trunk key hole drip tube grommet. I slit it on one side to allow fitting around the sensor wires for a nice seal. Mount The Display In the instructions they give you two options for the tiny half moon digital distance display - one the dash and on the rear view mirror. I chose the mirror. Decide where you want the display mounted and then run the wire to back end of the car under the door jamb trim panels. Mount The Control Unit All of the cords, the display, power and four sensor wires connect to the control unit. Figure out where you will mount the control unit. Because I ran my wires down the left jamb, I placed mine on the back of the left backup light housing as shown below: Connect Power Power consists of a ground and the reverse light connection. If you are not sure which wire is the reverse light wire, then use a test light on the wires. Testing Now try it out by putting the car in reverse. You should see the display light up, If the car is within 8.2 ft of something, a number will display along with the appropriate bar graph and chime alarm sounds. As you gradually get closer, you will see the digital number decrease, the dinging rate increases the closer you get to the object. I have found zero to leave me about 3 inches from an object. Installation Videos


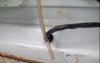
 MR_Loyale replied to jellybean's topic in 1990 to Present Legacy, Impreza, Outback, Forester, Baja, WRX&WrxSTI, SVXIf it is any consolation, even a dealer can screw up an oil change. Had this happen to me. Got it back with no oil in the engine. The negative experience is as much a lesson as the positive ones. Half my life's in book's written pages Live and learn from fools and from sages You know it's true ...I saw one just like yours today on first ave heading up marion. I liked it. Congrats.That's only if it is in gear.Wow. I would never have thought of a battery cable going bad like that! Thanks for sharing. Looks like another thing to note in a checklist if I ever experience something like that.MR_Loyale replied to Subie_Doo's topic in 1990 to Present Legacy, Impreza, Outback, Forester, Baja, WRX&WrxSTI, SVXCall a transmission repair shop and ask them how it should behave in park.Sorry dude, you are incorrect. BRZ are frameless: