Search the Community
Showing results for tags 'loyale'.
-
 In an effort to eliminate my TOD for good, i'm gonna swap out my oil pump, so i'm looking for a new one, but haven't found any that aren't priced very reasonably online. hoping to get some tips one tracking down one directly. and if i'm gonna be in there doing the oil pump, might as well do the water pump while i'm at it. they seem a lot cheaper than the oil pump, but if anyone has suggestions or a line on a water pump, i'd be very happy to know. thanks much!
 -
 Well, the dreaded happened the other day. I went to go check the fluids and this is what I ended up with! So I ordered the new cable online (Park Suabru, ordered it Sun night and arrived Tuesday morn. $14.23. :rock: ) Hood Release Cable, part number 57331GA122 But there was a major problem. How the *%&^ do I open the hood w/o destroying the grille, hood or other stuff. (If your hood is open, then skip ahead to the cable replacement part) Well, for those of us with large hands, an A/C condenser or want to just make it easy, the ever useful slim-jim to the rescue! It was as if this tool was made for this job.. Available at ANY auto parts stores, can be had for around 7 bucks and has helped me and MANY stranded people. (Disclaimer: Never use this tool for malicious use. With a great tool comes great responsibility) Coming from up under the bumper using the notched spade-head side (not the fishtail side), on the driver's side, in front of the A/C condenser, angle the slim-jim at a ~45 degree angle and starting just below the assembly, slide up behind the latch mechanism. Now while flexing the tool toward the grille and dragging it outward toward the headlight, you should feel it catch. This is the latch release. Continue to pull the tool horizontally (toward the headlight, not down toward the marker light/ground) until the hood releases. Viola! Here are some images once I felt the slim-jim catch the release lever. (grille removed for clarity) Under car, looking up. Now that the hood is open, we can get to work! So I started by releasing the 4 plastic anchor clips that hold the cable to the inner fender and core support. Remove the 3 bolts that hold the latch to the core support (you will need to do this if part of the cable is still attached AND to hook the new anchor into the mechanism when installing the new cable) backside with the cable anchor attached Remove the 2 screws holding the cable shield to the latch and the core support. (Set aside the latch) Near the cable end, remove the tear-drop bracket attached to the old cable (you will need to re-use this). Be gentle, it will butterfly apart and then set aside. With patience, work the cable through the pass-through in the core support, around the battery and under the strut tower support plate. Now feed the old cable through the rubber grommet on the driver's side firewall until approx 6-8" are left in the engine bay. Move to the inside. Using a phillips screwdriver, Undo the 2 screws holding the hood release cable bracket to the bulkhead. Once free, take the head of the new cable and tape to the old cable. Wrap several times so the head will not catch on any wires or insulation. Back into the engine bay. Gently peel back the rubber rectangle grommet and pull the old cable up through the grommet until the new cable attached to the old cable is visible. Undo the new cable from the old. Push the old cable back through the grommet completely. Push the new cable through the open hole in the grommet. Push the grommet back into place on the firewall. Make sure to massage the edges well to get a good seal. Water DOES like to nest up there... Back inside. Attach the new cable/bracket assembly back to the bulkhead. The screw holes were very easy to find. Back outside. Feed the new cable following the route the old one took (Under the strut tower support plate, along the inner fender, UNDER the body grounding cable, UNDER the coolant resevoir feed tube and back through the hole in the core support) Be sure to put the protective grommet back around the cable BEFORE you attach the cable anchor to the latch assembly. With the anchor in the cradle of the latch, attach the latch to the core support. Replace screws to the cable shield. Finally, anchor cable to sheetmetal with the plastic retainers. DO THIS STEP LAST. Once the cable has the plastic anchors on, it becomes NEARLY impossible to slide the cable in the retainers. Test pull a few times checking for binding, lack of return or general badness (yeah, it's a word. ) BEFORE closing the hood. If all is good, close the hood to check for binding or excessive force. Grab a beer and enjoy the luxury of having a cable operated hood latch once again!
 -
trying to eliminate my TOD (tick of death) or lifter tick and looking into maybe just making some adjustments along w/ using a heavier weight oil along with an oil treatment, but not sure i can make those changes if the rocker-arms are hydraulic. it would seem that based on the relative simplicity of the Loyale's engine, they'd be solid, but not sure. anyone got a firm answer for me? thanks much, Glen

-
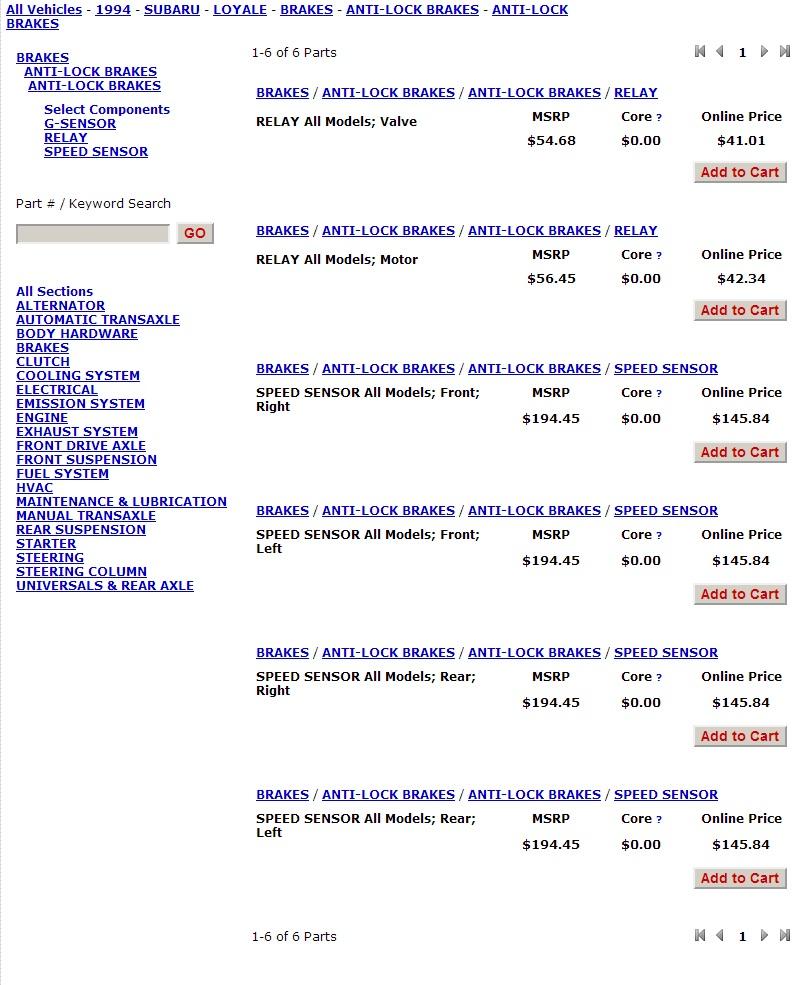
While pa-rusing around my dealer's online catalog, I decided to go into the 94 section looking to see if they listed thing there that my 91 didn't have listed.. And I found an ABS section. With subcategories of speed sensors, relays and G-sensors. What the what? I know the Legacy had an ABS option in 94, but when looking at the legacy parts in the same catalog, the part prices (no part numbers listed) were different implying different parts... Has ANYONE ever seen an ABS system on a Loyale before? And I went back into the 93 and below catalogs and the ABS line exists with the same parts... now, IDK where they would've put the sensors (Since the Impreza/Legacy spindles have provisions for them..) but...? Ideas?
-
I have been looking around and can't find specific photo's with steel bumpers being fabricated? Any ideas.
-
Hi there, I'm trying to replace the rear taillight lens on the driver side of my 92 Loyale and I cannot figure out how to remove the lens. I removed the two 8 mm nuts on the bolts that extend into the compartment you access to change the bulbs, but the lens doesn't budge. Can anyone tell me how to do this please? Thanks in advance!
-
Trying to assess my current '94 Loyale / 3AT situation, concerning the ticking sound which accompanies the generally rough sounding idle. Not a knocking but a tick, which i've been told is commonly referred to as "Lifter-Tick" or "the Tick of Death", and can be caused by a few different things. I'm getting help from another USMB member and fellow Loyale owner, @175eya, who said he eliminated his by swapping out his oil pump, but don't quote me on that, i think there was more to it than that. I've also heard simply using a particular type of oil treatment, not sure off the top of my head which one, and then using a heavier weight oil will more temporarily solve the problem. additionally, it's been suggested the valve covers need to be adjusted. i can live with the noise, but i'm looking to increase the performance of my little 90hp engine and more importantly, help save it from any potential damage i'm currently doing to it buy continuing to drive it while it's ticking. even being able to get it up to 70mph at 42k RPM, rather than 65 at the same RPM would make highway driving better, and i'm hoping that solving the ticking issue could help w/ that. thoughts? thanks, the generosity of knowledge and expertise i've experienced here on the USMB already has fantastic and i'm truly grateful.
-
To make a long story short my uncle towed it in over a timing belt. They let him have it, cheap. And i got it for the scrap from a very worn ouT XT. one belt and a quart ATF (to stop the ticking), and I have a new daily driver.
-
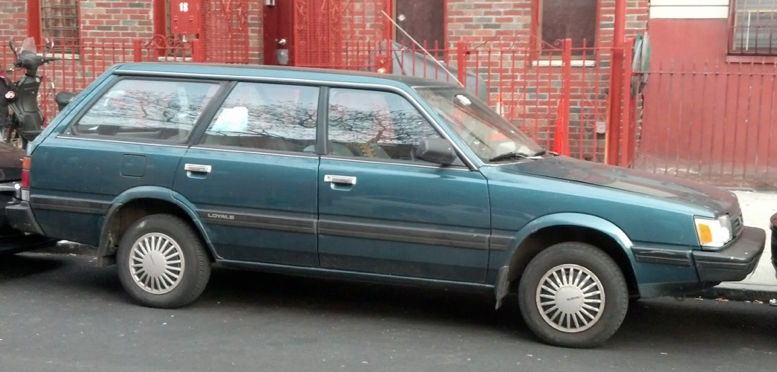
Hello, My name is Nick and I am the proud owner of a 1994 Subaru Loyale wagon. I'm relatively new to the older Subaru scene. I've owned this car for about 3 months now and I'm loving it. It is a 1.8L with a single range 4WD transmission. ~175k miles and running strong. Not much done to it other than: Roof rack (roof basket coming soon), plasti-dip racing stripe, painted steelies, and a kick rump roast sub in the back. Plans for Tint and a 2 inch lift in the future. Just saying hello (:
-
the "Low Brake Fluid" dash indicator light started coming on, i filled it the first time, was fine for a few days, then it came on again, but the fluid in the reservoir was right between "Full" and "Low", and taking on and off the cap of the reservoir temporarily turned off the dash light. when it came on again, i made sure to fill it up completely again. then the next day, i noticed when driving, the brakes were getting softer, requiring very little pressure to push the pedal down about halfway, then eventually all the way down before the car would actually brake enough to come to a stop. i think my first concern was maybe something got into the reservoir when opening and closing it so many times and it clogged the line somewhere, but after talking to a few folks, the thought maybe some air got in and i should just bleed them completely and refill. from what of know, this car sat for probably 7 or 8 years before a got it a little over a month ago. up to this point, the brakes were working, despite the rhythmic shudder which was relative to the speed of the car when braking, like you'd experience on a bicycle if there was a bubble or bum somewhere on one of your tires. this seems more of a fluid pressure issue. the timing belt failed about 2 weeks ago and was not cheap to have fixed and definitely outta my league, as far as doing the work so i'd really like to fix this problem myself because i think i might be within my ability and resources. suggestions? i'm not giving up on it yet, but it's beginning to make me wonder if it's worth keeping for anything other than that fact the body's in good shape. did i mention sometimes it likes to not start? i mean i turn the key, there's a click, and dash lights go on, but that's it, nothing else. sometimes it only take a few tries and it starts up, but sometimes seems like it takes a bunch of tries, then leaving and coming back to it. i haven't had to jump it yet, but i've started carrying around a booster just in case. that's a whole other issue, i'm more concerned with my brakes, considering the safety aspect. very much appreciate, thank you
-
 Hi all, I've been searching this morning on information regarding the charcoal canister. Anything that I've come across dealing with this, only pertains to 2.2-2.5 swaps.. The Legacy donor vehicle had hit a deer, so the passenger fender/radiator/light/charcoal canister were destroyed. I have the EJ in the Loyale now, and I'm wondering how to correctly hook up the Loyale's canister to the EJ motor. Is this possible? I believe I connected the two (available) EJ lines correctly. But there is the third line off of the cannister that I'm not sure where to hook up. It says VC I believe. My next question is about hooking up an EA temp sender unit, and a fan relay together... I will be hooking up two 10" fans to my brand new EA82 single row radiator. It is identical to the old one that I pulled out. There is a port on the side, that I believe I can put in some type of temperature sensor in... On to the subject... I will be using the EA temp sender so that I can keep the gauge working. I also will be using a 30amp relay/circuit/switch system to operate my fans. I do not want to make a sleeve for the sender, then to put it in-line with the upper radiator hose. My idea is to make a T-adapter that can be used in that radiator port. Any reservations? I was thinking of getting a small length (maybe 1/2" long) of threaded pipe (to the size of the hole..) then attaching that to a T of some sort that I can put in the temp sender for the gauge, and one for the fan sensor... That might not make any sense, my brain is firing sparatically from all the coffee... This is similar to what I'll be using for the fan relay... Any thoughts would be great! Thanks, Greg
 -
OK so i have a 1992 subaru loyale 5sp w/4wd and the clutch is having issues and i have ordered a new clutch, my problem is i think i ordered a clutch for a 2wd and not a 4wd, so will it work in it or did i just screw up and need to return it after i get it?
-
Just finished up some engine swapping and have an extra EA82 engine and a lot of engine parts. Including: - Short block 100$ OBO (NOT rebuilt. about 150k miles, cylinders are clean almost no ridge, was running, doesn't even need rebuild - just put back together) - Heads 25$ each OBO (needs valve job) - Long block 140$ OBO - Oil pump - Water pump - All pulleys - Valve covers - Some timing belt covers and the tensioners - Flywheel - Oil pan -Engine mounts - Ask if you don't see the part you're looking for, I may have it NO -Alternator - Intake manifold - Carburetor - Transmission - Radiator - Power steering - AC - Distributor email chasewell@gmail.com I can give you pictures or more history or information about any of these parts. Suggest a price for the little stuff if you are interested, let me know if you want the engine for a different price and we will discuss (via email)
-
The Ignition Module is the Electronic Part that Substituted the Points inside the Distribuitor; it usually consist in two parts: One Pick up the Signal and the other sends the Pulses to the Ignition Coil. How you Test an Ignition Module? This Test was Done with the Nippon Denso Distribuitor, from a Carburated EA82 Subaru Engine, from the 2WD version; but this test is pretty Standard. This is the Nippon Denso Distribuitor, without its Cap, so you can see its Interior: The Red Part is the Rotor, while the Two Black plastic covers under it, hides the Two Parts that conforms the Ignition Module, they only have two Wires Between them and other two wires that goes outside from one of them, to the Ignition Coil. To do the Test, You'll Need: - A Good 12V Battery and Jumper Wires to use its Power. - The Distribuitor with its Rotor & Ignition Module inside. - The Ignition Coil. - A Sparkplug's Wire. - A Sparkplug. The Distribuitor has two Wires that comes from the Ignition Module, one is Black with White Stripe, this is the Positive (+) while the Yellow one is the Ground (-) or Negative one. The Easy Test Procedure goes as Follows: If you Turn Manually the Distribuitor's Gear under it, Two things Might Happens: ► Sparks on the Sparkplug = Means a Good Ignition Module. ► No Sparks on the Sparkplug = Means a Dead Ignition Module. But you MUST Double Check that you have done Right the Connections. I Hope this can Help. Kind Regards.
- 1 reply
-
- 3
-

-
- Loyale 2.7 Turbo
- Loyale
- (and 6 more)
-
 Suspension Improvements For the third Gen Subaru Leone (also known as: DL, GL, GL-10, RX, RS, GT, GTi, ST, Omega, Winner, Loyale Royale, Vortex and even as Isuzu Gemminett II, depending on the Market, but here will be referred to, as the "EA82" for easy reference.) However, since the Second Gen Subaru Leone (EA81 / Brat) uses the same diameter and tall coil springs on the Front, being different on their spring rate and load rates only; you can use the third gen Leone's (EA82) coil springs on the second gen Leones (EA81), also you can use the Alternative coil springs from another automotive makes, which I mention here, on the second gen Leones, but their suspension could get way too stiff and might need a small cut off on the coil spring's wire, to work. Remember: going too weak or too stiff on the suspension on any car, could make you loose control of it, mainly on irregular terrains, so this could be Dangerous if you don't know what you're doing. Disclaimer: Use this information, and All the information I post, at your own Risk! Introduction: Please note that this writeup is intended to give you ideas to make stronger the Suspension, intended for rude use / offroad \ heavy loads; it gains a Sporty feeling, but the suspension could become harder, Stiffer. The modifications written here, has been tested with great results on the third gen Leone (EA82) Wagon only. My dad purchased this 1985 Subaru Wagon EA82 new that year; I've done regular maintenance and lots of repairs on it since then; when this subie became mine, I did many modifications and named it: the "BumbleBeast" I've Been part of this Great Club since year 2001 and I've Learned a Lot (mainly here, in this Awesome Website) about how to fix and improve many Things, but I personally have Discovered by myself, many other things about those older subie Models, things which I've Shared here with you, like the following suspension ideas... Let's begin! In this Writeup: ► Shock Absorbers and Coil Springs. ► Alternative ones from non-Subaru cars. ► Their part numbers. ► Photos. First Part: modifying the Suspension with other cars' Parts: About The REAR Suspension: In my own humble opinion, the subaru's weakest suspension part is the Rear shock absorbers; no matter how careful I drive, if I hit a pothole with some Load on the car, is almost sure that a Rear shock absorber will say Good Bye... Those are somehow, the "Achilles Heel" of the Subie: The trail arms, of the front wheel drive (2WD) Subarus, have a different mounting point (perch) for the Shock Absorbers than their four wheel drive (AWD) counterparts, as you can see in the following photos: The 2WD ones mounts the shock absorbers in the position where normally goes the constant velocity joint (Axle)... ...while 4WD ones have the said mounting point, raised, two inches higher on their trail arms, to let the axle pass. So, Subaru made two different Rear Shock Absorbers for the EA82: The Front wheel drive (2WD) Models' Shock Absorbers, has the base plate for the coil spring, welded to their bodies, two inches (2") Higher than the four wheel drive (AWD) ones, to compensate the lower mounting point (perch) on the trail arm; and both models use Same Coil Spring. 2WD .Vs. 4WD ► Using a 2WD shock absorber, on a 4WD subie, will lift the rear, due to the Higher position of the Coil spring's base. Then Subaru Suddenly changed the Production of those two, for one "Universal" Rear Shock absorber, which featured Adjustable Base for the Coil Springs, so you can place said base Up or Down (2" of Difference) and also included a "Middle" (1") Position; Despite the Coil Spring's Base position, the Total damper travel of those "Universal" Subaru Rear Shock absorbers, is 160 mm / 6.3" inches. Here is a Photo of said "Universal" Rear Shock Absorber, with Part Number and KYB equivalence: The Subaru Part Number for the Spring Coil's Base (seat) is: 21025GA230 But those Rear Shock Absorbers are Still Weak to handle our Horrid Roads, plenty of Potholes -and even Potholes inside the Potholes- with my Loaded Subaru "BumbleBeast", especially during my Usual offroad Weekend Mountain Travels; and I wanted my Subie to be Taller without a Lift kit in the Rear. Chapter 1: How to Improve the Rear Suspension: First I Needed Stronger Coil Springs for the Rear of my Wagon, because Usually I Travel with it Fully Loaded and many people in our very Bad Roads; also I do many Weekend "Mountain Adventure" Family Travels offroading; so, let me explain my own Method for searching and finding suitable replacements: I took off one of the Old Rear coil springs in order to take measurements of it with my vernier scale (Caliper Tool known here as "Pie de Rey" = King's Foot), and then I carried it as a Sample for comparison purposes, to the local Junk Yards; then I searched, and searched for suitable replacements, among piles of coil springs and strut assemblies, found on many different local Junk Yards, called here "Yonkers" as you can see in the following photo: Honduran “Yonkers” are different from the regular “PaP” (pull a Part) or any other USA version of a Junk Yard; they receive the cars and disassemble everything; sending the unuseful things such like crashed metallic bodies and cracked plastics to the Recyclers; and then they classifies everything in “Areas” so, you can find in a Latin American “Yónker”, one area dedicated solely to Doors, other area dedicated to Engines, other areas for Starters, Alternators, Seats, Headlamps, Struts, Mirrors, Transmissions, etc, etc, etc, let me share with you a photo of a typical Latin American “Yonker” (Junk Yard): I went there carrying my Vernier Scale and made annotations of the Measurements found on the Coil Springs that could be suitable replacements; then I came home, contrasted those measurements and researched online further information regarding those coil springs that I found to be as possible candidates; because they don't only need to have similar size and shapes; they must be of similar capabilities. The variables that I compare, are their Measurements, Spring Rates, Load Rates and Wire Diameters, to find the perfect ones for the application. I wanted taller coil springs with similar diameter and shape, but with increased load rate / spring rate, under certain margin, because you can not go too stiff nor too soft on them, otherwise the stability and safety of the car would get compromised. So after many search and research, I found that the Subie's Rear Coil Springs are almost the Same Size, Tall and Wide than the Honda Accord's Front Coil Springs (1986 ~ 1989) but the Honda ones have Thicker wire and it has Two More Turns than the Subie ones; so I Swapped the Rear Subaru Coil Springs with the Honda Front ones; it Makes the Subie More Capable to Manage the extra Weight when is Loaded, without going too low; also the Honda's Coil Springs does Lift the Subaru's Rear in two inches (2") and its Movement & Handling while Driving in Unpavemented Roads / Pot Holes, becomes Firmer and Sportier. So they gets rid from the Bouncing and Saggy Butt. The Front Honda's Coil Springs that Fits on the Subaru's Rear, came from the 1986 ~ 1989 Honda Accord, (The Prelude from that Era has them too) it could come either from the Manual or Automatic, With or Without A/C, but Keep in mind that the Hondas with manual trans and without AC, does have weaker Coil Springs than the Hondas with Auto Trans and A/C, so I chose the Stiffer ones. The Part Number for the Honda's Coil Springs, is: ~► MOOG CC248 for "Moog" Brand. ~► NCP 2775298 for "Napa" Brand. So, How to get Rid of those weak Rear Shock Absorbers? My Subie was in dire need of Stronger Rear Shock Absorbers, so after Searchin' and Researchin' a Lot using "my own method" that I explained above, I Found This permanent and simple Solution: To Swap the Toyota 4Runner's Front Shock Absorbers in the Place of the Subaru's Rear ones! (Despite that this two photos says: "Subaru 4WD" the shock absorber shown on them, are "Subaru 2WD" the ones with taller spring perch. Sorry, that was an involuntary mistake while editing the photos on a hard day's late night...) As you can See in these Photos, the Toyota ones has the Same extended Tallness than the Subaru Ones; Also the Toyota ones has the Same Wide Base for the Coil Spring and they use almost the Same Design; But the Toyota Ones are Thicker and Heavier, have a thicker bar, they're more Capable to manage the Stress of Riding in my Crazy Country Roads, especially for offroading with a Fully Loaded Subaru Wagon. (Subaru 2WD shock absorbers shown on this photo) The Subie Ones had their Threaded top of Nº 10 mm and the Hole opening on their Base is for a Nº 10 mm Screw; While the 4Runner ones has them Nº 12 mm Screws; So the Subie's Nut on the Base for Nº 10 mm Screw had to be Removed in order to Use a Pass-Thru Nº 12 mm Screw with its own Nut and locking washer. The Subie's Part for the Shock Absorber's Top shall be Modified too, in order to Accept the Nº 12 mm Screw Size instead the Older Nº 10 mm One, I Just made the Hole Larger; pretty easy! For Those who want the 4Runner's Shock Absorber Part Number, it is: ~► KYB 341232 in KYB (Kayaba) Japanese Brand The salesman from the Aftermarket parts store where I purchased those KYB 341232 Shock absorbers, said that those are for the Front of a Toyota 4Runner for the 1998 model year; However, Toyota used the same platform and shared these shock absorbers in the Hi-Lux Surf, and the Land Cruiser Prado / Colorado (J90) Which is a very Popular car here, in LADM (Latin American Domestic Market). The Following is a Screen Caption of a website that I Saved long time ago, where you can find the Original Toyota's Part Numbers for their OEM Shock Absorbers... According to online databases, it does interchange with: ~► Monroe D8344 ~► Sachs 230631 ~► BOGE 27-D67-A I Tested the KYB 341232 only, any other Toyota Shock Absorber could be "Visually" Identical, but might have some differences, such like even shorter travel, Harder ride, Thicker Body, etc ... So I Kindly suggest you to Stick to the KYB Part Number I Provided, I can not guarantee to work the other ones... My Subaru "BumbleBeast" Runs very well with that Setup: Toyota Shock Absorbers + Honda Coil Springs in the Rear, since many, many years ago... ...despite that they has only 4.3" of total damper Travel. (as I wrote above, the Subaru rear Shock Absorbers has 6.3") But that shorter travel is not an issue, because the Coil Springs won't let it go down more than 4" under compression, and the total expanded -extended- lenght is Equal to the Subaru's ones, as you can see in the photos above. In case you need to do a Rear Alignment on these Subaru Models, here is the Factory Guide about how to do that: ► IMPORTANT NOTE: You can use the 4Runner's shocks along with the subaru coil springs, to keep the original height of the suspension. If you use the Honda coil springs, the rear suspension will be lifted two inches (2"), stressing the angle of the rear axles in 4WD (AWD) models only. (You might drop the rear differential a little to compensate the lift) The 2WD (FWD) models doesn't have any problem with that configuration. ► LEVELING ISSUE: Since Those front Honda Coil Springs does Lift the Subaru's Rear two inches (2"); after that Swap, I had to Lift the front of my "BumbleBeast" an equal amount to compensate, using lift blocks, as you can read the complete information and see many photos about that, ~► Here, but also, below you'll see a photo of said lift blocks already installed. About The FRONT Suspension: The 4WD (AWD) Shock Absorbers has a 5.75" / 147 mm in Total damper travel, While 2WD (FWD) Shock Absorbers has a 6.12" / 155 mm in Total damper travel. Since I couldn't find any 2WD (FWD) Shock absorbers locally, I installed into my "BumbleBeast", new Monroe Front Shock Absorbers for the XT; this are their part Numbers: Passenger Side: ~► 71876 .................Driver Side: ~► 71877 Chapter 2: How to Improve the Front Suspension: Next, I wanted to install Firmer Coil Springs for the Front of my Subaru, as I already did on the Rear, to have equal balance of handling and sportier feeling (Harder / sportier Suspension). Initially, I searched for stiffer Coil Springs for the Front of this models of Subaru, on year 1999; Because my 2.7 Wagon (now dead) Project, had the Heavyweighed ER27 engine, plus a Fiberglass & Metal sheet Reinforced Front Bumper; I Needed Something Stronger than the EA82's coil Springs to better carry that extra weight. So, using "my own method" which I described with details above; I Found that a suitable replacement are the front coil springs from a Ford Tempo; which looked pretty similar to the Subaru ones, but having around two more Turns and a thicker wire. I found those Tempo Coil springs on year 1999, already taken outside their car; (they only had a Mark done with white paint marker on them, that said: '94 Tempo) and originally I used them on my Loyale 2.7 wagon project; but since it is dead (More info, ~► Here) I decided to remove certain parts from it to make my EA82 Weberized Wagon (Now renamed as the BumbleBeast) a Better car, with the Better parts from the two; including the front Tempo coil Springs. So, I installed those Tempo's Coil Springs on the front of my "BumbleBeast" and those add to the Front Suspension the Same Firm & Sporty Feeling that the Rear suspension obtained with the Above written Modifications. ► IMPORTANT NOTE: The Ford Tempo Coil Spring's total radius -diameter- is Half inch (½") smaller than the Subaru ones, but that is Not a problem, I Drive my Subaru "BumbleBeast" with them since Years ago and they doesn't "Shift" nor make any clunk noise. Somehow these front coil springs from the Ford Tempo, aids to keep the Camber / alignment within specs; other coil springs that has been tested on the front of these Subarus, makes the camber to be even Worse... Further information on the subject, photos and even a Video can be found, ~► Here. (thank you Bryan Dudas / Subaru Adventures \ Anderson Design and Fabrication, for your kind words) According to the info I obtained back then from the Junk Yard's salesman, the Front coil Springs came off a basic 1990's "Second Gen" Ford Tempo with in-line 4 Cylinder engine and manual transmission; Those are "Non-Progressive" Coils, so they measure the Same between each turn. I searched on internet for The Part Number for those Ford Tempo Front Coil Springs, So those should be: ~► MOOG CC854 for "Moog" Brand. ~► NCP 2775375 for "Napa" Brand. These are the Lift Blocks I had to use in the Front, to compensate the Rear Lift, as I explained in the "Leveling issue" note, written above: ► IMPORTANT NOTE: The Ford Tempo Coil Springs I used, came out from a used 4 cylinder Tempo, so they were used and not as Stiff as brand New coil Springs, so I didn't had any fitment problems nor had to trim them; but People who has brought those Coil Springs brand new, had to Trim them up to 1.5 Turns, especially the Moog CC856 because those are "Progressive" which means that they has different spaces between coils and they're intended for heavier V6 Automatic Tempos, and are even Stiffer than the Moog CC854 I Used, so I don't recommend to use those uncut, they might be too stiff for the Subaru. Also, I found that the Front Coil Springs from the Kia Sephia (first and second generation), are almost identical to the front coil springs on the Subaru Loyale; but the Kia Sephia ones have a thicker wire (around 2 mm) and the Sephia ones have a slightly bigger total radius, but they fit on the Subaru's shock absorbers; and the Sephia ones have an increased load capabilities. Let me Show you: They're almost identical, here are the Sephia's ones, Load Capabilities: Even the first gen Sephia, has an increased load ratio than the second gen Sephia. The ideas in this writeup are for those who are interested in Improving the Suspension of their Subies (Specially for Off-Roading), let me Tell you again that this Mods are intended for a More Rude Use and Longer Lasting Parts; not for Confort; so be adviced that the Ride will become Harder, with the stiffer suspension. Despite that, I use my lifted Subaru "BumbleBeast" as daily driver on city roads & Highways during weekdays (60% usage) and offroading on Weekends (40% usage) on our usual "Mountain Adventure" travels with my Family + Luggage, toys, food, etc... ...to Drive my Modified Subie with those 4Runner Shock Absorbers + Accord's Coil Springs in the Rear, and the Subaru XT Shock Absorbers + the Tempo's Coil Springs in the Front, Changes the Handling & Feeling of the Subie in the same way you'll notice while Driving a Police Car after being Driving the Civil Version of it before. I've Test Drove it Unloaded and Loaded, up to 160 KPH (100 MPH) in Highways... ...Bad Pavemented Roads and gravel off roads... ...and it Feels Really AWESOME! ... ... but rides Pretty Hard to be a "Family Wagon" anymore. Please see further details on the Second Part of this Writeup, below!
- 1 reply
-
- 17
-
-
- Struts
- Loyale 2.7 Turbo
- (and 8 more)
-
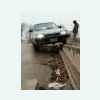
Well... it all Started one Weekend, my Dad took the Yellow Wagon to do a Short trip, and he stopped at a Gas station for some gas, then at its food mart for some snacks. While he was sat on the car, correctly Parked at the Food Mart, talkin' by Cellphone, someone drunk driver did side hit the front bumper very Fast... and this is the Result: The Damage wasn't much bigger, due to the fact that the bumper was already reinforced with Fiberglass and some added metal assist points, but the car moved around a feet horizontally with the side hit. Well... dad just got a li'l Head's hit, but he's Fine, O.K. Now ... but my Yellow Wagon's front Bumper was in very sad conditions... So, I went home (I work soo far away for now) to do the Repair, and I asked a friend who is a Good Fiberglass Artisan, to help me with such material. First, we took out the Front Bumper. This is a Detailed view of the Damage, includin' some Li'l twist on it's Metallic Base. Then, we started to remove out the old finish material and we Dissasembled it, Repairin' the Li'l Twist on its Base, and Reinforced it with more metallic assist points, a pair of `em did bypass the original plastic cover, The idea is to hold very firm that plastic cover to the Metallic base. We needed to cut down the Remainin' Reinforcement points... ...This is my Friend, doin' that. Then, We used sandpaper and covered it with the Fiberglass. Fiberglass comes like a Fiber Fabric, just cut the pieces you want, and then Spread all over it a Epoxy Compound, mixed with Hardener... Many coats of that Epoxy / Fiber, like you're makin' a Lasagna! Then, we used Sandpaper on the Already Dryed Fiberglass (untill Next day's Afternoon, to be Sure that was completely Cured) And Covered it with Flex. You can Notice a Li'l bit the Heads of the Metallic Assist points, and the Licence Plate's Screws, that comin' from behind the Bumper. This is how it ended lookin` at my Friend`s Repair Shop: (he did help me with fiberglass, I Prepared and Painted it) And Finally, This is the Results: My Yellow Wagon's Smile is Back! ... ... I Love it! The Bumper was Clean, while the Rest of the car was Dirty... But it Looks Soo Good! Well... I Hope this Idea could help those who want to Repair or Improve the Lookin' of their Car's Bumpers... Next to Do: a Hood Scoop... "the InterFooler" ...Comin' Soon! Kind Regards.