.jpg.8343172922df74ee7c070889109ecc34.jpg)
czny
Members
-
Joined
-
Last visited
Everything posted by czny
-
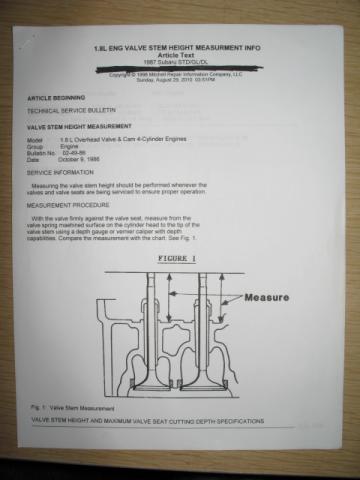
Did you have a valve regrind done on these heads? Once had a shop cut the stems too short leaving too much clearance. 3 of 4 cyls wouldn't make enough compression to run. Had to pull eng & tear down for cyl heads fix, again. If not maybe there's enough gap @ valve stems for lash caps? Not really good practice to sink the valves deeper.

-
Went to local PAP Sunday & found the elusive 99 Lego OB EJ25D for Frankenmotor. Seems appropriate for October - another Frankenmotor. :cool: Went back today & stripped engine down to shortblock. $125 for shortblock including $25 core. Longblock would have been $202 before the extra charges. Timing belt, PS cam sprockets were gone - broken pieces. Toothed idler brgs were seized - & a few BBs missing. No damages to cyl heads nor the piston crowns. Head gaskets looked good. Really have to believe that if more maintenance had been done this Lego OB would still be on the road. ................................................................. Already have a 90 Lego EJ22 complete for heads, cams, manifold, eng wiring loom, interior loom & ECU. Bores of EJ25 still have good crosshatch marks, no step in bores from rings at all. Just a slight amount of glaze. Will split the cases for light hone & re-ring, new rod & main brgs, polish the crank. .................................................................. Lucky the guys doing pre-lot work didn't hork the header pipe. $10.
-
Here's the radius rods for comparison. Top is stock, 1.25" longer then .75" longer. Chopped the rods in half, added 1"x .090" wall Cr-Mo DOM tubing & welded the ends. Then drilled .375" holes thru tube just into the rod material @ 8 places for each rod. Plug welded the holes for extra strength. ................................................... Installed rod: ................................................... Hard take-off in 1st still had wheel hop so checked all the engine & trans mounts. Engine mounts were fine but the trans mounts may as well been made of artists' gum rubber erasers. The mounts were allowing the drivetrain to shift forward when the tires bit hard & the torque went way up, pushing the DS axle into the engine cross-member & making a grinding sound. ................................................... So for stop-gap I added pieces of steel to the mounts to limit travel. Left 3/16" gaps for mount flex up, down & forward, back. They clatter when starting the engine but thereafter are OK. Big improvement. ................................................... Found some Energy Suspension bushings 9.9107 to fit inside 1.50"x.120" wall DOM tubing. Will fab these mounts later when doing my EJ engine swap. ...................................................
-
Tearing down the LSD carrier to remove the nut buttons from inside. Cutting grooves for the slip-in sub axles. Clean up & reassembling the LSD. Trial assembly & checking the fit. Agreed - a lot of extra work for hybrid axles.
-
Don't forget to measure your bearing preloads(turning torque) of your ej r160 at the pinion fully assembled with a inch-pound torque wrench(about 27-35 in-lb). Then measure the pinion preload with the carrier out(about 12-15 in-lb). You don't need to remove the pinion from the ej case - just change the companion flange & tighten to correct preload. You'll want to duplicate these figures for long brg life. Keep R&P backlash at .004-.008"(measured with dial indicator at outside teeth of ring gear). Measure the shim packs from both diffs to determine which way you need to shift the ring gear. Find some Prussian Blue paste at the auto parts & run your contact patterns. You want an elongated olive shape - most of that contact toward the toe(inner diameter) of the ring gear.
-
That's a timing hole plug for an EA82. Nice color choices - not too 'loud'. Very good work you got going there. Congrats!
-
When I used to have stock sized wheels on my 87 gl I would drive around curves faster - there's a similar one to yours here @ the 605 s to 60 e fwys. Sweeping rt hand curve filled the left VC with oil then once on the fwy again would show bluish smoke under hard acceleration. Closed throttle - high manifold vacuum pulling oil into chambers through pcv system &/or valve guides(worn guide seals). Had the heads chk'd for the un-usual chamber cracks - pressure tested by a shop. Negative on coolant leaks. Valve guide seals were worn. Plus PO had submerged the car sucking water into #4 scoring the cyl walls. Compression/leakdown tests found that.
-
I purposely drilled & tapped the zerk fittings higher than some have - but this creates a tight spot when greasing the bushings. Found a tight spot 90* "special" access grease coupler, Lincoln model 5883. Mcmaster-Carr # 1091K61, $7.99. Slick little coupler slips on sideways with a urethane seal. For all you vintage Saturday Night Live watchers: "Now isn't that special."
-
Reset the toe to .13" toe-out & drove for 30 mi. today Seems better with a little less toe-out. Tracks straight with hands off at fwy speeds for a count of 5. Trimmed the fenders ahead of the front tire - they were rubbing on downhill dips. Replaced the ignition cyl with one keyed alike to the doors. Old cyl was worn out & difficult to operate. Replaced the rt side instrument cluster(speedo/voltmeter/fuel) - odometer working properly now. Still have to replace the trans speedo seal.
-
Great attention to detail. Keep up the fine work!
-
Yup......same noise you're describing. Could feel vibration in the resevoir while running. It was more expedient just to replace it with a reman pump. Some seller on fleabay had them for $46 shipped.
-
I talked to my parts man about the same thing - apparently they've improved their quality control in manufacturing. Good news.
-
Replaced 4 yr old battery with Optima Redtop 25, 720 CCA. Old battery kept dropping voltage, setting off the alarm or resetting the dash clock or putting the Kenwood radio into protect mode. Suspected it was a cell shorting out - load test confirmed this.
-
If your going to be out wheeling, it might be beneficial to add a rubber sleeve over the braided brake lines to help keep dirt/dust from working it's way into them. Very nice looking wagon! Thanks! Already ahead of you - wrapped the SS lines with spiral plastic available at most AP stores. Not liquid/dust tight but enough to keep rocks & gravel from abrading the lines. Edit: I may wrap the lines later with vinyl tape & wrap them again with the spiral plastic. Have some front & rear brake improvements in mind .
-
Yeah, a locker would be nice! Still would hear chatter on corners though.:-p jk Replaced the radius rods with 1.25" longer ones today & reset the toe to .25" toe-out. The extra caster & toe-out seem to help sure enough around town. Will have to go a long drive on the fwys & hwys to check road manners better.
-
In my search for nyloc nuts found some 9/16-18x4 grade 8 hardware & so replaced the arm bushing hardware. After the Tempo strut spring replacement the car now rides level. The lowest point is now the front cat @ 11.75". Front toe was then way out at 1.44" toe-in - adjusted this to .13" toe-out. But I'm still getting wheel hop on hard take off in 1st gear. Will try changing the radius rods 1.25" longer. Have 0.75" longer rods now. Change the caster angle & readjust the toe. Toe out seems to work better with positive camber for ride & wheel tracking - at least it feels better on the road to me. ................................................................. Could be the soft trans mounts too. Fab up some urethane bushing mounts for less give. Another project These are the 90s Nissan Pathfinder wheels - 15x6 with 215x75x15 Hankook M/Ts.
-
Early 6 lug Chevy PU rear brks - 11x2 inch drums? Nice re-tasking of old brakes.:cool: Oh, your backing plate is on backward. I've had a 65 Chevy PU for 22 yrs.
-
One step at a time: ordered new GL trans speedo seal from local dealer. FSM shows the same diagram for both 2 & 4WD, P/N 806712090. Will be here next week.
-
I've experienced much the same thing with the speedo readings in my 87 wagon. Driving the fwys 65 is now 55 because of the whl/tire combo on the wagon, but at times it reads lower, like 45. Tap the cluster lens a few times & it rises to where it should be. I have 2 other instrument clusters - may have to try replacing the current one & dissect the old one, if possible. Perhaps its something to do with the magnetic drive cup losing its magnetism with age? Or worn "jeweled" brgs in the speedo? Or dust & oils collecting in the "jeweled" brgs slowing the drive?
-
Scott was considering much the same thing I think. Some 280/300zx diff info is here:http://ultimatesubaru.org/forum/showthread.php?t=135488&highlight=R200+diff+EA
-
Decided against adjustable camber after re-reading this thread: http://ultimatesubaru.org/forum/showthread.php?t=125882&highlight=EA+camber+adjust Instead I offset a 9/16" hole at about 30* down from the original 10 mm hole to move the lower arm out about .160" with a die grinder & a 3/8 olive carbide burr. This slight decrease in positive camber plus adjusting the toe to 0.00 - 0.13" toe out should be enough to even up the tread wear. Burn the old bushings out with a torch, clean, rinse, repeat & paint the arms. Energy Suspension part # 8.2105G bushings. Slip bushing flanged end onto a piece of 5/8" round stock in a vise & hacksaw to length. Cut lube groove with a rat tail file. Drill & tap a 1/4-28 holes(not all the way through) then screw in your zerks. ......................................................................... A 4" L 9/16 coarse Gr 5 bolt has enough shank to fill the bushings with no thread to score the bores. The cross member is just formed sheet metal & the difference in strength between a 9/16" & 10 mm bolt would negate the need for grade 8 hardware I'd think. Only thing I need to change is adding 9/16 nyloc nuts for this. Don't want to compress the bushing flanges too much nor limit the free motion distorting the crossmember. ......................................................................... The inside of the tread shows uneven wear - darker part to right of snow stud holes.
-
Yup - flush with the clutch disc side. That's all.
-
Working on it! The short list: 1)replace the 87AC axles with 95ACs - done 2)replace the front struts with Monroes loaded with 88 Tempo springs to even out the ride height - done 3)clean 6 Nissan Pathfinder 6 lug whls & mount new Hankook 215x75x15s M/Ts to gain more rolling clearance - done 4)replace worn out front control arm bushings with Toy LC Energy Suspension bushings - done 5)mod front control arm mount points in cross member to accept cam adjusters for camber - working on this today 6)cut fender wells, spot weld in 1" wide strips of 18 GA sheet metal to mount fender lips - soon after. Will post some more pics later today. Need to beat the heat now.
-
I had that happen once on my EA82. Valve cover nuts were loose to point of falling off. First thought was some jerk was messing with me - its happened before around here. A sore reminder to re-torque all fasteners regularly & use Locktite. Especially before a long trip.
-
Some more eye candy about the LSD: ........................................................ And some about the disc brakes: ....................................................
.thumb.jpg.96479a473cd1ed4b8bac667c0ee181f5.jpg)