.jpg.8343172922df74ee7c070889109ecc34.jpg)
czny
Members
-
Joined
-
Last visited
Everything posted by czny
-
I agree with McBrats comment about grease getting on the clutch disc. 40 yrs ago I was taught to only apply grease to the input shaft, the TO brg collar(that the TO brg rides on), the pivot(s) for the fork & the pilot bushing(if it has one). Just enough grease to coat the input shaft & then wipe it lightly with a rag.
-
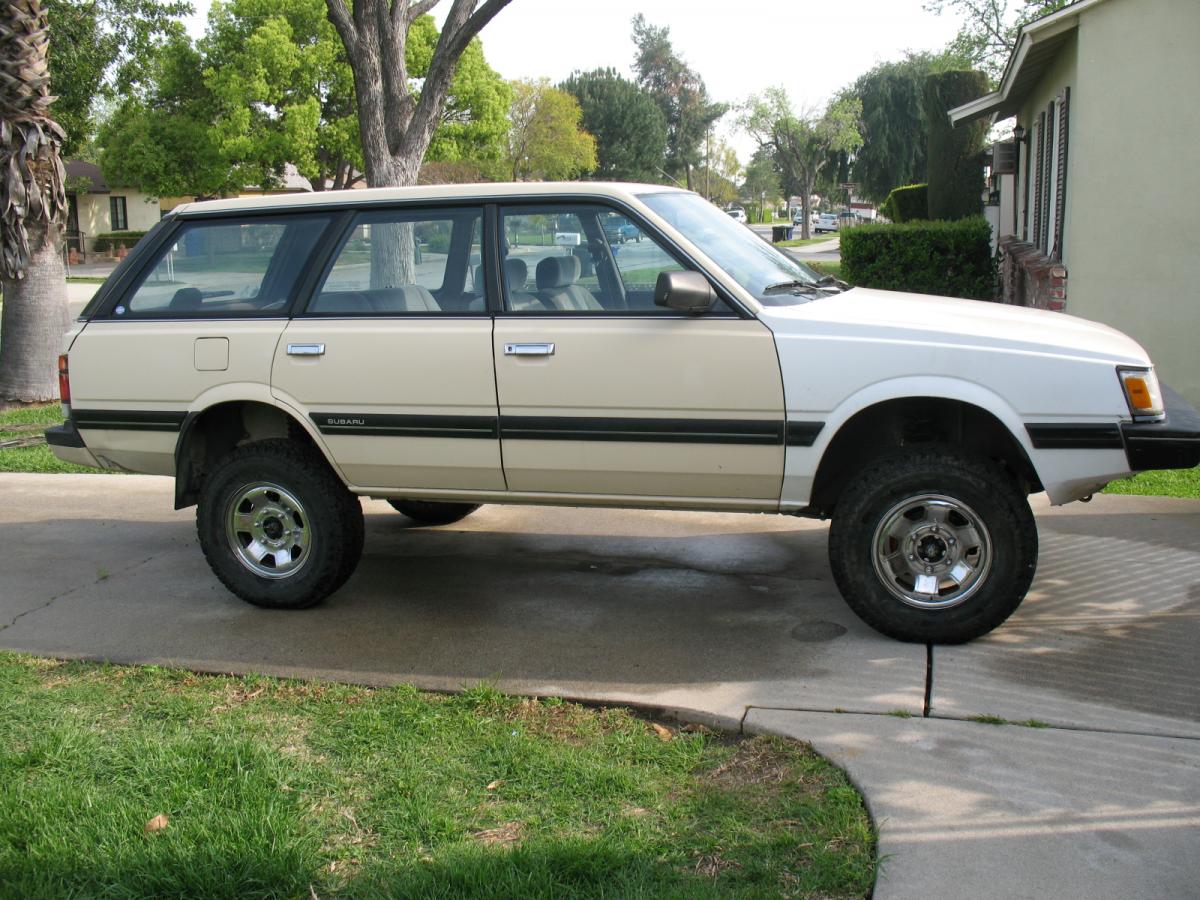
I had bought this 135k mile d/r wagon in 2007 for $800 from the 2nd owner. It had the usual oil leak, TOD, etc & sun baked plastic dash parts typical of a SW car that hasn't been garaged much of its life. Did the usual maintenance for the first 3 yrs including clutch, tires, tuneup. Joined USMB & aspired to build it into a light duty ORV. So I added a 4" SJR lift, new struts & mounts, 6 lug conversion including rear disc brakes, R160 plate clutch LSD, 14x6 Mazda PU whls with 27x8.50x14 Grabbers. In lieu of the stock brake hoses I opted for -3 braided SS/teflon lines, which I've built for some of my other vehicles before. A nearby hardware store is a Earls supply vendor;). Before tearing down my original 3.90 diff & the 3.70 LSD R160 for the carrier I had measured the bearing preloads so they could be restored. Set the backlash to .006" & checked the pattern. A little extra care here pays in longevity.
-
I've been thinking about an upgrade to this MIG: http://www.millerwelds.com/products/mig/product.php?model=M00245 Not that my 220V Challenger I've had since '93 can't do whatever I need of it, just a little more flexability would be nice.
-
3" Wire wheel from hardware store chucked in electric drill. Wear eye protection.
-
Found the lowered & stock height springs for Leone at King Springs site, but likewise $400 is a bit too steep for me. Found straight wound '88 Tempo springs with top & bottom isolators on a suspension 1/2 off day at local PAP for $37 for the pair. Top mounts can be ground down to nestle nicely inside the top hat for the Subaru struts. Cut one bottom coil off the springs. Chopped the KYB snubbers in half for more travel. Springs are mounted on Monroe 4WD(#s 71876 & 71877) EA struts in the pics.
-
Because my front springs are sagging some & the front sits lower than level on my 87 GL I'm considering what springs to use. Found a pair of used Tempo fronts(straightwound - not progressive) with all the rubber parts. Because of added front end weight(steel bumper, winch, front skid plate & tubes, ~15lbs for EJ swap) have been considering higher load&/or rate springs. Among those found at the Moog universal spring page(http://www.moog-suspension-parts.com/Universal_Coil_Springs.asp) were CC854, CC856 or CC835. The CC852/854/856 all have about the same rate as the original 4wd springs-146lbs/in. The last one has a shorter install height, higher rate & load(174lb/in, 691lb load, 9.13" install height, 13.50" free length, .541 dia wire, 4.030 ID coils). The CC835 has a short pigtail end coil that would need to cut to fit. The intended application is for 1980-2004 Ford Mustang coupes/convertibles. I could see the need for a higher load spring because of added front load(sprung weight) plus a higher rate spring for the added weight of larger wheels & tires(unsprung weight). Anyone else been thinking along the same lines?
-
September 2009 I made the trip from LA to Seattle, then to Everett, back down the I82 thru Yakima to the 395 down to the I84 W to hwy 97 S thru Bend to see my relatives then continued s on 97 to the I5. Stayed on the I5 all the way to LA. Didn't care to sightsee in the CA state. 3300+ miles in an 87 GL wagon with stock 13" wheels. Stock AM/FM radio. Just great country, me & the windshield. Getting ready to do it again this month, this time lifted 4" with 215x75x15 tires, thru La Grande & back to Bend. Yeah!
-
Good for you! It's OK - I'll list all my parts soon. Need to clean house for moving.
-
I have both L&R door shields & the speakers with the mounting brackets for an 85 gl. Send a PM & we'll get them to you for USPS flat rate if you like. The speakers in them are Boston 4 ohm, 20W nom, 4.25". Here's the pass door:
-
I seem to remember reading that you can find the diff ratio on z31s using the chassis # on the ID plate near the radiator. I searched this stuff back in June so its all IIRC.
-
There's a way around this bogus warning in Firefox: Go to Options>Security> Uncheck "Block reported attack sites">click OK. If you don't go to the real infected sites you have nothing to worry about.
-
I considered it for my 87 gl too. Had found a 86 & 88 turbo 300zx for donors but life got in the way. Haven't done it but here's some info you might find useful: http://www.zhome.com/ZCMnL/tech/GearRatios.html and http://www.zhome.com/ZCMnL/tech/R200.htm
-
I opted for 215/75/15 Hankook M/Ts on 6 lug 15x6 Nissan Pathfinder wheels. They were lees money than the BFGs. And the 215s I got had snow stud holes(how here in So. Cal. I got the studded tires I don't know:D.) Haven't bolted them up yet to check for clearance with my 4" lift on 87 gl. Here's a link: http://www.offroaders.com/tech/AT-MT-Tires/Hankook-MT.htm Edit: tires I got are the Dynapro M/T RT03s. Pic on this site doesn't show stud holes. Hmmm.
-
I had thought to add a 6000 lb winch to the front on my 87 gl. Something like this which is short enough(17.5"L x 6.5"D x 8.3"H) to fit between the headlights, series wound motor, with a hardwired remote: http://www.harborfreight.com/6000-lb-off-road-vehicle-winch-with-automatic-load-holding-brake-68141.html You don't feel this generation of bumper is strong enough with the added hoop & bracing tubes? And 1" x .090" tubes down & back to the engine crossmember for engine skidplate?
-
I get the same warnings: its stopbadware.org being overzealous. Quote from the site: "Badware is not always evident when you visit a site. Some badware only gets distributed under certain conditions; some installs silently, without alerting the user. It’s also possible that the site was infected and has been cleaned up but hasn’t yet been removed from the list of badware sites. Owners of websites in this situation may want to request a review. " Back to the thread. That is a really nice bumper Scott! I suppose you could add a short loop to the top tube for a winch mount(hint, hint,??)
-
It pays to carry spare parts & tools sometimes.
-
Wow! Who'da thunk double tapered bearings would've failed so completely. See how many rollers were left intact, if any.
-
Jack up the right rear corner & check for crunchy feeling rotating the wheel.
-
Broken right outer cv joint cage? Not as likely the stub axle bearing - they last forever.
-
One of these could help:http://www.ebay.com/itm/Carburetor-Adjusting-Tool-Lisle-55250-/380461506611?hash=item589545e033&item=380461506611&pt=Motors_Automotive_Tools&vxp=mtr You may get lucky & find one at a local auto parts store, most likely not the mainstream ones.
-
I've had success with heat hardened bolts & studs using carbide-tipped drill bits: http://www.use-enco.com/CGI/INSRAR2?PMSECT=0000000618&PMADID=SI0000069016&PMAVID=1626 Having done field maintenance on bakery & pizza ovens where repeated 500+*F heat cycles hardened the hardware(pun intended) it became necessary to resort to these. Straight flute carbide tipped die drills work too.You need to keep the bit from chattering otherwise they'll shatter. Low RPM & lots of pressure.
-
I've got a 85 gl-10 pass side door glass here. Let me know. Could box it up with the plywood & scrap lumber I have here then send it by Fedex ground.
-
While this far in, I added the a/c ducts running from the tunnel back, across & up the door pillars. Fishing the door looms was easy for the rear doors, an arm stretch to get to loom anchor points for the power mirrors. Flexible claw makes an ideal tool for fishing the mirror connectors. Just wrap the connector with a little vinyl tape leaving a little to grab: Cleaned & burnished the window switch contacts with a little piece of Scotchbrite, added some dielectric silicone to hold the small parts together for protection & assembly: Had the door card pads recovered then painted them with SEM color coat #15023, Cordova brown. Covered the window reg crank holes with 2" furniture coasters(single flathead 10-32 screw epoxied to back & 1/8 x 1 x 3" aluminum flat stock on inside of panel): Kenwood 5 1/4" speakers(KFC-1394PS) just fit front speaker mounts - barely. Replaced the broken down front seats with a pair from a 90 Lego: May paint them later with SEM light buckskin #15093. Or not. Definitely will paint all the dash parts while doing the ea2ej upgrade later while the dash is apart. BTW, added the door lock actuators to all doors including the tailgate. The drivers door gets a switch, not an actuator. The power wiring for these was already in the rear loom for my 87 gl wagon.
-
Good to know-everything is already buttoned up(I'll post more pics again soon). Thanks! The donor cars were from here in So. Cal. but sometime in their pasts they just might have gone swimming in the Pacific Ocean.
-
Finally posting some pics of the pwr window upgrades. Had to pick front doors from a 85 gl wagon & 86 gl wagon rear doors @ the PAP. Some nimrod had horked the front doors on the 86 already. Here's the pwr window wiring loom: Power window control/relay/circuit breaker detail: Power window wire loom P/N: And while I was at it added A/C ducts to the door pillars: Detail of the tailgate wire loom connector. Will change that loom out later - it is fished down the rt rear window pillar, across to rear light & up(or down) rt side of tailgate: Passenger side front door looms both manual(top) & power:
.thumb.jpg.96479a473cd1ed4b8bac667c0ee181f5.jpg)