Leaderboard
-
el_freddo
Members46Points4485Posts -
pontoontodd
Members38Points2617Posts -
bushytails
Members37Points165Posts -
SuspiciousPizza
Members35Points219Posts


Popular Content
Showing content with the highest reputation since 04/04/25 in Posts
-
5 pointsFirst joined this forum 20 years ago when I had an 84 hatch that I had bought sitting in a field while I was in high school. At the time, I had a 91 Legacy. Drove that till it blew up and then picked up an 83 Brat that I found for sale on here and picked up another 83 for parts. Had a 2000 RS coupe in college, then a 95 Outback beater. Sold the RS and got an 05 STi, sold it in 2016 and got back into an 04 WRX in 2022. Picked up this 84 GL 2 weeks ago as if I needed another project but I am not poor on vehicles - also have a 2019 Tundra and 2015 Rav4. This thing was in surprisingly good shape for being an east TN car. With that, it does have its issues. I have on my work bench a new rear wheel bearing to install, hatch struts, will need a radiator as I see it dripping. I am also trying to nail down why the blower isn't working. I pulled the fan resistor switch last night and it showed continuity but I need to see exactly what ohm values it's supposed to have. Nothing like reading 20+ year old USMB posts. We still like pics on here?5 points
-
4 pointsRepairing a stripped spark plug hole is a much smaller project than the other options... I haven't tried, but I've seen people do it in the vehicle and just blow the chips out afterwards.4 points
-
Finally made more billet rear knuckles. Spent some time making these a little smoother/nicer than the first pair. One pair with tapped holes in the side for wheel scraper/caliper bracket and no wheel bearing holes for slammo. He is planning on using a different bolt on wheel bearing, I'll machine that when the time comes.3 points
-
3 pointsConverter ended up being the problem - just took a minute to warm up and relearn I guess, Runs perfect without the exhaust connected3 points
-
3 pointsI got a 2009 Outback special edition instead. Only 95,000 miles on it. It spent 2016-2025 in Arizona and before that in Colorado. Pretty much rust free. I drove it home to Fairbanks, Alaska.3 points
-
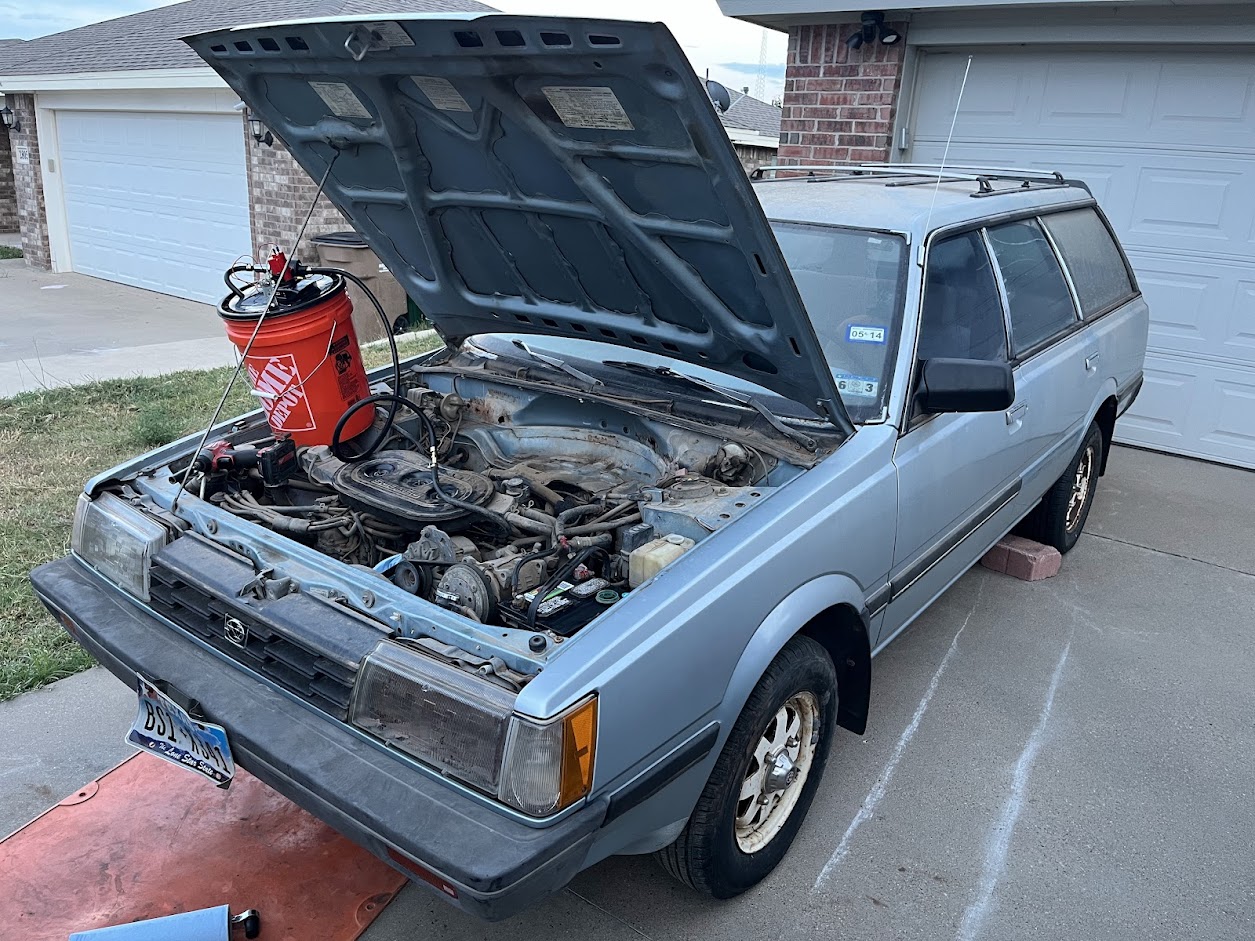
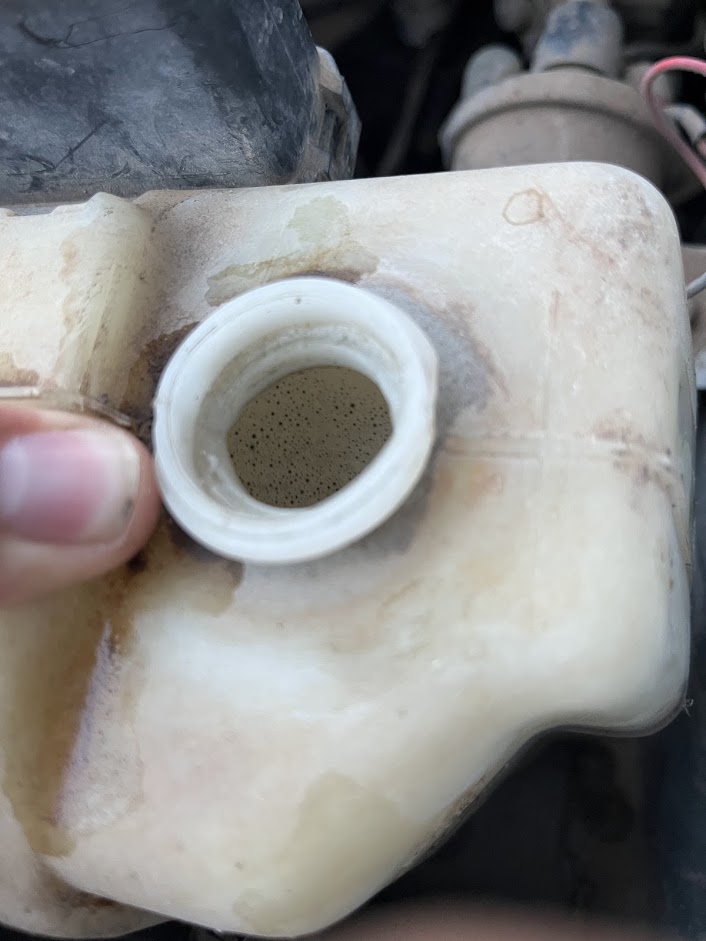
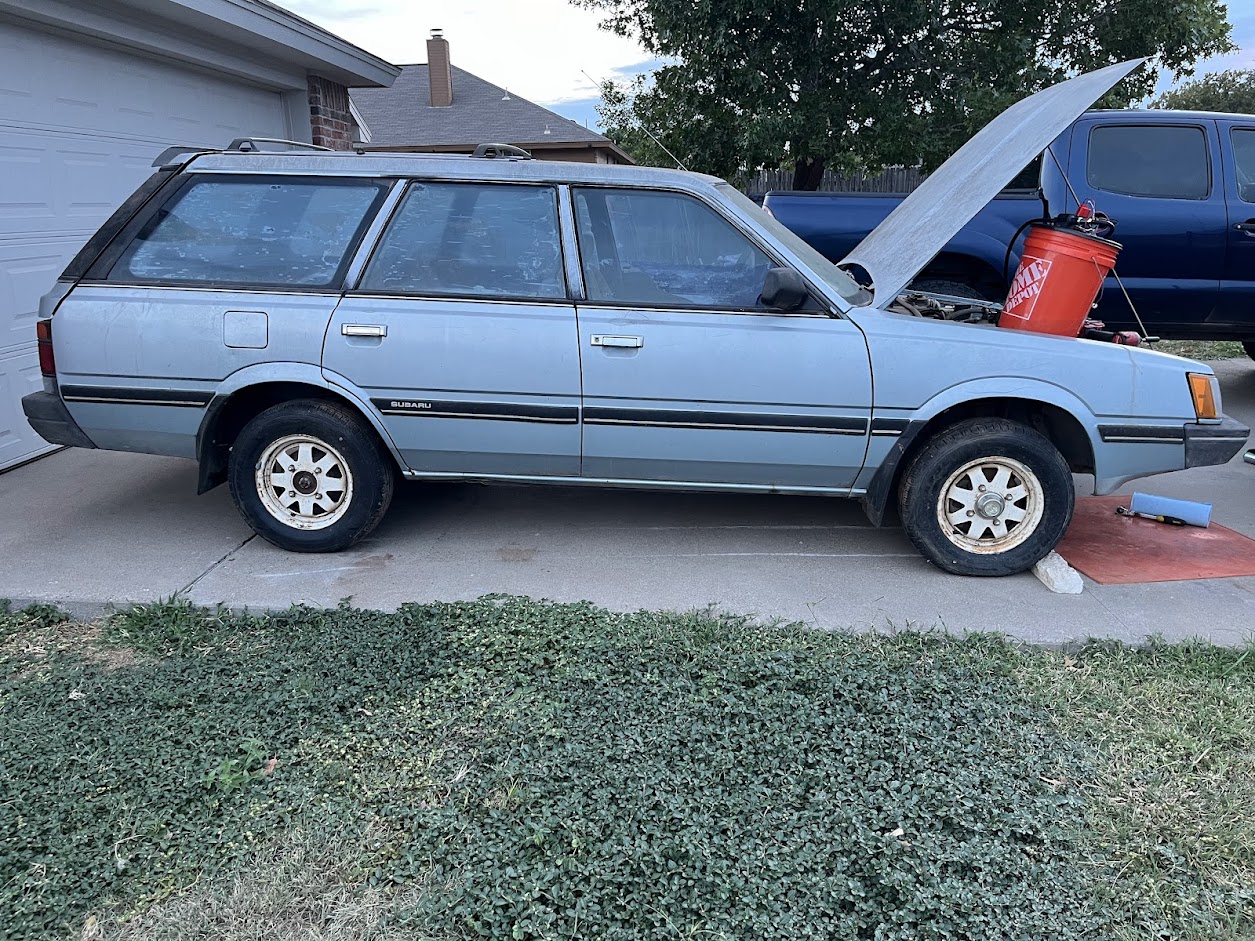
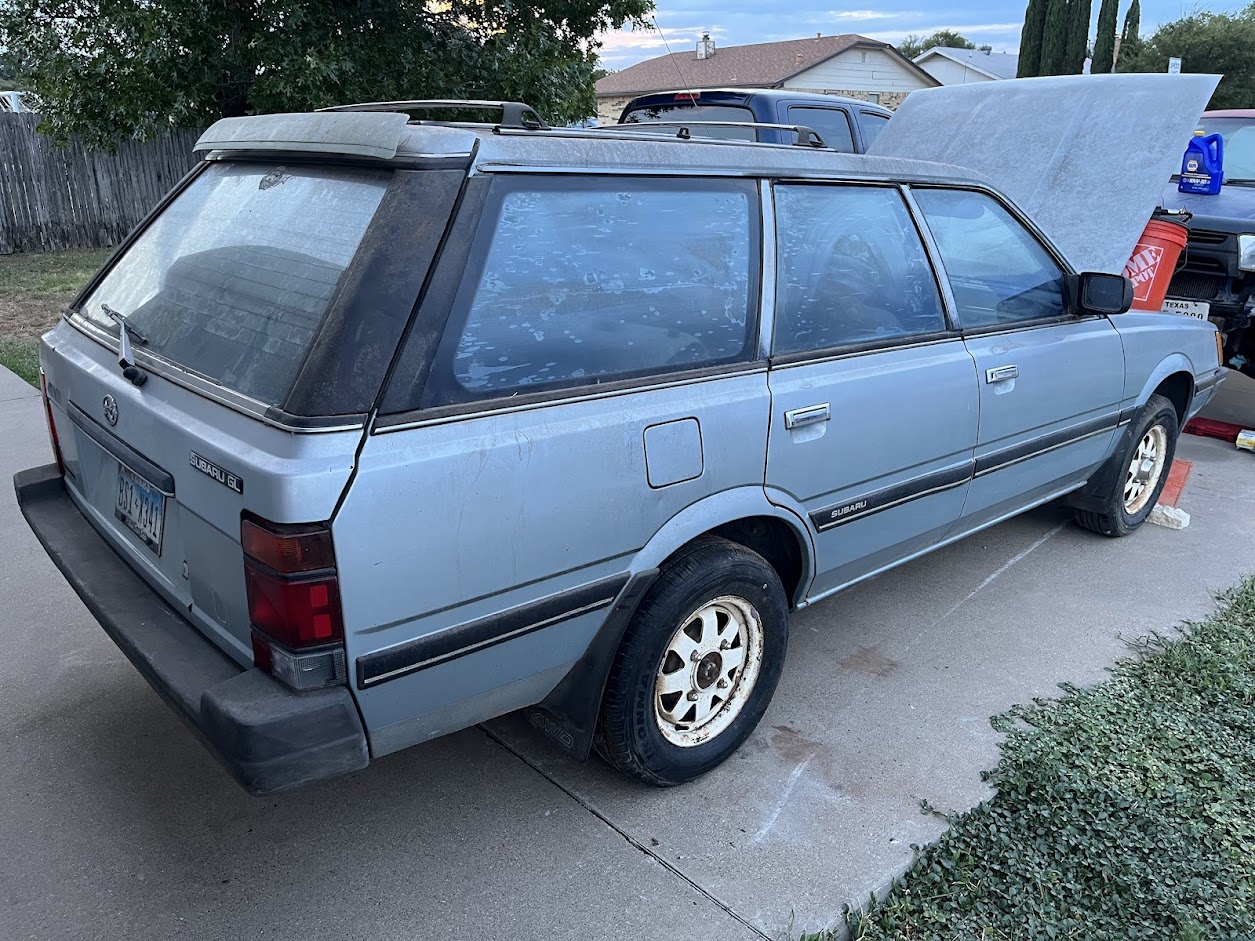
3 pointsHello. I apologize if this is the wrong place to post this. I recently acquired this 1986 Subaru GL Wagon AWD/3spd auto. I made an account here a few years back while helping a friend with his '87 Brat. If I'd never worked on that Brat I wouldn't have given this $500 listing the time of day. The car is relatively clean for sitting in field in Odessa, TX exposed for a decade. Some rust under the cowl visible from the engine bay from debris sitting in it. Then some from a failed brake booster or master cylinder that was leaking. I'm technically the second owner since the guy I bought it from didn't register it, tried getting it to run off the fuel tank, failed, and gave up on it. Today I got around to setting up a Home Depot bucket fuel pump setup and ran it straight to the carb. I changed the oil and filter because the filter looked ancient, topped the radiator and reservoir off with some distilled water, and charged up the battery. I was surprised when the car eventually was able to run on it's own at about 1200-1500rpm. The carb was dripping fuel so I didn't want to run it long. The temp gauge climbed up a bit past halfway, so I quickly set some bricks around the tires to test the transmission without rolling away. I was able to roll forward and backward so I called that a success and shut it down. I noticed a burp in the coolant reservoir and some bubbles inside for about a minute after shutoff. I'll do a combustion leak test on it to verify. I'm going to list some major items that will need to be addressed before it even goes on a test drive. Engine - Verify if this engine needs head gaskets. Then go through cooling system and timing belt. Carburetor - Weber swap or try and work on this stock Hitachi Complete braking system refresh - Including the booster, master cylinder, and rubber lines. Transmission Drain/Fill and filter. Some less major items that will need to be addressed. Headlights housings are rusted through and don't work (I guess from filling up with water?) I'd probably try and find some sealed beam DL headlights and grille. CV Axles - All 4 CV boots are leaking and they'll probably fail pretty quickly. Suspension looks original. Door locks don't work and the passenger rear door is stuck shut. Rear hatch struts. left turn signal works with hazards but not stalk. No spare tire. But I have all the hardware that retained it. I think the battle going forward is going to be parts availability. I'm spoiled from working on Toyotas. I remember struggling to even find shocks for my friend's '87 Brat. The automatic transmission is also a downside if it ends up having issues. I've found a number of great write-ups on this forum and some other websites so I have that on my side. Here are some pictures and videos to go with my random assortment of thoughts.
 3 points
 -
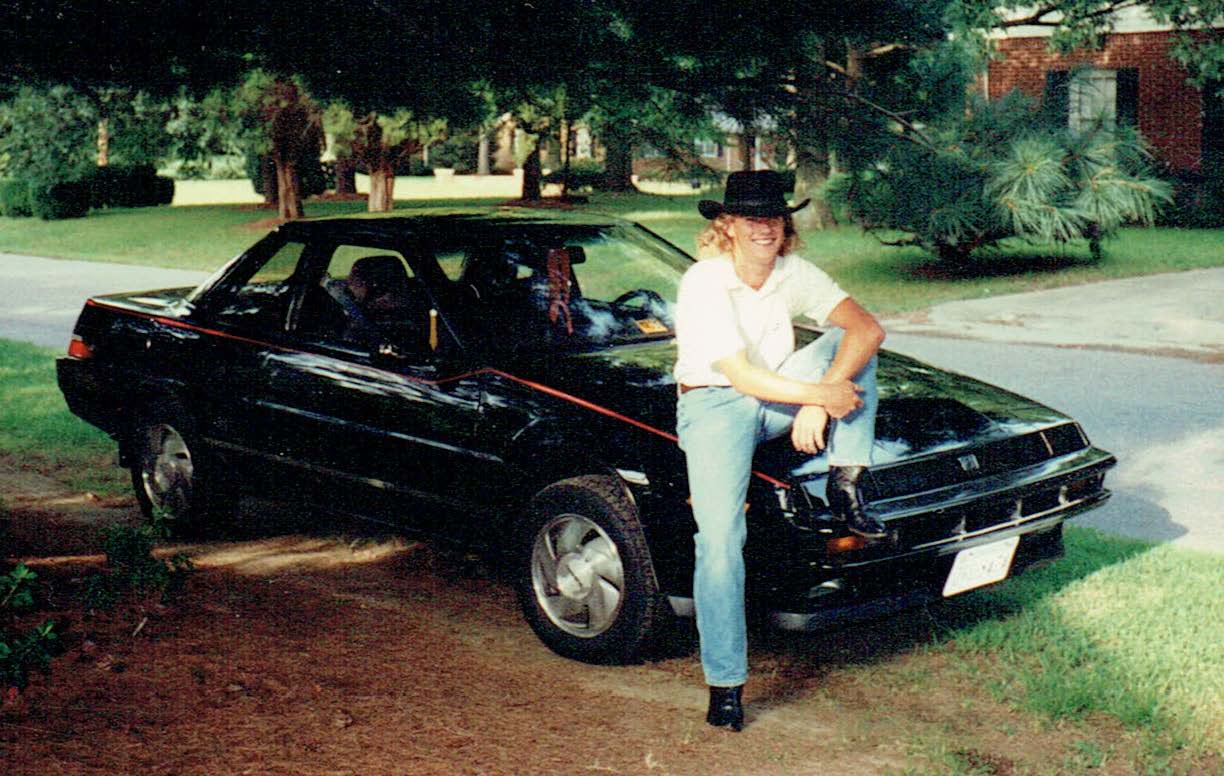
This was my 3rd Subaru - best damn car I ever owned and I kick myself for getting rid of it. ©1995
 3 points
 -
3 pointsThe weather was finally somwhat bearable (if humid as hell for my tastes), my leg is 99% healed, and I had a day off to play with, so I started poking at the rear suspension again. Pulled the subframe apart and separated the sheet metal piece from the diff, and removed the knuckle assemblies including the CV's and lateral arms. Also I think i made my first obnoxious mistake. Nothing too unrecoverable but still... annoying. Made a couple of test fits and chalk marks with the whole assembly to get an idea of what I thought I'd be wanting to chop. Actually chopping was the mistake (sort of) - but I'll detail that shortly. The diagonal marks indicate roughly where the frame ends on the brat where I need the subframe to sit. Did another test fit with just the diff and subframe, determined it would be easier to fit where I needed it to if I just cut it straight where the stock bushings ended. The intent here was (and I guess still is) to re-fabricate mounting points to the frame with new bushing locations to fit in the smaller chassis. Got everything tucked up in and sort of leaned in place where I think It will go. The diff is bolted to the subframe, and then also mounted to the original Brat front diff crossmember. Fits pretty close to where it needs to be - only thing now is that it looks as if there's about 1.5 - 2 inches of height I'll need to make up to keep everything sitting level. It was at this point where looking back I think I maybe made a bit of a mistake cutting off the bushings. Funny thing is - mere minutes after completing all the test fitting and cutting today, a friend sent me a youtube video from a guy doing a similar subframe swap in on a later gen brat where he just...*widened the frame and used the stock bushings.* Shocker, this would have been a much simpler approach and I think there would still be enough clearance for me to narrow the links and CVs to tuck everything back in under the stock wheel wells. Granted, the gentleman in question had to refabricate his whole rear frame, and appeared to be planning on adding a widebody kit setup though so maybe he didn't need to be so concerned about the wheelbase width in the back. Lack of access to the "frame" from a different perspective was also a reason for me not thinking of this - I'm still using the bed as a demi-storage locker and haven't cut the bed floor or wheel wells out yet. Might change that and get the ol' death wheel out for the bed soon to, but that metal is in pretty good shape and I'd rather not cut into it if I don't have to. I'm deciding to look at the silver linings here - It's probably for the best I'm still going my own way of it - I'm definitely maximizing the room i have available to move the wheels inboard for a more stock look. I'm thinking I might be able to get clever and integrate the original moustache bar mounts or something... We'll see - I have to sleep on it. Absolute worst case I go to the junkyard and try to source another rear subframe and then widen the frame rails similarly to the other builder. A quick Google looks like one can be had for about $150 used. Maybe less if I find a pick and pull with one nearby or get lucky on marketplace. Mounting problems aside - having put everything roughly where I want it and looking at the bare underside of the subframe itself I think I'm going to have to take a slightly different track and shorten both the CV as well as the lateral links - chopping up the subframe more than I already have is going to prove much more complex than I initially assumed. I'd wanted to try to save on parts money and maintain stock impreza parts wherever possible, but in this case I think it will end up becoming much more expensive in terms of my time to relocate the pivot points instead of just changing to an adjustable link setup (It looks like I can get some of those for my GC model year for about $200.) Hopefully adjustable links will be adjustable enough to where I don't need to modify those to shorten them sufficiently. Anyways, looks a lot like it did when I started today but now I have more information to play with. Ever onward!3 points
-
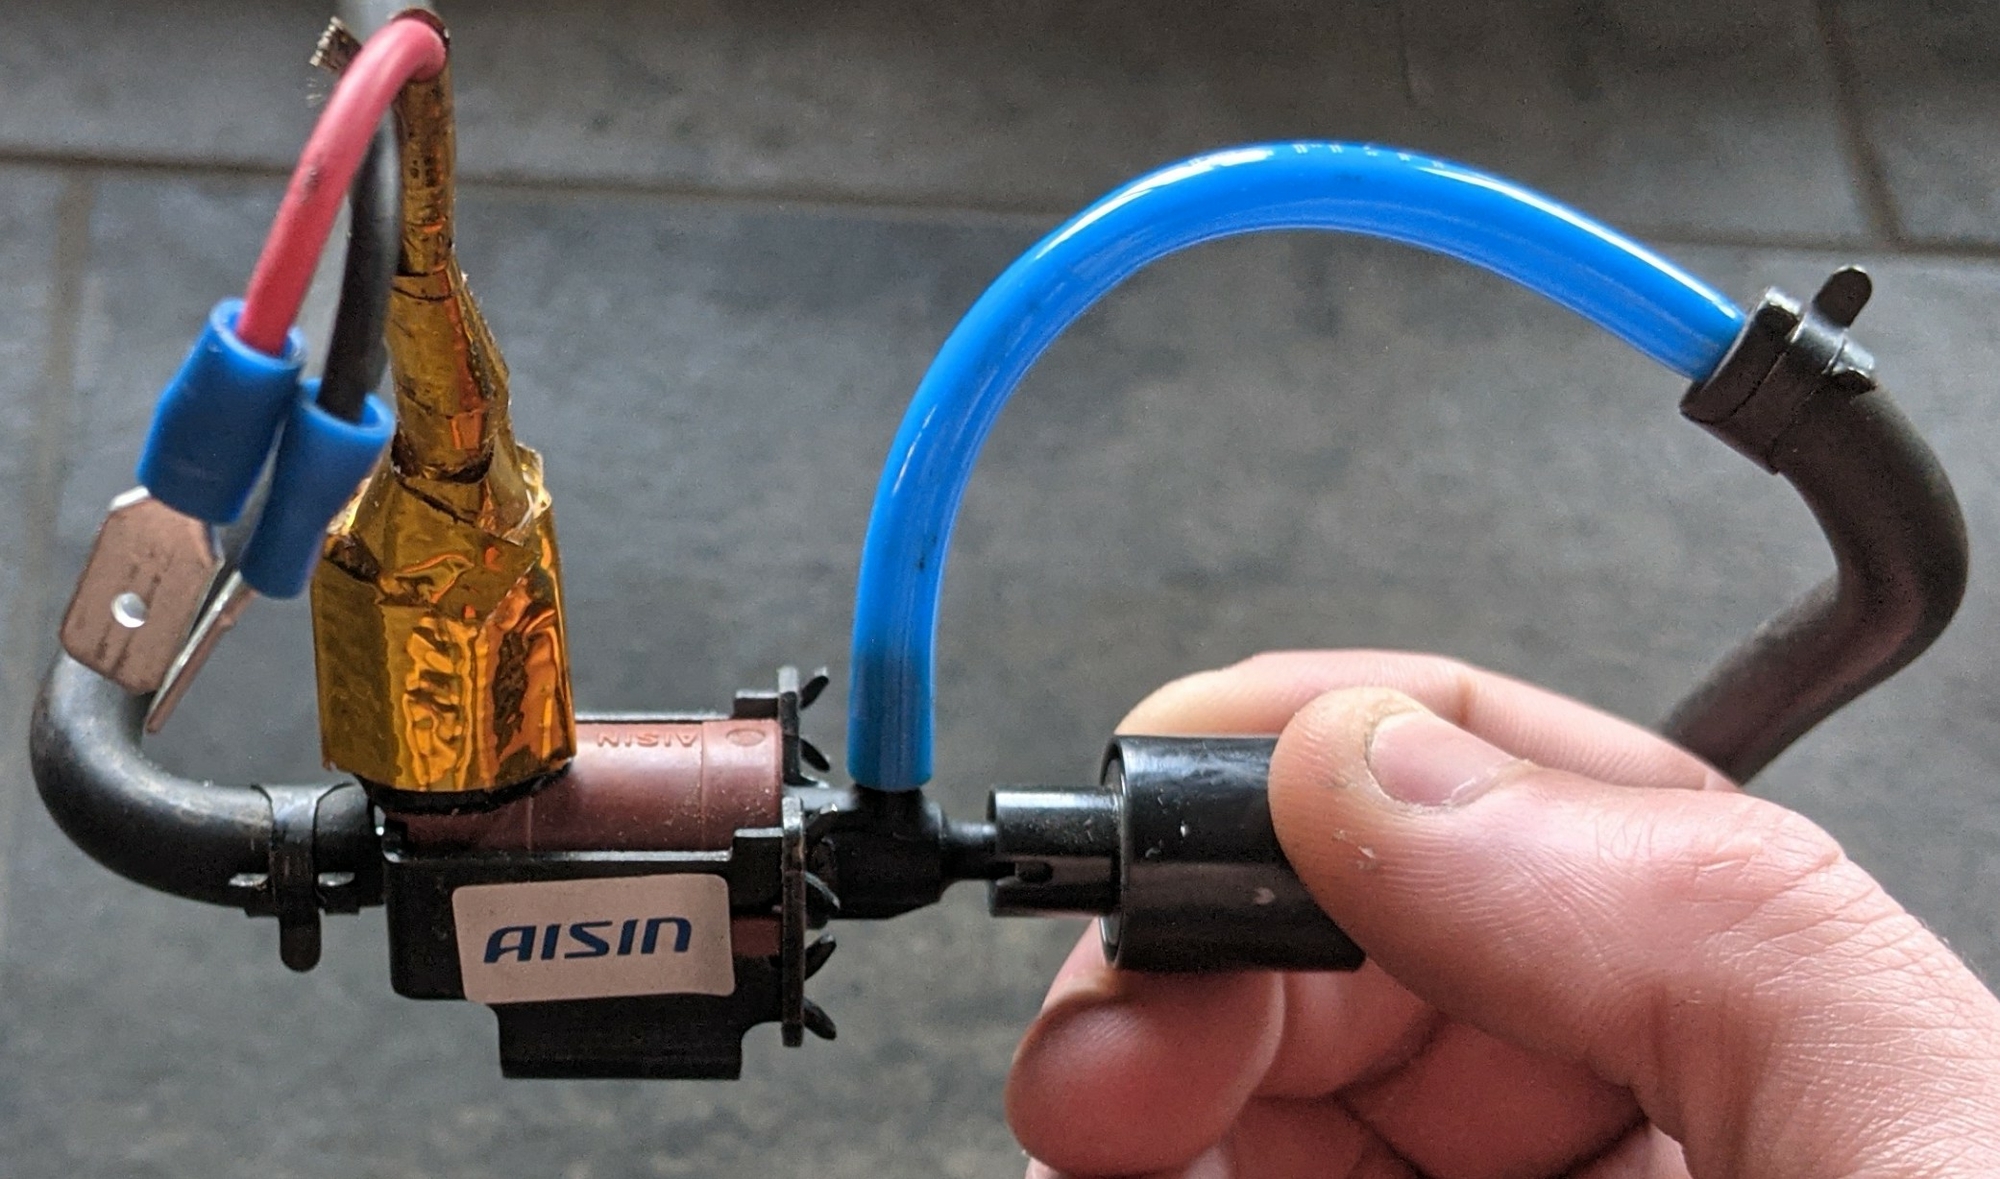
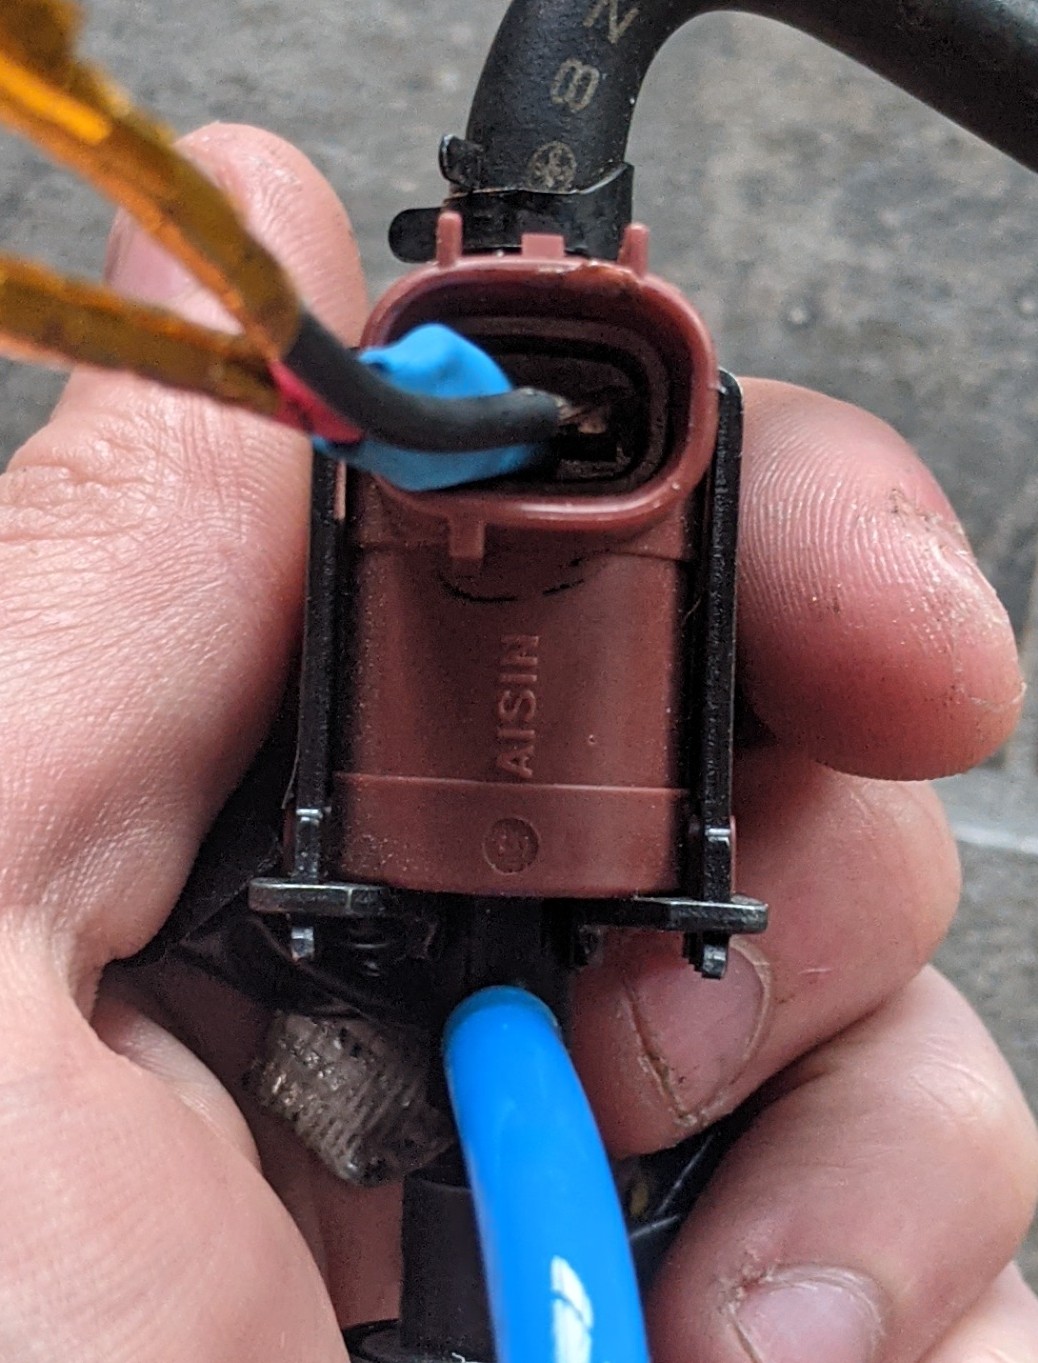
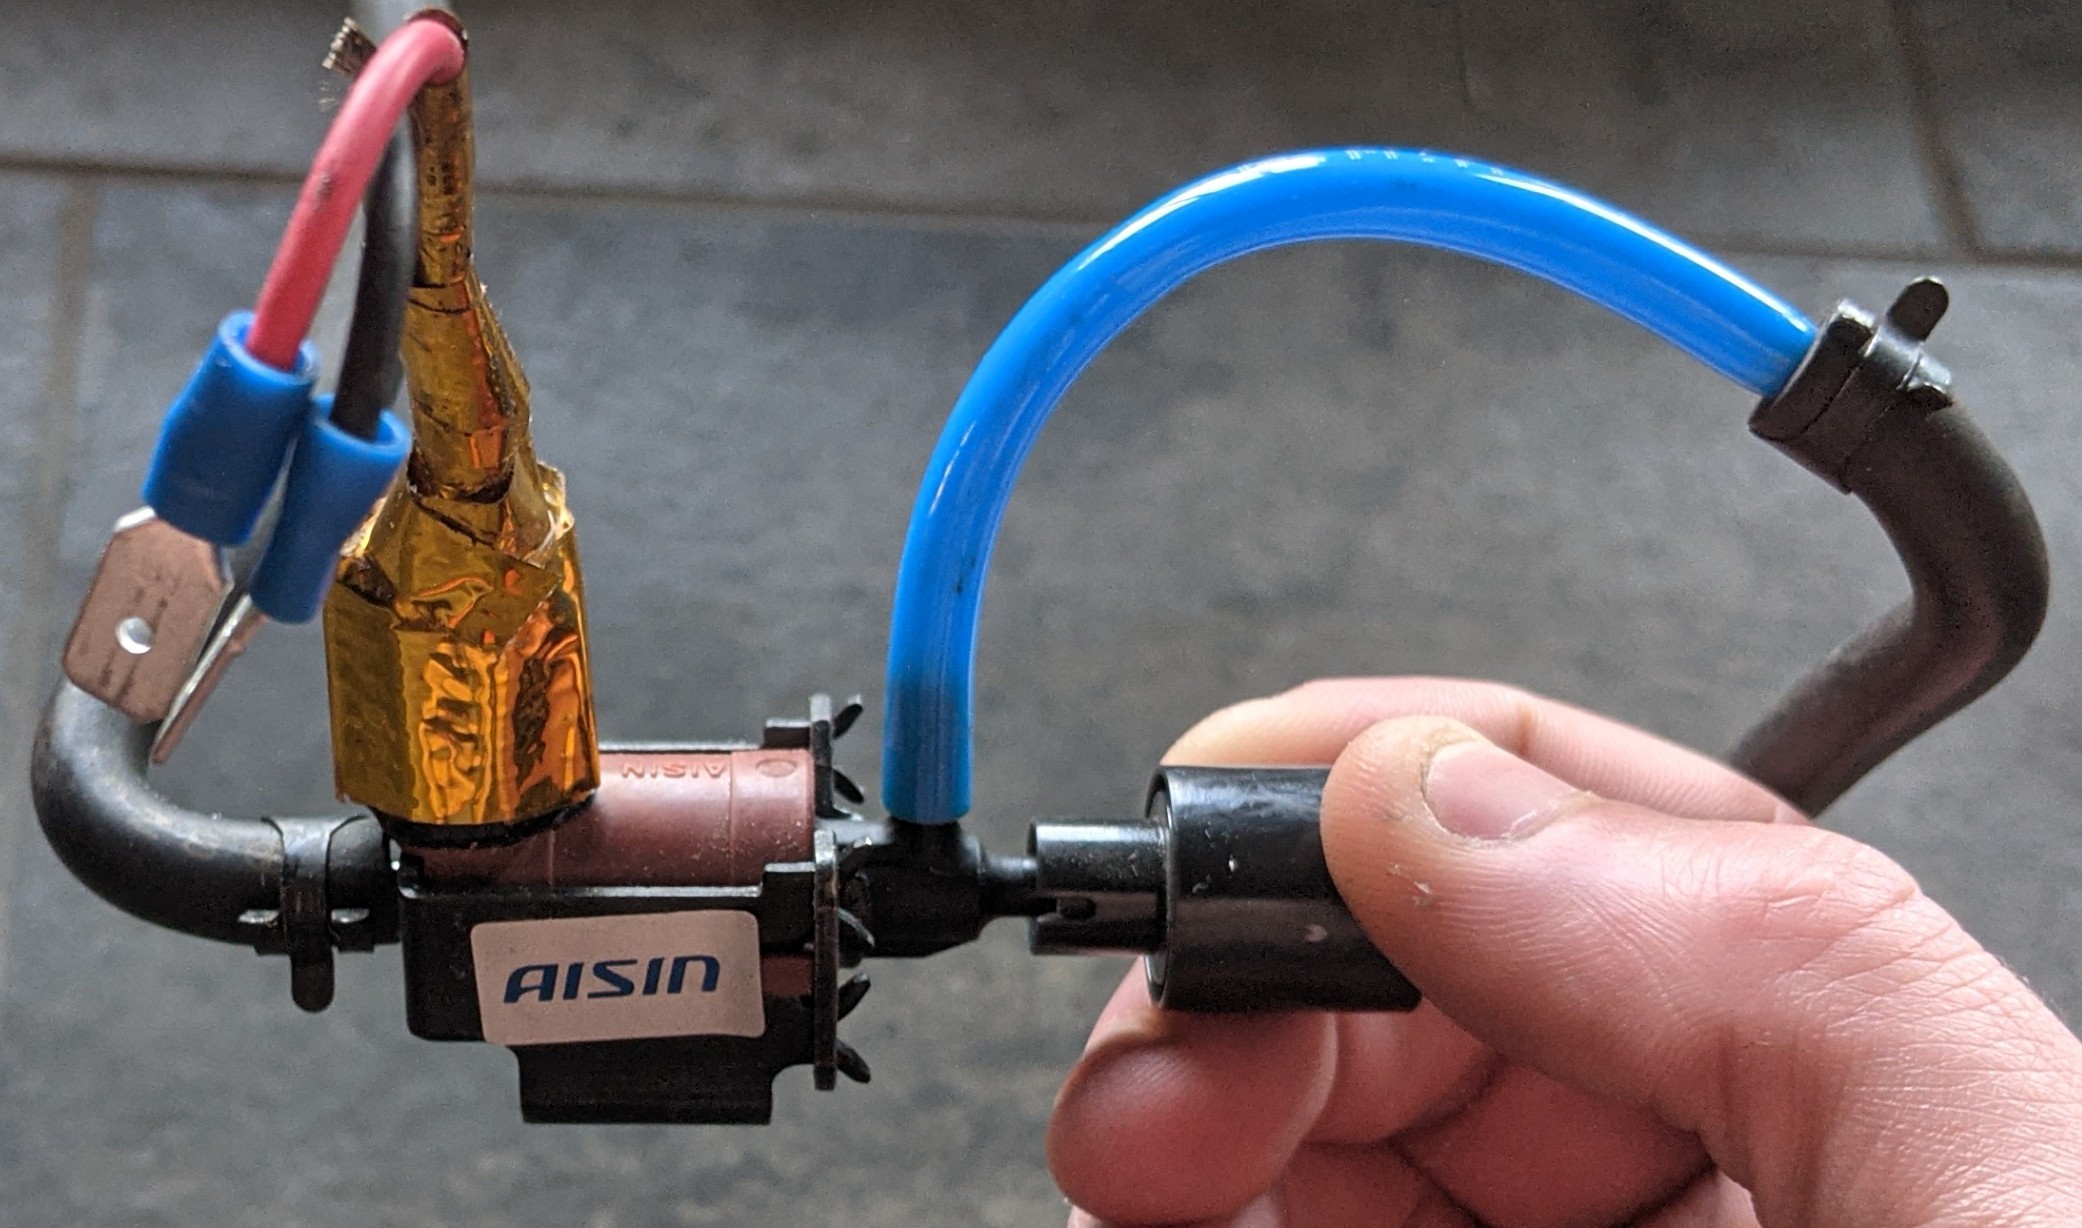
Here's how I set up my valve. I planned to get a proper piece of EPDM hose and a fitting but there's nothing more permanent than a functional temporary fix. The stock hose does fit on the "rear" fitting, but I also used a tight hose clamp. I soldered the wires to the terminals in the polarity you see in the photos. Red (with the blue heat shrink) is +. In the engine harness connector, the top terminal closest to the connector hook (latch thingy) is -, the bottom vertical terminal is +. :]
 3 points
 -
3 pointsReplace them with the MLS units. I can’t remember the part numbers but others will. They’re from the EJ25 STi WRX model. You’ll thank yourself for going to that effort later. If you don’t, they’ll end up doing the external coolant leak thing. If money is tight, drop it in and run it. Over time you’ll see the leak develop. It won’t damage anything, especially if you regularly check the coolant levels. Cheers Bennie3 points
-
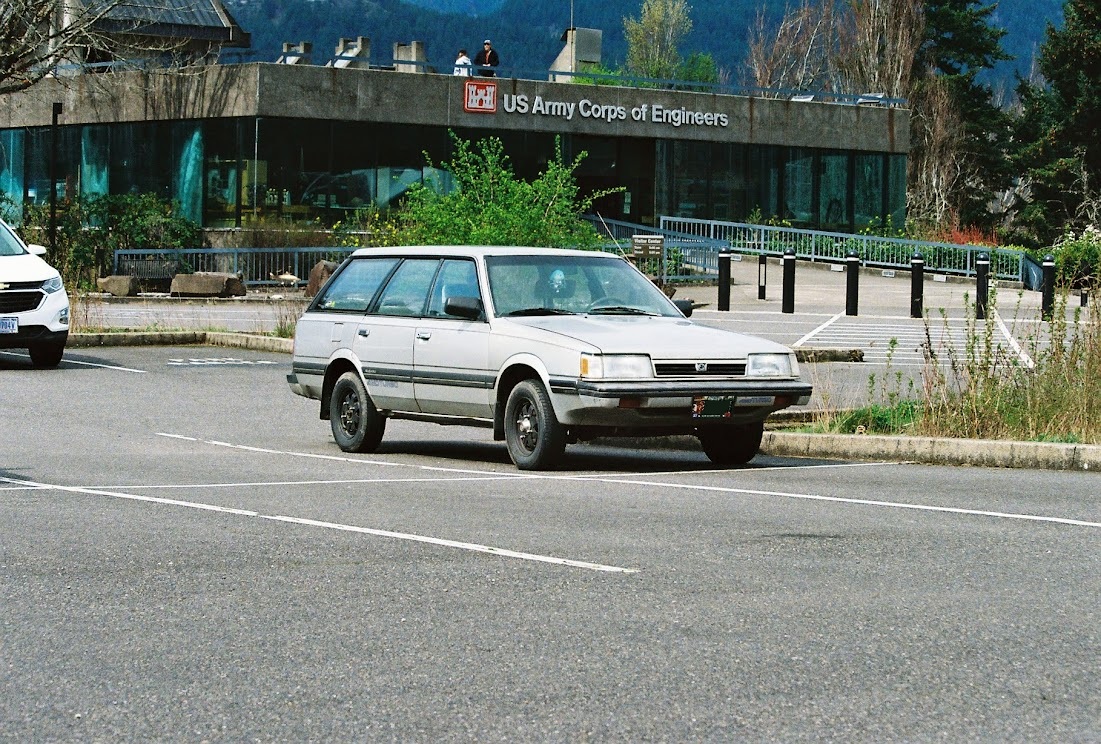
First post! Here are some pics of my 88' GL. I call her Constance. I have just about a million photos of her, but these are some of my favorites. Everything is stock except the exhaust which custom made by the last owner, nothing loud just not stock. Not exactly sure why it was done but it's not an issue, so I don't mind. Also, the rims were painted black which I'm a huge fan of. -Philly
 3 points
 -
A friend of ours from Houston drove up to my house a couple weeks ago and we headed up to the UP. Once we got there we stopped for pasties and ate them at a park along Lake Michigan on the edge of town. A younger guy stopped on his motorcycle and asked about the Impreza, we talked Subarus for a bit. He had just imported a 99 STI from Japan. It's funny to me, ever since I got this Impreza I've gotten a lot more questions and had a lot more people taking pictures of the car than with the other Subarus. Not sure how much of that is people's love of first gen Imprezas and how much is the fact that you don't see many turn of the century Subarus driving around anymore. We drove up to the campground along the reservoir in the southern UP. M and B showed up later. Friday we went to the rapids and then hit the mini banked oval. There was a snapping turtle at the edge of the oval. Then we wandered up to the Baraga pipeline grade. We were all entertained as usual. Hit some of the sandy stunt areas nearby and a few of the side trails. Before we got to Houghton we were on a trail in the woods where we decided to turn around. I could not get the Forester out of the ruts so we eventually put a bunch of branches and sticks in the ruts and I was eventually able to get out. Then going back down the trail I was crabbing the Forester sideways for hundreds of feet before I finally got straightened out. Headed north to Houghton and then to Gay beach. M declared it the mother of all stunt areas. Drove much farther south than we had before after crossing a narrow spit of tailings along the lake. Did some side by side uphill jumps and then decided maybe we should leave while we still could. Checked out the mine building ruins, some good post apocalyptic flavor there. Temps were solid while driving on Gay beach which is a good test of high duty cycle and low speeds. Then they crept up in the woods and we discovered one of the fan fuses was blown. The passenger side fan would turn most of the way pretty easily but there was one spot in the rotation it would get stuck. We eventually figured out there was a tiny pebble(?) stuck to the outer ring of the fan blades. We were eventually able to get it off and replaced the fuse. Later we noticed it had a slight coolant leak. We tracked this down to the small welds on the underhood heater core that attach the mounting flange to the end tanks. Rerouted the heater hoses to the stock configuration. Got up to the top of the cliff along Cliff drive. I had parked a few hundred feet back from the first overlook and when I was walking back to my car a UTV was coming up. I heard the driver blurt out “what the f--k?” when he saw the Impreza. He told me he knows people who won't take their Jeeps up the rocky climb we took to get to the top. I then walked back to the overlook and he said the same thing to the other guys. We drove to the next overlook and hard parked on the edge for some pictures. The yoopers showed up again and we talked to them for a while. “This isn't what most people from Illinois do when they come up here” one of them says while holding out his pinky finger. They had both seen different UFOs and had some story about a cave nearby that no one could find with a wall of silver and a bag of gold coins. I believed the UFO stories more. We camped at the overlook. Saturday morning we headed up to Brockway Mountain. As we pulled on to the long road going there we were proceeded by three extremely slow drivers. We pulled off on a side trail rather than test our patience following them the whole way there. This trail eventually led to a very sketchy bridge but we managed to cross it. I think it was in this area I checked one muddy stretch on foot and it didn't seem too bad so I drove through it, but I was barely able to do so and then the ruts were deeper and softer. So I told B he shouldn't come through and I didn't want to go back through so worst case we come back to that spot in a half hour. Fortunately we were able to maintain radio contact and I was able to drive around the block so to speak and meet back up with them. We eventually found a different way out of the area. At one point the temps had started to creep up in the Impreza again and a fan fuse was blown. This one was probably from the fans running while driving in deep water, we replaced it and never had the problem again. We eventually got up to Brockway Mountain from the other side. After we'd been on trails for quite a while and got back to pavement B said the Forester was shaking quite a bit. Turned out all the LR lugnuts on his Forester were loose and one was missing. We tightened down the ones we could and continued. From there we did a little more trail riding and buzzed up to the beach to camp for the night. At camp B swapped out his wheel studs on the LR hub as most of them were somewhat damaged or packed full of aluminum. Sunday we started heading back on various trails. One of them eventually became deeply rutted and I didn't think I could get through without taking off a mirror so we turned around. We came to a fairly long and deep water crossing where beavers had flooded a road. There was a muskrat swimming in it when we pulled up. I walked it and it was just below knee deep for a couple hundred feet. I drove through it in the Impreza after we removed the fan fuses. There was water over the front of the hood for a good portion of the crossing and we realized we should have stuck the gopro on. B crossed it in the Forester and then we put the gopro on the Impreza and I crossed it back the way we came and then back again to proceed. At the top of the hill right next to the stream was a cool old furnace of some kind. Later we found the beaver dam that was flooding that road. The highlight of the day was probably discovering and climbing Mt Houghton. Probably the most intimidating rocky climb we accomplished that weekend (ever in the UP?) and one of the best views in the UP once we made it to the top. Got gas and water at the Lac La Belle resort. Cashier was using binoculars to read the mechanical gas pumps. Found a silly hillclimb along the border of a wildlife sanctuary that M almost convinced me to try but ultimately we decided it should wait for a different weekend. Buzzed down to Lake Linden to camp that night so J could take a shower and we'd be closer to the portage. Monday morning we took the Bill Nichols trail basically all the way from South Range to Adventure Mountain with a few detours and stops for some stunt areas and mines along the way. M and J enjoyed the Firesteel trestles and the lookout near the top of Adventure mountain and we headed back from there. The trail west out from the Adventure mountain climb was rough and narrow but we made it through with some extra dents in the rockers and floorboards. Stopped near the end of that trail to air up and eat PB&Js. We drove down to Watersmeet together and the Impreza seemed to have some high frequency vibration that didn't go away when I put the clutch in. Cleaned some dirt out of the wheels when we stopped for gas but that didn't help. Stopped again and discovered two of the driveshaft bolts were missing from the pinion flange. I had looked before but those two must have been up. Installed some bolts and tightened them all down and had a smooth ride home. Could only run the AC intermittently on the way home or the coolant temp would creep up. Overall a good weekend, cooling issues with the Impreza are still frustrating but we all had a good time. J and M were impressed with the Impreza, especially the EZ36. J definitely enjoyed the UP and quickly got in the groove of following overgrown trails (with a surprisingly high success rate of connecting to other trails this weekend). M said it was probably his favorite off road trip we've taken, no major malfunctions, lots of stunt areas, lots of overgrown trails (which he likes). Removed the radiator after we got home and it seemed clean. I had sprayed it off at the car wash but that's usually not too effective. So I'm still a bit surprised the car was running hot on the highway. We did check the overflow at least once when it was hot and still have never seen air bubbles. After spraying the condenser out from the back with a hose wand it did become clear that a lot of the fins on it are bent over. We did go through a lot of brush so it's probably from the fan blades spinning leaves and twigs against the condenser. Should be getting a replacement today, hopefully that brings the temps back under control. Also got a pair of 80s Ford Econoline heater cores I plan on putting where the extra heater core is now for more cooling capacity.3 points
-
3 pointsUpdate found 2 burn resistors and soldered them in and it fires right up3 points
-
3 pointsI finally got an easy one! The 2002 was missing intermittently, bad enough to affect driveability. We got under the hood and tried spraying propane from an unlit torch along the vacuum hoses, for just in case it had a vacuum leak. No luck with that, but I did hear a tick each time it missed. I started paying attention, and was able to see a spark jumping from one of the coil end plug wire boots to a rubber hose! The boots had gotten dirty, and the medium voltage had made a track to ground. I pulled each boot and wiped the outside of the boot with a rag moistened in WD40, and wiped the dirt and carbon off the coil where the boot plugs on. FIXED! New plug wires are on the way. On a side note, we tried sticking the unlit torch into the air intake and opening it as wide as it would go. Couldn't hear any change in the motor noise. That trick might have worked with carbureted engines, but it doesn't seem to work with this engine.3 points
-
3 pointsSuper easy. Unplug the white connector from the module mounted vertically to the left of the steering column. Here's the old write-up on it, but looks like the pictures are dead. https://www.subaruoutback.org/threads/diy-disabling-drl-2000-2004.6668/3 points
-
Two weeks ago we drove the Subarus out west. Somewhat last minute shift of plans to western AZ for our trip as that was the only part of the western US that had a decent weather forecast for the week. In retrospect we probably should have done the last week of April instead so we had more options but it worked out. Saturday morning Z and A and B met at my house at 8AM and we packed up and headed west. Got to a campground east of Denver and stayed the night. Not too much below freezing but we got a dusting of snow overnight. Sunday we kept driving and made it into Nevada and camped east of Vegas along Lake Mead, saw some donkeys on the way in, the first group of many we'd see that week. It was very windy that night. The ground was too hard to effectively stake in the tents so I put the loops around some large rocks but we didn't sleep well as the tent sounded like it was going to start ripping apart at times despite parking the car just upwind of it. Monday we took the scenic route to Hoover Dam including some unpaved trails. Continued into Arizona and started down some Massey trails. Saw a lot of Joshua trees in NW Arizona, some of them quite green. Started on Massey NW29. Massey NW28 was fairly high up in the mountains and we got snowed on again, this time in Arizona. Might have been graupel (small white pellets) but probably not hail. Excellent views. Saw an old Ford truck down the slope from the trail (middle of picture below) and hiked down to it. On the way we also saw a Saturn. Neither had batteries. The Ford's transmission tunnel had been cut out (appeared to be cut out where we found it, we saw at least one chunk of it laying on the ground). The transmission had been removed and presumably carried hundreds of feet either up or down a steep loose rocky grade. Some cool mine ruins at the end of the side trail. Definitely want to take this one clockwise (as viewed from above) which we fortunately did, there was a lot of rocky downhill in one section but the uphill in the direction we took wasn't bad. The next point of interest we saw were some murals that had been painted on rocks along the trail that were originally painted in the 1960s and then repainted early this century. That night we were trying to find a more sheltered spot from the wind but even a small pond at the bottom of a 100' deep mining pit was windy so we just camped out in a wash along Massey NW26. That night was windy too but not quite as bad as the previous. There were also donkeys nearby at night and in the morning. Tuesday the first trails, Massey NW26 and NW27, took us the rest of the way to Lake Mohave. Then back up into the mountains and more graupel. Saw another truck rolled down the slope off Massey NW19 trail. Drove to the remains of an old mine, probably the biggest ruins/tailings we saw that week. Got some more graupel and we were getting a bit hungry so I cooked some dino nuggets in an abandoned mining shack. A climbed the sandy tailings pile in the Forester. Numerous old cars half buried in gravel. Next we drove to Massey NW15 towards Alamo lake. It was getting late so we found a neat well used campsite under a couple big trees along Massey NW17 and finally slept well, basically no wind, A hammocked between the trees. In the morning we found an old overgrown truck bed, a homemade vault toilet, and an old well. Wednesday morning we drove to some other mine ruins and then down to Big Sandy River. Z briefly got the Impreza stuck but we were able to just jack the rear end back up out of the sand, put down sand ladders, and he drove out. We drove the rest of the way to Alamo Lake and then took Massey NW14 to a river crossing as there is a bridge for the gas pipeline but not for vehicles. I waded a few options and picked the one with multiple firmer crossings rather than one with a single long crossing and soft spot in the middle. Both cars drove through the various crossings/mudholes without incident and we celebrated with some PB&Js. It was very green along the river, not super surprising but not really what we'd expected driving in western Arizona. We took Massey NW12 to Swansea, perhaps the largest mine/ghost town ruins of the week, and spent a while exploring on foot. Drove down Massey NW13, a pretty fun wash, as close as possible to the Bill Williams river we'd crossed earlier and found the remains of the old pump house, more donkeys along the way. Took Massey NW6, crossed a canal and continued. Started getting dark so we found a spot off the main road to camp for the night. Thursday morning we visited more old mines along Massey NW1. Saw the Bouse fisherman, a bit disappointing honestly. Back to more old mines along Massey NW3 and a cave/arch at the top of a hill. Headed down to Quartzite for fuel on the way to Kofa NWR. When we got to the highway there was a sign to “wait for the pilot car” and the old man driving the minivan ahead of us got out and sat on his hood to smoke a cigarette. After a few minutes of impatiently waiting I noticed the powerline grade along the highway so we followed that for about five miles, crossing various washes along the way, until we'd passed the construction zone and got back on the highway. The Mobil gas station sold water for $0.25/gallon or $1 / 5 gallons (quarters only) so we got some water for drinking and rinsed off our heads. Best quarter I ever spent. The first trail we took in Kofa was Massey C2 up an extremely scenic wash/canyon. Small arch at the top of the canyon, skull rock, and a large balanced rock. You can no longer drive all the way through, you'd have to do a through hike, but we hiked from the end of the driving path up to the saddle to check out the view. Then we drove down Massey C1 (Palm Canyon trail) to hike back to get a view of the only native palm trees still growing in Arizona. It's a fairly arduous trek to actually hike up to them (start at the red post to the right) and it was getting dark so we hiked back to the cars to find a campsite. Found a decent one close to the intersection of Massey C3 and C4 where we wanted to start the next morning. Friday morning we drove south on Massey C4 to an old mining town/museum. A bit of a tourist trap but there were a lot of cool old things to see, plus they had flush toilets. We looped back to the highway and went back by the campsite to head east through the NWR on Massey C6 and C9. Where C3 meets C6 is the site of a large mine, fair amount of equipment/ruins and some tunnels to explore. We headed north out of the NWR on Massey C10, drove along the top of a dam, and drove down a bit of a fun pipeline grade. Crossed the interstate, continued north on Massey C11, and found a spot to camp next to a small old mine of course. Saturday morning we drove up to the highway and started heading home. Stayed in the same campground we had on the way out east of Denver. It was cold again, the small pond by our site was frozen in the morning, but no snow. Sunday we drove the rest of the way home. B's Forester drove about 4400 miles so the Impreza probably did about 4300. Forester needs a RF CV axle and one of his valve stems was leaking so we swapped on one of the spares in Iowa. Impreza needs a RF tie rod. Most disappointingly the coolant temperature crept up a few times on long slow uphill trails with the AC on and once in deep sand with the AC off. AC needs some work/tuning too, I might try running it at a lower voltage. It seemed to work fine last summer but it was mostly discharged before the trip and since I recharged it, the high and low pressure slowly diverge until it eventually shuts off and then it will cycle back on again. It does this every minute or so and you can feel it surging while driving. Not sure if it's fully charged. I'd forgotten how rocky a lot of the Arizona trails are. I'm not talking about challenging rock crawling, although there was some of that, rather many of the trails had a lot of 4-6” rocks that were just annoying and rattled the cars. For instance my glovebox latch came unscrewed near the end of the week. Haven't run into trails quite like that for such long distances in other states. A used the low range on the Impreza once at the top of a hill when he didn't have quite enough momentum to get to the top. Forester low range got used 5-10 times. Overall a good trip. No major problems, only got stuck twice briefly, saw some good scenery, hit some fun trails and had good weather. Sorry travelvw, not a lot of critters or carnage on this trip.3 points
-
I haven't worked on one of those, but the most common cause of such problems is bad wiring between the body and the door where it flexes, followed by burnt out speakers. Does opening and closing the door, or wiggling the bundle of wires to the door, make it go on and off? Does thwapping the door over the speaker make it go on and off? Does poking something through the grille and pushing on the speaker cone make it go on and off? If it's not the door flex wiring or the speaker, then look into the radio itself and the rest of the harness wiring.3 points
-
B fit and tacked up a set of lateral links for the billet knuckle swap. I turned up some of the pieces for that and a couple of wheel bearing spacers. Sometime in the next month or so we plan on swapping out his rear diff and doing the billet rear knuckle conversion on his Forester.2 points
-
Whole gearbox swap = easier than repair. I find it easier to pull the gearbox out from under rather than pull the engine from above. The drive shafts can be left to slide off as you take the box out, no need to pull them off first. Once the gearbox is clear of the bellhousing of the engine, push it left, remove shaft then push it right and remove the other shaft. Lining it back up if stub axle is a little tricker but possible. I’ve done it several time now and it works a treat!2 points
-
yup, swap out the trans. you mentioned noise was only in 2nd gear. bad diff would make noise according to speed of the car regardless of gear2 points
-
2 pointsOk so on the ground by 2026 didn't happen - but i did finally get things to the point where the subframe and diff are now semi-permanently attached to the car. Hooray! Using the holes in the bed for access I cleaned and tacked in the subframe, using the diff and its sheet metal as a jig to get everything in evenly Once everything was pretty sturdily tacked - I pulled the jack out from under everything. So far so good! I pulled the CV axles off of the knuckle/wheel assemblies and bolted in the stock lateral links and stacked the tires on blocks to get an idea of where I want the wheels wheels to sit at rest, and this is where the next complication arises - overall things look really good, except the wheels rub on the front of the arches left to their own devices. I'll need to play with this a little more - I'll either need to do a little bodywork to extend the wheelwells about an inch or two forward, or I may also consider options to move the whole diff/subframe assembly backwards about the same amount, though then i run into other clearance problems in the tunnel. I'll need to spend some time under the car staring at it to figure out which I'd prefer to do. Currently my gut says the latter is the easiest. For now, however, this still lets me move forward somewhat with the suspension construction. the more pressing issue at this stage is that the rear track is still several inches wide at the back. I loosely bolted the rear coils in place, and that let me get an idea of how much room I have to cut and move things inboard. I can almost see the end result - II'll be able to scrap the plan of using the impreza towers and modify the stock wheel wells without too much trouble, even though I might want to reenforce them after the fact. Had I known this prior I would have just cut the tops out, but oh well. Maybe if i do another in the future I can save myself the exploratory chopping. Or hell, even if someone else does this similarly - hopefully I can save you a little trouble. Did a little measuring and this is what I came up with: Forgive my mixed units and felt tip marker sketch on my mechanics crawler (free USPS cardboard) - but here's the broad strokes: I have a little more than roughly 2" / 5cm of horizontal clearance before the coils begin contacting things they shouldn't. The stock rear lateral links measure about 41cm long bolt center to bolt center, and I'm estimating about 10cm of vertical drop from their frame mounts to the knuckle mounts. if my math is mathed correctly, that means I'll need to shorten the link about 6cm to get the wheel moved inboard the requisite 5cm. I'm going to pull the links all the way off so I can measure them on the ground to double check these measurements - as I've found some adjustable links that would appear to be able to get close to these lengths without much serious modification and if i can do that and save myself a few hours of fabrication, I'd prefer to do that. I've also gotta figure out the trailing arm mount, but that'll come after I figure out the width issue. Anyways, that's all for my new years update - until next time kids!2 points
-
Have you drained the gearbox oil and see what comes out with it? Also carefully feel around inside the gearbox through the drain hole for any other fragments that may be present. Noise will travel to different areas. You’d need to use a dowel/long screw driver/stethoscope to pinpoint where the noise is coming from more precisely. Seems more likely that second gear is chipped, possibly both gears - if that’s the case you’d get an un-rhythmic sequence that will repeat after some time. This is because all gearsets have at least one gear that’s got an uneven number of teeth so they wear all teeth against each other for even wear across all the two gear cogs’ teeth.2 points
-
2 pointsFinally solved it for anyone wondering it wasn't actually oil burning like we thought at all it somehow is getting brake fluid sucked in from the brake booster which I didn't even know was possible2 points
-
2 pointsDid a little more weekend deathwheel work today - took about an hour to get some access panels cut into the bed floor so I can more easily add some gussets to the subframe while it's bolted to the assembly. The idea here is that I'm going to use them both to reinforce the subframe and it will give me a locating feature when I go to tack this piece into the car so everything lines back up. The idea here is that I'm going to use them both to reinforce the subframe and it will give me a locating feature when I go to tack this piece into the car so everything lines back up. I've still got to take things in and out a couple times before this becomes a more permanent part of the vehicle. I'll probably weld the panels back in once I'm satisfied with the subframe and suspension towers, as some of these welds I'm planning on leaving only semi-permanent till I've got all the clearances worked out with the coilovers, so I'll be leaving access until I'm sure I don't need it anymore. This last photo looks real scary but in reality it's just me adding four tack welds to the gussets only on the subframe. I'll be removing it one last time to box everything in and hit it with a bit of weld-through primer. Folks with a real professional background in automotive engineering would probably cringe at some parts of my approach, but I got everything measured up as even and straight as a mallet and tape measure would allow. I'm honestly pretty impressed with myself at how evenly I was able to get everything to line up with a couple symmetrical features I used as reference points (a couple bolt holes and a few key bends/seams. I find myself repeating the mantra "perfection is the enemy of progress" a lot on this build, and so far (knock on wood) it's working out pretty good. Next up I have a fairly short punchlist to get this subframe on the car in a meaningful way, and then I'm planning on attacking the lateral links, trailing arms, and locating the strut towers. The more I think on it the more likely it is that I'll probably be scrapping more of the Impreza tower than I'd intended. The rust is pretty deep in the driver side tower and the more I stare at the mockup as it sits the more dislike the way it looks. One way or the other I'll figure out something good. Main goal is to have it back on its own four wheels (again) around the new year. We'll see if I make that goal or if I blow past it for some unforeseen reason. Hopefully I'll have at least one more update before the New Year, but if you don't hear from me beforehand, have a good last few weeks of the year, everybody! -M2 points
-
2 pointsTurns out the IAC needed adjusting. Part of my problem (in my shop) is having too many parts laying around. This GL10 was a rebuild from the ground up and I had parts from my RX laying around also. Which means multiple IAC's to choose from (and not keeping stuff separated). So I grabbed the best looking one and cleaned it, then installed it on the GL. Only messed with it once, after getting the engine running, but knew too much fiddling is a bad idea. I got the car back to my shop last week and after going thru everything (again), I tried a little adjustment on the IAC. It worked like a charm, no more surging and fuel dump is almost gone. No more smoke after startup. It went home last night and the owner took it to work. He txt'd me and said it stumbles, shakes and farts at first, then runs better when its warmed up. I have the 2 10in fans on a switch now, the engine struggles to get to Op Temp but manages after several miles. Big reason is the radiator is a BIG 2 row aluminum rad (In prep for NA/T), so we may find a smaller rad to run temporarily. Now he needs to find another 5spd D/R trans as the current one is almost gone2 points
-
2 points
-
2 pointsAlready surpassed the 40 years milestone of being with my "BumbleBeast" in continous ownership and, despite that this SportsWagon is looking smaller as new cars around tend to get bigger; I preffer this Yellow noisy fellow over any other car, everyday in any weather condition. Lousy cellphone photo Kind Regards.2 points
-
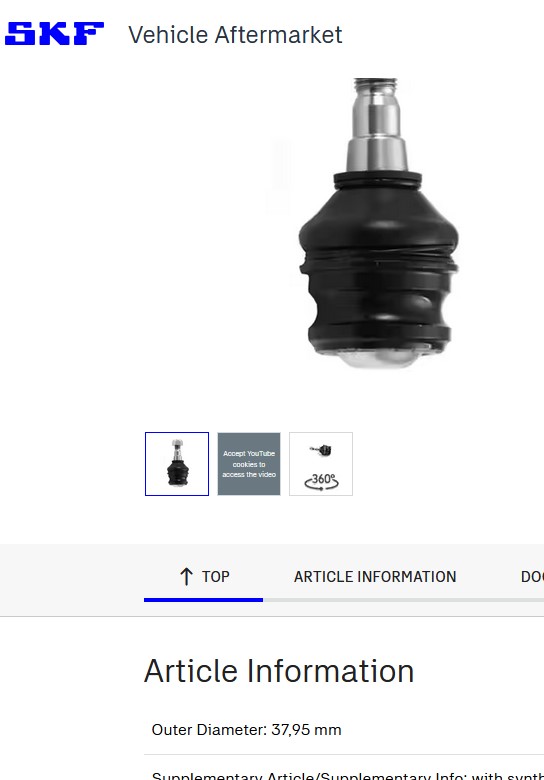
Well did the thing, so kinda pleased with myself, but also bummed.... dismounting went smooth, in italy they dont use salt on roads in winter, so cars here are very rust free, there was nothing frozen. I did have to make a 1/8" U shaped plate to add height to my fork tool as it wasnt tall enough to separate the taper, easy. 10 mins with an angle grinder to make second bigger issue was none of my fault, i mounted the first new ball in the arm, went to feed it into hole in the steering knuckle.... wont go in! Really? Turns out the SKF bodies were machined oversized due to an error in the factory, 38,10mm instead of the 37,95mm it should be! how the hell this can happen is a mystery. Options was to send them back to amazon and wait for new ones, but with the car on stands and the rubber boots destroyed during removal i couldnt go back to the old ones Luckily i have a lathe and been able to take a lick off the diameter and bring it back to dimension, but gee.... what the heck Now for the real bummer - As i was bolting back the torsion bar tie rods, i casually pulled on the bar and heard a knock.... well turns out that the free play making noise was in the tie rods, not the ball joints!!!!! Indeed after lowering the car and driving with the new ball joints, clacking was still there. The old ball joints had no free play to begin with. Ordered new tie rods, changed them in 10 minutes or so without even lifting the car, noise gone. Cant believe i did all the knuckle ball joints work (and SKF agravation) for nothing. So lesson learned, check your stupid little tie rods before changing your ball joints.
 2 points
 -
It might work, not sure though. The issue is the strut sockets into the steering knuckle, so you'd need a strut that had the right diameter and spring mount location. Here are the 4WD strut parts numbers I had in my notes. There are some used Loyale struts on eBay at the moment (both right and left). Front Right Sachs: W0133-1932779 Front Left Sachs: W0133-2038805 Front Right TRW: JGM4031SR Front Left TRW: JGM4031SL Front struts are very difficult to find. They are available but the parts availability seems to come in waves. There's not really any "upgrade" parts for these cars (there are overload springs out there). Just finding parts designed for these cars is an accomplishment. :]2 points
-
2 pointsThey replaced the slave. If they give me the old one, I might investigate rebuilding it and keep it with the other spares I have for the car. With fresh fluid and a bleed, maybe the master will be ok, if not, it's the onley thing left so, I might tackle it myself but really guys, maintenance and repair work is getting to be a challenge for me nowadays.2 points
-
2 pointsThat's a lot cleaner than any you see here! Good choice for a project. Stuck thermostat also can cause overheating and foaming, but head gasket isn't too bad of a project. The stock carbs aren't terrible, and often can be fixed with just a cleaning, being careful not to tear gaskets. Brake booster and master cylinder are usually reliable; no need to replace them unless you have issues. Try ebay or junkyards for better headlights.2 points
-
2 pointsI'm the one who suggested that the cylinders were washed. lol. The piston rings seal with a very thin coat of oil on the cylinder wall. If you ever get fuel without starting, like trying to get a bunch of old gas and a dirty carb to run, the fuel washes this thin oil coat off the cylinder walls, and you lose compression. Fixing the problem that caused it not to start (i.e. flushing bad fuel, and dismantling and cleaning a gummed up carb), and starting it, will get oil slung back onto the cylinder walls, restoring the ring seal, and restoring compression. Sticky valves or such aren't going to happen simultaneously to all four cylinders from a running engine... Mechanical things that could affect all cylinders at once are a broken crank, broken cam (I saw this once! ... but there was a lot more broken too), broken timing gears, slipping ring gear (so you're not actually cranking the engine), etc... But if the accessories and dist are turning, those are all going to be fine. Broken cam or timing gears also cause a distinctly different sound, since some cylinders will be stuck with both valves closed, and compress each revolution - the sound of an EJ ready for a timing belt and half the valves replaced.... Am I positive I'm right? Of course not. They could have blown both headgaskets at once, or some other simultaneous multiple failure. Or the engine is total crap and never actually had any approximation of full compression but was limping along. But, based on my experience, I think it's the most likely diagnosis, which is why I said "probably".2 points
-
Made a tube to brace the radiator support longitudinally and to protect the exhaust. Bracket bolts to the body right in front of the subframe where the bumper brace was bolted in stock. Added a tube to brace that and protect the oil filter and cooler. Tubes welded back in to connect the radiator support to the bumper and to mount a piece of sheetmetal. B cut a piece of 1/8" 4130 plate for the front of the skid and I welded that in. Old airbox guard was mostly destroyed so I made a new one. Welded as much as I could on the car, then we unbolted it. B cut a piece of 4130 sheetmetal to protect the condenser and radiator. Radiator and condenser mounts welded on new radiator support. Basically ready for paint. I would like to get this thing back on the road ASAP but I'm going to see if the paint shop can get this all painted up fairly soon. Have new lines/hoses for the oil cooler, new radiator, etc. B took a pair of good engine mounts off my spare EZ30. So we have to swap some of that out.2 points
-
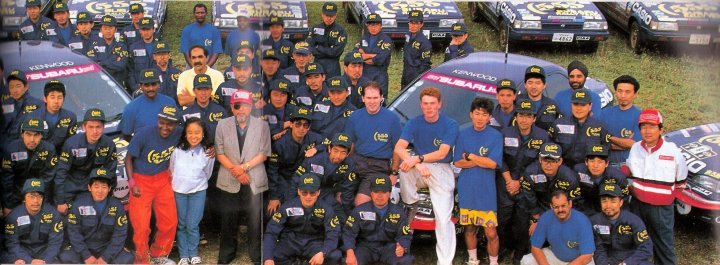
2 pointsI was just looking at this old rally photo of the Subaru WRC team (I assume in the mid 90s?) and I just noticed that the cars in the back of the photo are Leones/Loyales and not Legacys! I thought it was surprising since all the photos i see from this time are the early Legacys. Does anyone have any or know of any other photos of these 555 Leones. I honestly think it wouldn't look too bad, although I prefer the white blue and gold on the rally Leones.
 2 points
 -
2 pointsThe old “how do you eat an elephant?” dilemma. One bite at a time.2 points
-
B and I worked on all three of my Subarus and his blue Forester a few weeks ago. Bunch of relatively minor stuff but I went through the front struts on the white Outback. They've been making some clunking/spring shifting noises when turning tight at low speeds so I suspected the steering bearings needed a cleanup. I replaced one and regreased the other, haven't noticed those noises since. While I had them apart I noticed the bump stops were split. Haven't seen this on our other cars but this is the only set where we made the bottom of the body bigger to allow the bumpstop to expand to give it more travel. Perhaps now they can expand too much. Regardless, I replaced them. We got the Ford van heater core and electric fan installed on the Impreza. Tried to figure out which front wheel bearing (I assume) on my 2001 H6 OB is making noise but even using B's multi microphone noise identifying system we still can't tell. Neither side is loose or seems to get hot but at least one of them is making a lot of noise. Definitely louder or quieter when cornering so I assume wheel bearing. We replaced one of the rotors we thought was pulsating figuring it'd be an easy try and it maybe pulsates less but did nothing for the noise. The next weekend we went to the UP with some in laws/friends and went trail riding one day in the Impreza and Outback. Stopped at a gas station after some trail riding and I noticed the temps on the Impreza were creeping up so we pulled over, fuse and relay seemed good but driver's side fans were not running. Without the AC on temps didn't creep up too much even in the sand. I made the mistake of letting a novice drive the white Outback without me in it. Then I noticed the Outback was pulled over with steam coming out of the front end. Driver claims the brakes weren't working. It has some serious lower front end damage after going off the trail a bit and hitting a log. Lower radiator support and skid plate and bottom of engine very smashed. I think the front fenders, lights, crossmember, and possibly hood are still all in the right spots. In the long run probably the biggest downside is I’ll have to replace the head gaskets on my spare ez30. As we were pulling the car back on to the trail, I realized that we’d lost the rear bumper cover somewhere. Hooked the tow bar, lights, and safety chains up and started towing it north on the trail. Not too far down the trail we got to a big steep drop but it didn't look terrible so we went down that. Kept it under 20mph, looked it up later and that's apparently the safe flat towing threshhold for the 4EAT for a max of 30 miles. Still curious what exactly fails if you flat tow it too fast for too long. The rest of the trails weren't much of a problem and we eventually got back to pavement and aired back up the tires on the Impreza to 40psi. Flat towed white Outback to the closest town and asked the guy at the grocery store if it'd be OK to park it there overnight. He said one night would be fine. I couldn't convince others to retrace our steps and retrieve the rear bumper cover mainly since it was going to be dark soon. Most of the rental, almost all Uhaul, places were only open a few hours on Saturday so I either had to wait for them to open or by the time they were open I wouldn't have been able to get to them before they closed, had to talk to one guy for a bit to figure out how to get them to rent me a tow dolly. I did a test drive of my dad’s 1987 full size 3/4 ton Dodge van, seemed to be running rough but not terrible. None of my primitive engine tuning skills seemed to help. After a lot of calling around I drove the van an hour to U haul to pick up a tow dolly. On the way there the engine starting making noise and I looked at the oil pressure gauge (blocked by my hand in a normal 10-2 driving position) and it was reading nothing. Pulled over, after a bit of looking around figured out one of the oil pressure sensors had started leaking badly. We've had this happen on a different full size Dodge van probably 20 years ago. Fortunately there are two sensors on this one going into a tee so I was able to take that apart and just put in one sensor. Dumped some engine oil in and proceeded. At the rental place the lights on the tow dolly didn't work. Wasn't getting power at the four pin connector but had power at the six pin connector (both on van). They of course had just run out of adapters. So I drove to the local Ace and picked one up, drove back, plugged it in, right side light on tow dolly not working. Hooked up to another tow dolly with functional lights. Drove about two hours back up to where we'd left the Outback. During this driving I'd realized I didn't have the keys to the white Outback. But I did have a coat hanger and a screwdriver so I was able to get in. Fortunately for whatever reason in that car you can shift it into neutral without turning the ignition on. Lined the tow dolly up with the car and backed the van up to it. Pulled the car onto the tow dolly with a come along (hand winch). Strapped it down, looped safety chains around the control arms. Then I realized I should have unbolted the rear driveshaft sooner but I was able to just get all four bolts. Was able to strap the driveshaft away from the rear diff so it didn't rub (I assume). Towed it about 1.5 hours back to the cabin. Chocked the rear wheels with some chunks of 4x4 and set the parking brake and drove the tow dolly out from under the car. Sunday morning I drove the tow dolly back and left it at the rental place, a two hour round trip. We drove the van back in addition to the two other cars we drove up there that still ran. Impreza temp gauge was right in the middle even with AC on in 95F weather on the highway. After returning home and tracing the fan wires from the fuse box to the fan I found that one of the pins for the main driver's side fan had pulled out and the connector looked melted. It would still occasionally run when I was pushing or pulling on the wires so I think it was just loose in the connector. Replaced the stock connector with spade terminals and heat shrunk/taped/zip tied everything back up, they all seem to run now. Drove Impreza to the cabin the following Friday morning. Strapped RF of bumper to engine. Removed front CV axles and replaced with loose OB Cvs I found in the basement. Unloaded flat towing equipment and put in Outback. Saturday morning I drove to the end point of our trail riding, filled up with gas, and retraced our steps backwards in search of the rear bumper cover. I figured I now had most of the rest of the day to kill so I'd do some mild trail riding/exploration on the way back. Impreza seems to spin the tires with less forward traction with the tires at 45psi as I had them that day than the 25psi I'd normally drop them to if I'd known I'd be trail riding as long as I did that day. I tried to do a big loop south of where I found the bumper cover. At the start it seemed a bit narrow/overgrown but there was a Forest Service trail open sign so I decided to go for it. Parts of it were very overgrown. Eventually there was a large tree that had fallen blocking it. I drove around the other half of the loop and got back to the fallen tree. There was no way I was going to do anything about it without a chainsaw, which I did not have. Checked out a stunt area I'd found on the satellite that had one big hillclimb and drove a side trail near the top of it. No intention of trying something like that solo so I moved on. Went to the end of a road on the map, figuring I might as well see where it went, turned out it kept going for miles with various side trails, none of them on my map at all. Went by a few old cabins along a river that looked like they hadn't been used in years but in decent shape. Drove down some roads that definitely seemed like they were just for logging, some of the steeper ones were even pretty nicely graveled. Eventually I was heading south on a nice wide dirt/gravel road and getting closer to a paved road we've been on many times. There were a couple of large boulders in the road but they could easily be driven around. Didn't see any signs on either side but decided not to drive past them. Also I think where this road comes out to pavement there might be a large berm. There was also a wide smooth road heading north from the “blocked” road but it had tall grass growing in it so I decided to skip that for the day and head back the way I came. On the way back north as I was heading by the old cabins I caught up to some locals driving UTVs. Each one had a guy in his 70s and one in his 20s. The younger guys were pretty entertained by the Subaru and they all kept asking how it did. I told them the trails around there were no problem for it. I asked about the cabins and they said the one we just passed by used to be theirs, they had a year by year lease with the forest service. Then it was declared a scenic river and hundreds of people lost the use of their cabins. Where we stopped was another one with a similar story. I asked about the logging roads and the big rocks and they said the logging company that has the contract for that section of forest tries to keep people out from tearing up their gravel(!) logging roads. They pulled over to let me by and I kept driving north until I eventually found a different way out. I got back on the highway and found a waterfall I'd seen on a 40 year old Michigan county map. The “trailhead” is a gravel spot big enough for one car along a gravel road with a rope tied around a few trees heading into the woods. No sign or anything. Hiked into the woods, trail was easy to follow, found the waterfall, pretty cool. Near there I went down a dead end forest road and encountered this turtle. When I got back to the cabin I set up the flat towing hardware and did a test drive. Seemed to do OK but tire was still rubbing on the tape I'd put on the end of the front bumper so I cut that off with the recip saw. Had some dinner and went to bed. Got up Sunday morning, packed up the car, checked fluids, aired up the tires in the Outback, and headed south. Flat towing went as smoothly as possible. Impreza has good power and bigger brakes than stock which helps. Temp gauge was right in the middle all weekend, even when towing, climbing sandy hills, AC on, etc. Left tow bar connected, drove Impreza in garage, disconnected tow bar, slid rear of Impreza sideways with a floor jack, drove Impreza out, pushed Outback in garage with Impreza.2 points
-
2 pointsI completely replaced all of the grounds (wire and ends) for all of the grounds I could find in the engine bay. So far, so good. The windows seem to be moving a little quicker as well.2 points
-
2 pointsI should add, it's just my *theory* that not having a reservoir makes them crack. I've had a lot of problems with them cracking, and here's what I decided: With no reservoir, the radiator always runs with a bubble on top. Even if you fill it to the brim, when it warms up and expands, it'll push coolant out the cap, and pull air in when it cools. At idle, the bubble is at the top of the radiator. Coolant entering the upper hose at low velocity drops by gravity and slowly flows through the tubes, with the top couple tubes filled with air from the bubble. At throttle, the high-velocity coolant against the resistance of the tubes causes coolant to flow through all the tubes, including the top ones, and the bubble is pushed to the outlet side of the radiator. You can see this if you look down the cap with it running - the level drops when you give it any throttle. So, at throttle, the top tubes are filled with hot coolant, and are hot. As soon as you go to idle, and the bubble moves into them, the airflow over the radiator instantly cools the tubes down to air temperature. Then you give it throttle, and they get filled back with hot coolant, and instantly heat to coolant temperature. Then you go back to idle, and they drain and instantly cool to air temperature. And paper thin aluminum can only take so many 100 degree temperature cycles every few seconds before cracking... especially since when they cool, they contract against the force of the rest of the hot tubes expanding the tanks apart... I couldn't find any other claims about this when I extensively searched for info on them cracking - just lots of other people having mysterious cracks in fairly new expensive radiators. So, with no other competing theories, I'll go with the one I came up with!2 points
-
I've had pretty poor luck with aftermarket ones leaking in less than a year. 25240KA041 genuine Subaru number, MSRP is $24.57. Every dealer has a pile of them (I have 15 at the moment). I used a Subaru switch on my Toyota Celica because I was tired of the aftermarket ones leaking and the Toyota one has an MSRP of $712 points
-
That video is OK, but kind of short on detail. Do a YouTube search for "Miles Fox EA82" and watch his timing belt video. He posted on this board for a long time, and his videos are good ones that have a lot of why you're doing what you're doing instead of just how to do it.2 points
-
2 points
-
2 pointsYou could narrow the subframe... you could add fender flares... orrr.... you could cut the brat down the middle and add 6" of sheet metal!2 points
-
2 pointsWell, everything was sort of in place for me to get a first order test fit even with my bum leg. Doc says I'm good to do pretty much anything that doesn't stress the break through my new aircast boot, but no running, jumping, sprinting, wrestling, or heavy lifting. Basically I have to be deliberate with my movements and creative with the use of wheels and levers when it comes to heavy stuff. I'm not pushing it, even though this update so soon may appear otherwise. I had all the heavy stuff in place already, so today was just minor manipulation to see how things sit. The new diff does in fact mate directly up with the original front diff mount, exactly where it needs to be. The bolt patterns are exactly the same and the lengths are almost identical as well, so I will be reusing the OEM Brat front mount for the differential. I may need to figure out a replacement option for the rubber bushings that secure the front mount to the frame, but for now the originals are intact enough. There's a little interference on the tires at the front of the wheel wells which I should be able to counteract by placing the trailing arm mounts correctly in combination with narrowing the wheelbase. As far as the width goes, one could ostensibly leave that alone and just flare the wheel wells out to accomodate things, but that's not the direction I'm going to take with this build, as I'm going for a more subtle outward appearance. Lastly for the big rear diff subframe, it is a few inches too wide and will need some trimming and a creative solution to mount to the frame. likely more bracketry. In the spirit of the build I'm hoping to reuse what I can from the Impreza - I bet I can come up with something to allow me to repurpose the bushings that mounted it to the undercarriage of the newer car when I narrow the pivot points governing the rear wheelbase - the plan for which I've sketched in on the photo. Red dashes indicate cuts and shifts I plan to make to the pivots, green indicates the trimming of the outside edge so I can move the frame mount bushings to a place where they will be able to be attached to the frame. It looks like the original fuel tank will either need some serious modification to fit in the space with the new subframe, or I'll need to fabricate an entirely new cell. I suspect I should be able to find something serviceable that will fit behind the entire assembly and still meet up with the original fill spout. Just need to take some measurements once I've got the new differential subframe into place. It seems easy enough to put a new cell behind the differential, under the bed, but I'm a little concerned that may turn my Brat into a Pinto in the event of a rear end collision. There's also an empty space up behind the cab, but I'm not exactly excited about that placement, either. Suggestions for solutions are welcomed but as usual not expected2 points
-
2 pointsI've managed to keep the momentum I've built this last few days by removing the hull of the Impreza from my shop. In the interest of clearing the walkway even more I've decided to start preparing to transplant the rear end, which means removing the old one. This turned out to be easier than expected - probably in part because of the practice I had pulling the subframe from the Impreza, and partly because this one had fewer and more accessible bolts holding the thing on. I've learned a few things from today's endeavors. 1) the Impreza fuel tank is too long/wide to fit in place of its original counterpart in the Brat. This "too wide" feature seems to be a trend and for good reason - the wheelbase left to right when measured before removal were a good nine inches different, give or take. As such I'll likely either end up needing to reuse the original tank and run an aftermarket pump (most appealing, easiest on my wallet), or building/locating/modifying a new fuel cell to fit. Whether or not I will be able to use the original tank largely relies on item 2. 2) While the wheelbases are different, it looks like the differentials and housings themselves are very similar in size and shape - so much so that I'm tempted to think they used a modified version of the molds for the diff cases - or at least a very close one. The only visual differences I've been able to scope out at a glance are a few missing bolt holes on the Impreza cases vs. the Brat. There will probably be something more significantly different that I find as I dig into it more. The big "what if" that stands currently is how much fabrication I will need to do in order to get the Impreza differential and subframe parts onto the Brat without causing interference problems with the original fuel tank. If I'm extremely lucky I might even be able to reuse a couple of the mounting bolt holes and front crossmember from the original brat - albeit with a bushing refresh. My plan here is to remove the struts from the Impreza rear end next - which should then allow me to roll the existing crossmember under the Brat bed to check and see what lines up and what doesnt. 3) Lastly and certainly not least - if the preceding items line up, I believe that again with some creative angle grinder surgery I can, similarly to the front end, move the pivot points for the rear suspension inboard far enough to maintain the stock Impreza components without completely custom control arms. Adjustable arms may still be smart and will probably end up being necessary to keep things tracking straight but at least this way I can still drop in off-the-shelf components for an Impreza instead of destroying my bank account. Onto the next one...2 points
-
2 pointsI’ve heard tree frogs make that noise. Seriously , doesn’t sound normal to me.2 points
-
2 pointsGot the transmission tunnel and parts of the firewall out as well as the remaining brake and fuel lines. The husk is now well and truly a husk. Some might ask "why the firewall?" when i have a perfectly good Brat firewall and my response is to preserve the mounting hole patterns for the Impreza parts like the brake master cylinder and passthroughs. I may not need them all but this way I at least have good templates or even pieces to splice in where I need them later. Getting the Impreza body scrapped this week and putting the brat back up on stands to get the rear end removed. Looking at it I assumed the removal would be an easier task than it was - there's way more structural stuff in there than it appears at first glance, especially were I've cut it. Took me much longer than anticipated to finish the removal, especially since I was using a 4.5" angle grinder to do it. Were I to do this again or make suggestions to other folks - use a good reciprocating saw at the support ribs - it will make for much cleaner cuts.2 points
-
Yes as the valve is working as it should.2 points
-
2 pointsIf you’re pulling the synchros out you might as well get them bead blasted and put them back in. This will be your issue - the synchros are worn out and smooth so they no longer grab to match the gearset speeds with the engagement hub. Rough them up and they should work properly again. Gearbox work can get tricky if you don’t know what you’re doing - but as always, the best way is to learn! Just have a back up plan if the rebuild doesn’t go as planned. Cheers Bennie2 points
-
I’ve been meaning to get back with an update on this: I finally got the car running again, and of course the problem was simpler than I thought. Turns out the wire from the distributor/ignition control module to the + terminal of the coil had come loose from the ring terminal connector. I don’t know how I missed it because I must have looked that wire over multiple times before, but I reconnected it, and it fired right up!2 points
-
2 pointsParts are out there, but they're not common at all. If it were me, I'd pull the turbo engine and keep it around. Then pull your NA EA81 and convert it to TBI using an EA82 SPFI intake and throttle body. There is documentation out there of how to do this but you'd be looking at a bit of work. Either way I'd say it's worth it, save these cars and SAVE YOUR PARTS! Good luck mate :]2 points


(1)(1)(1)(1).thumb.jpg.9a67b2972671901ccb8571c55dc8ea78.jpg)