Leaderboard


Popular Content
Showing content with the highest reputation since 12/15/14 in all areas
-
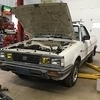
Hi all, I'd like to introduce you to my current project: This is Gladys, my 1987 GL hatchback. I bought her in August of 2021 and she was a wonderful car to have, until she blew her first engine in late October. Two more engines and a blown HG later, she has been sitting on a friend's property for the past several months awaiting her new engine, or rather, her new motor. See, I plan to replace the gas engine in this car with an electric drivetrain out of a Nissan Leaf. Part of the reason its taken so long to get this project moving has been waiting to find a suitable donor car in my price range (>$3,000 USD) but just a couple of days ago I was fortunate enough to get my hands on this crashed 2015 Leaf from Copart for a grand total of around $2,800 So in this thread I'm planning on documenting the swap and any problems or workarounds I'm encountering as I go along. The basic plan for the build is to take the motor from the leaf and mate it onto the existing 4 speed transmission using an adapter plate made by Angus over at http://bratindustries.net, who performed a similar swap on a 1983 BRAT (a little off topic, but he used the third eye mechanism to hide the fast charging port which I think is really neat). Since it's not strictly necessary with an electric drivetrain I'm forgoing the clutch in favor of a direct connection from the motor to the transmission. I then plan to power it using the battery pack from the leaf, stored in the back since I'm planning on a rear seat delete to preserve space and weight. The whole system will charge from a standard J1772 charging port located where the filler neck used to be. I intend to keep the look of the car as stock as possible inside, going so far as to replace the modified center console with an aftermarket head unit that was in the car with a stock unit I was able to find on eBay along with a factory cassette deck. the accelerator will hook up to the control electronics through the throttle cable and the stock gauge cluster will remain unmodified save for allowing the fuel gauge to read out the battery's state of charge. Should this project all go as planned, the car should have the equivalent of a 107hp motor with 184 lb/ft of torque and about 60 miles of range, give or take some thanks to regenerative braking. Of course if I want more range I might decide to upgrade the battery later on down the line, though I think this should be plenty sufficient for the time being. I plan to use as much from the Leaf as possible, but I'll use third party components to get stuff like the brake booster working on battery power Now, this project is still very much in the early stages even though I'm months in already, but I'm happy to answer any questions you might have about the project, as well as taking any suggestions you might have about how to get the conversion done9 points
-
I've done 3 joints in the last year or so. One on an '04 Outback, and the other a '00 Outback. Process should be the same for basically all Subarus. We've tried used ones here, most of them have worn joints...not worth the install time IMHO.Dorman makes an aftermarket shaft, same part number for '96-'04 Outback AT. I fished a donor shaft out of the scrap bin here at work with bad joints that came from an '07 4EAT Outback. I've measured it, and held it up under my car, and it looks like it should work, at least temporarily (front half was hardest to measure, looks like it might be a hair short, but I'm not worried about the slip yoke having a little less engagement for street use for a week).Rockford offers joints specifically to replace the staked in applications. Here's their application list for the 430-10 part (the Justy is the only Subaru found elsewhere in their list).http://www.rockforddriveline.com/media/documents/Vehicle_Fitment_430-10.pdfYou may notice it lists Legacy/Outback 1990-2009.Using parts interchange listings, and trying other vehicles on that list, I came up with a few other part numbers. Napa lists a UJ10430, although there was no availability. Autozone lists a 2-0430DL, of which they had 4 in their Hub store across town. I now have 2 of those sitting on my desk (they are greasable, btw). 1. The joint before I started, you can see some of the 8 little "stakes" being deformations in the outer yoke holding the caps in. 20180827_192114 by Numbchux, on Flickr I've seen 2 ways to do staked in joints (generally, not specifically Subaru), one is to grind the stakes out, and the other is to just use a press to push through them. In my experimenting on other shafts, it takes an enormous amount of force (easily the most I've ever done on my little 12 ton HF press), so I opted to grind first. High speed metal cutting bit on the dremel does a pretty good work down in the corners. 20180827_192401 by Numbchux, on Flickr While I had it out, I used the dremel to make a few light marks on the yoke and the shaft itself to ensure the orientation when it came time to reassemble. 20180827_192552 by Numbchux, on Flickr 2. Then over to the press, make sure to support the other end of the shaft pretty well. 20180827_192748 by Numbchux, on Flickr 3. Once it's pressed off to one side, the stakes become really clear (some of these are ground down, some are un-touched). 20180827_192926 by Numbchux, on Flickr 4. Flip it over and press it back all the way through to flatten those stakes. Then lay it with the opposite yokes supported (a vice works best for this), and pound on the yoke so those cups can be pushed out beyond the ears. Don't pound on the thin part at the top of the ears, and don't pound on the shaft tubing itself. 20180827_193255 by Numbchux, on Flickr 5. Flip over and repeat the other way until those cups are pushed as far out of the yoke as possible. It should get to the point where the cross of the ujoint can be removed from the yoke (if those cups are damaged, you might need to sneak a punch passed the cross to push the cup out further, just make sure not to damage the yoke). 20180827_193408 by Numbchux, on Flickr 6. Then pound the cups out the rest of the way: 20180827_193515 by Numbchux, on Flickr Rotate the shaft 90*, and repeat steps 1-6 to remove the other 2 caps, and remove the joint completely. 7. Now switch to a softer dremel bit (wire wheel or sanding drum work well) to clean up the inside of the yoke, you want to smooth everything out without taking off really any material. You'll also want to run a flat file across the inner surface of those ears, as the new joints will be held in place by snaprings against this surface. 20180827_195537 by Numbchux, on Flickr 8. Now to start preparing the new joint. The four cups need to be removed from the center cross, inside those cups are needle bearings which have to stay in place, and the only thing holding them there is grease. They *should* be pregreased with assembly lube for this purpose, but I don't trust it, so I hold the caps in place by hand and gently pump some fresh grease through them: 20180827_194557 by Numbchux, on Flickr 9. Then pull the caps off. You'll notice I removed the grease zerk from the one cap to protect it from damage, this is optional, but IMHO a good idea. 20180827_194833 by Numbchux, on Flickr 10. Put the cross in the middle of the yoke, and one of the caps in from the outside. You want to hold the cross inside the cap as tight as possible as you press on it to help keep those needle bearings in place. 20180827_194903 by Numbchux, on Flickr 11. Then press it in well past it's final resting place. This simplifies putting on that snapring, and aligning the opposing cup. 20180827_201328 by Numbchux, on Flickr 12. Put the snapring on the one cup, then put the opposite cup from the other side, and again slide the cross into the new cup as you press it in. This is a bit tricky, as you have to get it pressed in far enough to get the second snapring on, but you don't want to put too much pressure on the bearings to damage them (although, the cross should bottom out in the cups before the needle bearings bear the brunt of the weight) Back to step 10 to finish the other half of the joint, taking care to reassemble in the same orientation that you started with. Install the grease zerk (if you removed it), and grease. 20180827_203215 by Numbchux, on Flickr Now flip the shaft and do it all again at the other end. Install in the car, and enjoy!8 points
-
Chosen engine source: JDMracingmotors of Montreal JDM Legacy JDM 2000-2002 3.0L H6 EZ30 Engine video of compression test on youtube. all over 180 psi parts list from rock auto Stabilizer Bar Bushing MOOG K200635 pack of 2 $7 Front Stabilizer Bar Link MOOG K80693 #20420AA003 pair $27 ac delco oil filter $4 air filter $7 fuel filter $16 serpentine accessory belt ac delco $17 Screw on trans filter beck arnley $5 PCV valve $6 beck arnley fuel injector refurb kit (four seals) x6 $5 ea (from dealer $36) Pre-existing RH fuel rail vapor odor- could be hoses or seals at injector Retain fuel rails from stock, due to JDM having water-dirt contamination from weather exposure. Swap fuel injectors from JDM intake to stock intake. Replace all fuel rail hoses and filter hoses Raybestos 3/8" magnetic trans filter inline at transmission cooler add-on hose ID PCV hose 0.4" valve cover 0.5" head to intake 8mm fuel line 8mm (5/16") evaporator 1/4" power steering return 0.4" 3/8" Dealer parts Trans seal(s) leaking at CV axle right side, left side also? Replace both axle seals and o-rings. leaking oil at trans, suspect from seal(s) retainer ring, o-ring x2 806984040 $2 ea retainer ring, oil seal 806730031 $5 RH verify side retainer ring, oil seal 806730032 $5 LH verify side front differential oil drain plug gasket 803926090 PCV hose to valve 11815AB083 $37 valve cover gasket R 13270AA104 $25 valve cover gasket L 13272AA104 $25 valve cover spark plug gaskets x6 13293AA051 $8 ea exhaust manifold gasket x2 44011AE040 $6 ea exhaust donut gasket 44011AE031 $9 exhaust flange bolt at donut x2 44059AA010 $3 ea exhaust spring at donut x2 44044AA010 $4 ea exhaust flange bolt nut at donut x2 802008270 $2 ea exhaust flange bolt at muffler x2 010510307 $2 ea exhaust gasket at muffler 44011AE01A $3 exhaust flange bolt at muffler 902350001 qty 2 $2 water pipe hose, right angle, top, RH front 99078AA090 $6 water pipe hose, dog leg, top, front, LH 99078AA120 $8 water pipe hose, RA, throttle body, top, RH rear 807607251 $5 hose, water pipe hose, throttle body, top, 21204AA681 $10 hose, water pump bypass, at Tstat, straight, 807615030 $10 hose, water, at oil cooler, right angle, 99078AA110 $8 hose, water, at oil cooler, straight, 807611060 $4 hose, water, at Tstat, right angle, 807611071 $5 HOSE-HEATER,OUTLET, 72421AE02A $15 HOSE-HEATER,INLET, 72411AC020 $15 hose, vacuum, Intake manifold, right side, front, 99071AB361 $4 reuse: hose, vacuum, Intake, left side, front, 99071AB280 $13 or purchase generic hose such as: High Performance Silicone Vacuum Hose - 5 feet - 5/16" ID (.3125"|8mm) - Blue https://www.ebay.com/itm/263495230935?ssPageName=STRK%3AMEBIDX%3AIT&fromMakeTrack=true parts to refurb torque converter Housing OIL SEAL 806750060 Price:$6.51 Input Shaft O RING 806920070 Price:$0.84 Oil Pump Shaft RING-SEAL,A 31361AA000 Price:$8.74 Oil Pump Shaft CIRCLIP-INNER 805343020 Price:$2.43 Low pressure side power steering hose from hard pipe near airbox to plastic reservior is cracked. Power steering low pressure HOSE-RETURN 34611AE14A two types, either $17 or $70. Unsure which one I have. Replace with Gates power steering return hose. 3/8" ID. GATES 350010 (350020) Power Steering Return Four types of power steering return hose, suction side of reservoir Will keep existing hose for now, not leaking 34611AE23A HOSE-SUCTION $19 34611AE12A HOSE-SUCTION $38 34611AE07A HOSE-SUCTION $20 34611AE08A HOSE-SUCTION $24 CLAMP-HEATER PIPE 72057AA001 $2 gasket, thermostat 21236AA010 $3 reuse existing thermostat and rad hoses (replace at next coolant flush) valve cover hose to air box R side valve cover hose to air box L side 11815AB062 $17 gasket, EGR hard pipe x2 14719AA033 $5 ea donor is RHD: swap intake over (see notes) GASKET-INTAKE MANIFOLD x2 14035AA410 $13 leave head gaskets alone reseal timing cover with three bond 1217H (for 1280B) oil pan pickup o-ring 806919080 reseal oil pan with ultra grey oil cooler o-ring replace with dealer part reseal rocker valve covers with OEM gaskets and sealant recommended sealant three bond 1280B - discontinued by SOA Replaced by THREE BOND 1217H Part Number: SOA868V9610 Alternative: 3M™ Ultrapro™ High Temp Silicone Gasket 08672 Black 3 Oz replace spark plugs x6 with NGK PLFR6A11 $8 ea platinum WASHER,CYLINDER HEAD SEALING 10982AA000 Two on timing chain cover, replaced timing cover, crank pulley, oil seal 806738200 $5 bucket and shim valve inspect. Largely in spec. replace spark plugs transmission rubber mount 41022AE12B seems intact ************** Job notes *************** intake manifold ************** prior to pulling engine- removed intake manifold due to difficulty accessing 4 torque converter bolts. injectors and fuel rails remain attached to manifold. must remove all 6 injector electrical connectors...this is not mentioned in procedure. must also remove LH oxygen sensor mate that is fastened to a metal bracket in order to remove the injectors and leave the harness on the engine. removed bracket first due to difficulty with this step. Intake differences: vacuum line to brake on right side of JDM intake, strange square plug on L side. Could just run a longer vacuum line to the fitting...or swap intake over...I chose to swap. ...notes from subaruoutback.org... Brake booster connection has a nipple on one side and a plug on the other. About half the time I can get the two broke out and swapped. If not I just run a longer hose, and save the one-way valve made into the OEM hose. AC compressor is different. Alt and PS pump are the same. No other major stuff to swap. No need to swap intake manifolds. ...end of subaruoutback.org... *********** engine separation ************** advised to use the special tool p/n 498277200 https://www.ebay.com/itm/Kent-Moore-498277200-Flywheel-Stopper-Subaru/372549661330?hash=item56bdb0b292:g:I2kAAOSwrmRcJVqM:sc:USPSFirstClass!37122!US!-1:rk:1:pf:0 Tool is a keeper for the torque converter, attached to the lower bolt hole for the starter. Otherwise torque converter can wiggle off the trans and come with the engine. This part is $130 on ebay. Some have made it themselves. Others have jury rigged something using ty-wrap, wire, or the alternator bolt and washers through a torque converter bolt hole. Part I made from 16 awg sheet metal bent on engine separation. The torque converter was easily pushed back in after the engine came out, but according to FSM, it needs to be around +0.1" offset from the trans bell housing. I measure it to around 0.25". So torque converter coming out. Not sure where the problem is. The oil pump shaft is seated on the converter well and the circlip is seated in the slots w/o obvious damage. Will reuse existing circlip. Possibly the input shaft was dislodged slightly. The input shaft came out when the torque converter was removed (easily). Has an o-ring that is degraded. Will replace. Reinstall input shaft into transmission. FSM states that it should be 0.197 - 0.217 offset from front of trans. I measure it at 0.204 so we're good. Oil pump shaft has a ring seal that is split, intentionally? Will replace. Oil seal will be replaced for good measure. Alternative, from USMB: When you get the bolts out of the TC and its free from the flexplate, take a big screwdriver or prybar and pry it back away from the flexplate. Should move back about 1/4" and disengage the pilot stub which will help keep the TC from sliding out when you separate the bellhousings. When you get the engine and trans separated about an inch, get a bolt that's about 3/4" longer than the width of the upper bellhousing. Get a nut and a fender washer to fit the bolt. slide the bolt into the top corner bellhousing bolt hole, put the box end of a large wrench, about 3/4", on the bolt, point the other end of the wrench towards the center stub of the TC. Slide the washer on, then the nut, then tighten it up. It doesn't need to be he-man tight. Just tight enough to keep the wrench from moving. Now as long as you didn't drag the TC out that far while trying to get the engine loose, it will stay seated properly until you've put the engine back in. images of timing cover internals https://www.flickr.com/photos/dbur971/sets/72157700601187324/ ************ transmission seal retainers *************** R side first Degreased externals. Removed retainer lock. Marked retainer. Removed with channel lock pliers and PVC tool. 7 turns to remove. Tapped out oil seal with rubber mallet. Removed bearing. Degreased. Reinstall new oil seal and o-ring. Reinstall bearing after coating with gear oil. Reinstall retainer 7 turns to hand tight. Used pliers to turn 1-2 more teeth to line up with mark. Reinstall retainer lock 25 ft-lb. L side next Degreased externals. Removed retainer lock. Marked retainer. Removed with channel lock pliers and PVC tool. 7.25 turns to remove. Tapped out oil seal with rubber mallet. Removed bearing. Degreased. Reinstall new oil seal and o-ring. Portion of differential popped out and was easily reinstalled with some wiggling. Reinstall bearing after coating with gear oil. Reinstall retainer 7 turns to hand tight. Used pliers to turn 3 more teeth to line up with mark. Rather tight for last tooth. Periodically rotated shaft during tightening. Shaft not overly light after retainer installed. ****************** A/C compressor ***************** swap old unit onto JDM engine. JDM has lines cut. Will be spare. Existing harness does not match JDM connectors. ***************** alternator ***************** JDM will be spare. Reinstall old unit. ****************** power steering *************** JDM will be spare. Reinstall old unit. Old cradle fits JDM engine. left side oxygen sensor cable cut. swap harness over L side knock sensor missing, harness cut. Swap sensor over. small ventilation hoses on front of valve cover to intake piping L side loose/cracked. Replace. R side seems ok Replace fuel lines on intake as needed Gates 5/16" 27348 Barricade MPI Fuel Line Amazon, 15' $41 Fuel evaporator vapor return line from intake to firewall is rotting, replaced with yellow 1/4" tygon tubing, fuel rated Tygon F-4040-A PVC Fuel And Lubricant Tubing, 1/4" ID, 3/8" OD, 1/16" Wall Replaced PCV valve. Sealed with ultra grey. Note that JDM valve did not seem to be sealed. Torque converter notes: Post submitted to USMB. See separate post of the ugliness. Tapped oil pump shaft oil seal in using a punch to try to gain some increased travel on torque converter. Ended up driving it in too far. Tried to pull it back with a slide hammer but tore the seal. Removed with slide hammer. Bought and installed new seal. Drove it in about 0.05" past lip this time to avoid covering oil access hole at 3pm position. Reinstall torque converter w/o issues on 2nd time. Separation is 0.15". Plenty of space between flex plate and converter w/o impact after engine reinstalled. Install 4 bolts, replace cover. Then install intake manifold. Flex plate: Installed while on engine stand. Used a 3/8" extension to brace flex plate against engine case. Torque to 60 ft. lb. Grease torque converter center stub and flex plate receiver. No bearing here. exhaust manifolds: scotch brite and orbital sand with 60 grit. spray gaskets with copper sealant. Leave flange prior to resonator as is. loose heat shield repaired with extra piece of sheet metal placed between shield and exhaust pipe. new donut gasket placed. front differential gear oil 80w90 @engine swap 3-2019 used walmart brand. Poured in with 1 qt container with hose/nozzle. Added about 1.25 qt. Crank bolt: Method to install in a manual trans does not work (locking brakes). No way to lock the torque converter, just spins. Should have tightened it while on engine stand when installing flex plate. Used a combination of 3/8" extensions and a large bolt to hold the crank pulley vs. the center bolt. Torque to 160 ft. lb. Took pictures of the madness. Might have stressed the idler pulley bearing on the A/C bracket. Engine install: After much trouble attempting to level out the engine on the hoist, which was pretty unsuccessful, install goes fairly smoothly anyway. Engine was listing to the right side and not tipped back to match the transmission. After a lot of jockeying to line up the two lower engine studs on the transmission bell housing, the engine was raised on the hoist effectively tipping it back. It slid in fairly far on the studs, and then a bit of wiggling and pressure at the 12:00 position got the two pins started. Had sanded and greased the pins prior. Install four upper bolts. Can't find the short bolt on the top, so use a power steering bracket bolt instead. Install four long bolts in lower portion of bell housing, plus two nuts on the lowest studs. Opted NOT to reseal trans pan. Will monitor fluid levels. Pan accessible with exhaust installed so will not have to drop exhaust for reseal. First start: cranked a long time w/o firing. Likely no fuel in rails. Cycled ign on and off 5-6 times to build up fuel pressure. Started and ran at low rpm for a short while, some chuffing and shaking/vibration of engine block that lessened. (In retrospect this shaking is likely due to bad O2 sensor wiring on RH, see below). Had coolant funnel installed. Did not get heat in cabin until temp had climbed quite a bit, but eventually had heat. Raced the engine 5-6 times then held at 2k rpm. Was checking trans fluid also so not a classic cooling system burp. Lower hose cold. Eventually cooling fans came on solid and temp climbing to 206. Shut down and capped. Next day topped off coolant, restarted. Heat in cabin came early. Raced engine as directed. Heat in lower hose, cooling fans cycling normally with temp dropping as expected. Shut down. Next start was later than evening, did a test drive with good cooling results, a bit of gurgling. Still fighting trans fluid levels. Auto trans shifted will on short test drive. Also did a burn in on new front brake pads, up to 40 mph with braking not to full stop, 5-6 times. Getting P0031 which is R side heater circuit on front sensor. O2 sensor itself is 1.6 ohms on tinned leads, open on gold leads. Suspect the heater ckt is on the tinned leads, which is normal reading. O2 sensors have 50k and 80k miles each. R side connector has two pins pushed out that are for heater ckt. Push pins back. Restart, now getting P0131 code. Engine idling rough. Swapped a spare O2 sensor on RH. Same P0131 code. Bought two new Denso O2 sensors from rock auto. New sensor on RH has same code. So now presuming there is a fault in the wiring harness. Either pinched something when installing the intake or the donor JDM engine harness had a preexisting fault. Found broken wire in RH engine harness connector, E47 on wiring diagram. Black wire, part of signal pair to ECM. Buzzed out to B21 connector at firewall. Harvest O2 connector from old engine harness and splice into new harness. Turns out that the signal pair is wired backwards from the drawing. Left as is. No more CEL codes. Three independant O2 sensor-related wiring harness problems with JDM donor harness (LH connector cut off, RH heater pins backed out, broken signal wire). Statistically, of all the potential problems with engine swap to have this type of concentration is bizarre. Transmission fluid: Having trouble getting trans fluid level measurement. Seems to be high, then low. Could be fluid residue getting on stick. Have already added about 4-5 quarts. From USMB: The only way I can get a reading is basically vehicle cold, start, shift through all gears on shifter, put in park pull stick, wipe, reinsert, (a few times, to get excess off stick) Then slowly insert stick, then slowly remove and look at both sides of stick holding it in front of the headlight. It should generally be somewhere in the cold range then. Soob says check it warm/hot but sheesh I just see fluid everywhere on all three soobs if I try it that way. Added about 2 additional quarts of wal-mart dex merc. Finally reading at low end of cold level on stick with engine running, after shifting through all gears, while cold. Next cold start still reading low, so added about 1/2 qt. Now reading just above high end cold.7 points
-
Update time! I pulled the trigger and made the 4500 mile round trip to get the parts car. I live in Madison, Wisconsin, and the car was just north of Seattle. It is also a '71, but has a 1300 engine (1300G?). It has the window, it has a good subframe, and tons and tons of other small parts I'll surely need. I also picked up an EA71, an EA63, and an EA61 short block. I'm back in business! Picture time: The car is safe at my storage lot, it snowed a bunch while I was gone so I need to get everything re-organized over there. More progress to come!7 points
-
interesting thing i found out on this. the smell hadent stopped because i changed the belt. the smell stopped because the thing that was burning up finished burning up. i found both my fog lights not working a while after i changed the belt and when i dug into it the entire hid setup i had self destructed from the wires burning off of the bulbs and both ballasts being melted in the centers. i picked at the burnt rubber around the bulbs and it released the same exact smell i had been smelling.7 points
-
I posted this link into my build thread but it probably gets no attention there. I made a short video of me ripping around in my hobby built loyale. Car is no professional race car neither am i rally driver. I just built it for fun and i like driving around in my country side place.7 points
-
It's official: it's alive and street legal. It passed the periodical inspection with flying colours and minor marks. (oil wetness, corrosion in chassis.. Etc) It behaved well despite old fuel in the tank that I know has still some contamination. It climbed up the hills weakly at first but then it improved. I know now it needs to be used! Thank you all for the support @idosubaru @Rampage @88SubGL @el_freddo @1 Lucky Texan and the rest of the members who gave me ideas and help. My conclusion goes down to that clogged tank, and a chain of misfortunes for such a rare car where no one would understand its proper operation. I will: Burn up all the remaining fuel and clean the fuel filter or replace it again if needed. Place an injector treatment for good measure. Have a hydraulics hose made for the steering rack and address the leaking. (it's not the engine, it's the steering rack) I'd probably work on the body and continue a paint job detailing and polishing. Fix the radio console so I can finally play some old tunes while going about town. VID-20210205-WA0002.mp47 points
-
I've been slowly combing through various subsystems on my RX and the most recent system to get some love was the PCV system. I found that every hose is still available, except the one that attaches directly to the PCV valve on the intake manifold. I ran down to my local auto parts store with the original hose in hand to pick through their selection of hoses. WELL! It turns out that the small heater hose from a 2002-2009 Ford Explorer (Dayco P/N 87730) is almost a perfect fit. Hose was about $7 and needed to have a small portion trimmed off. NOTE: EPDM is NOT oil safe, so until I find a better solution, I'll need to keep an eye on this hose to make sure it isn't perishing too quickly.7 points
-
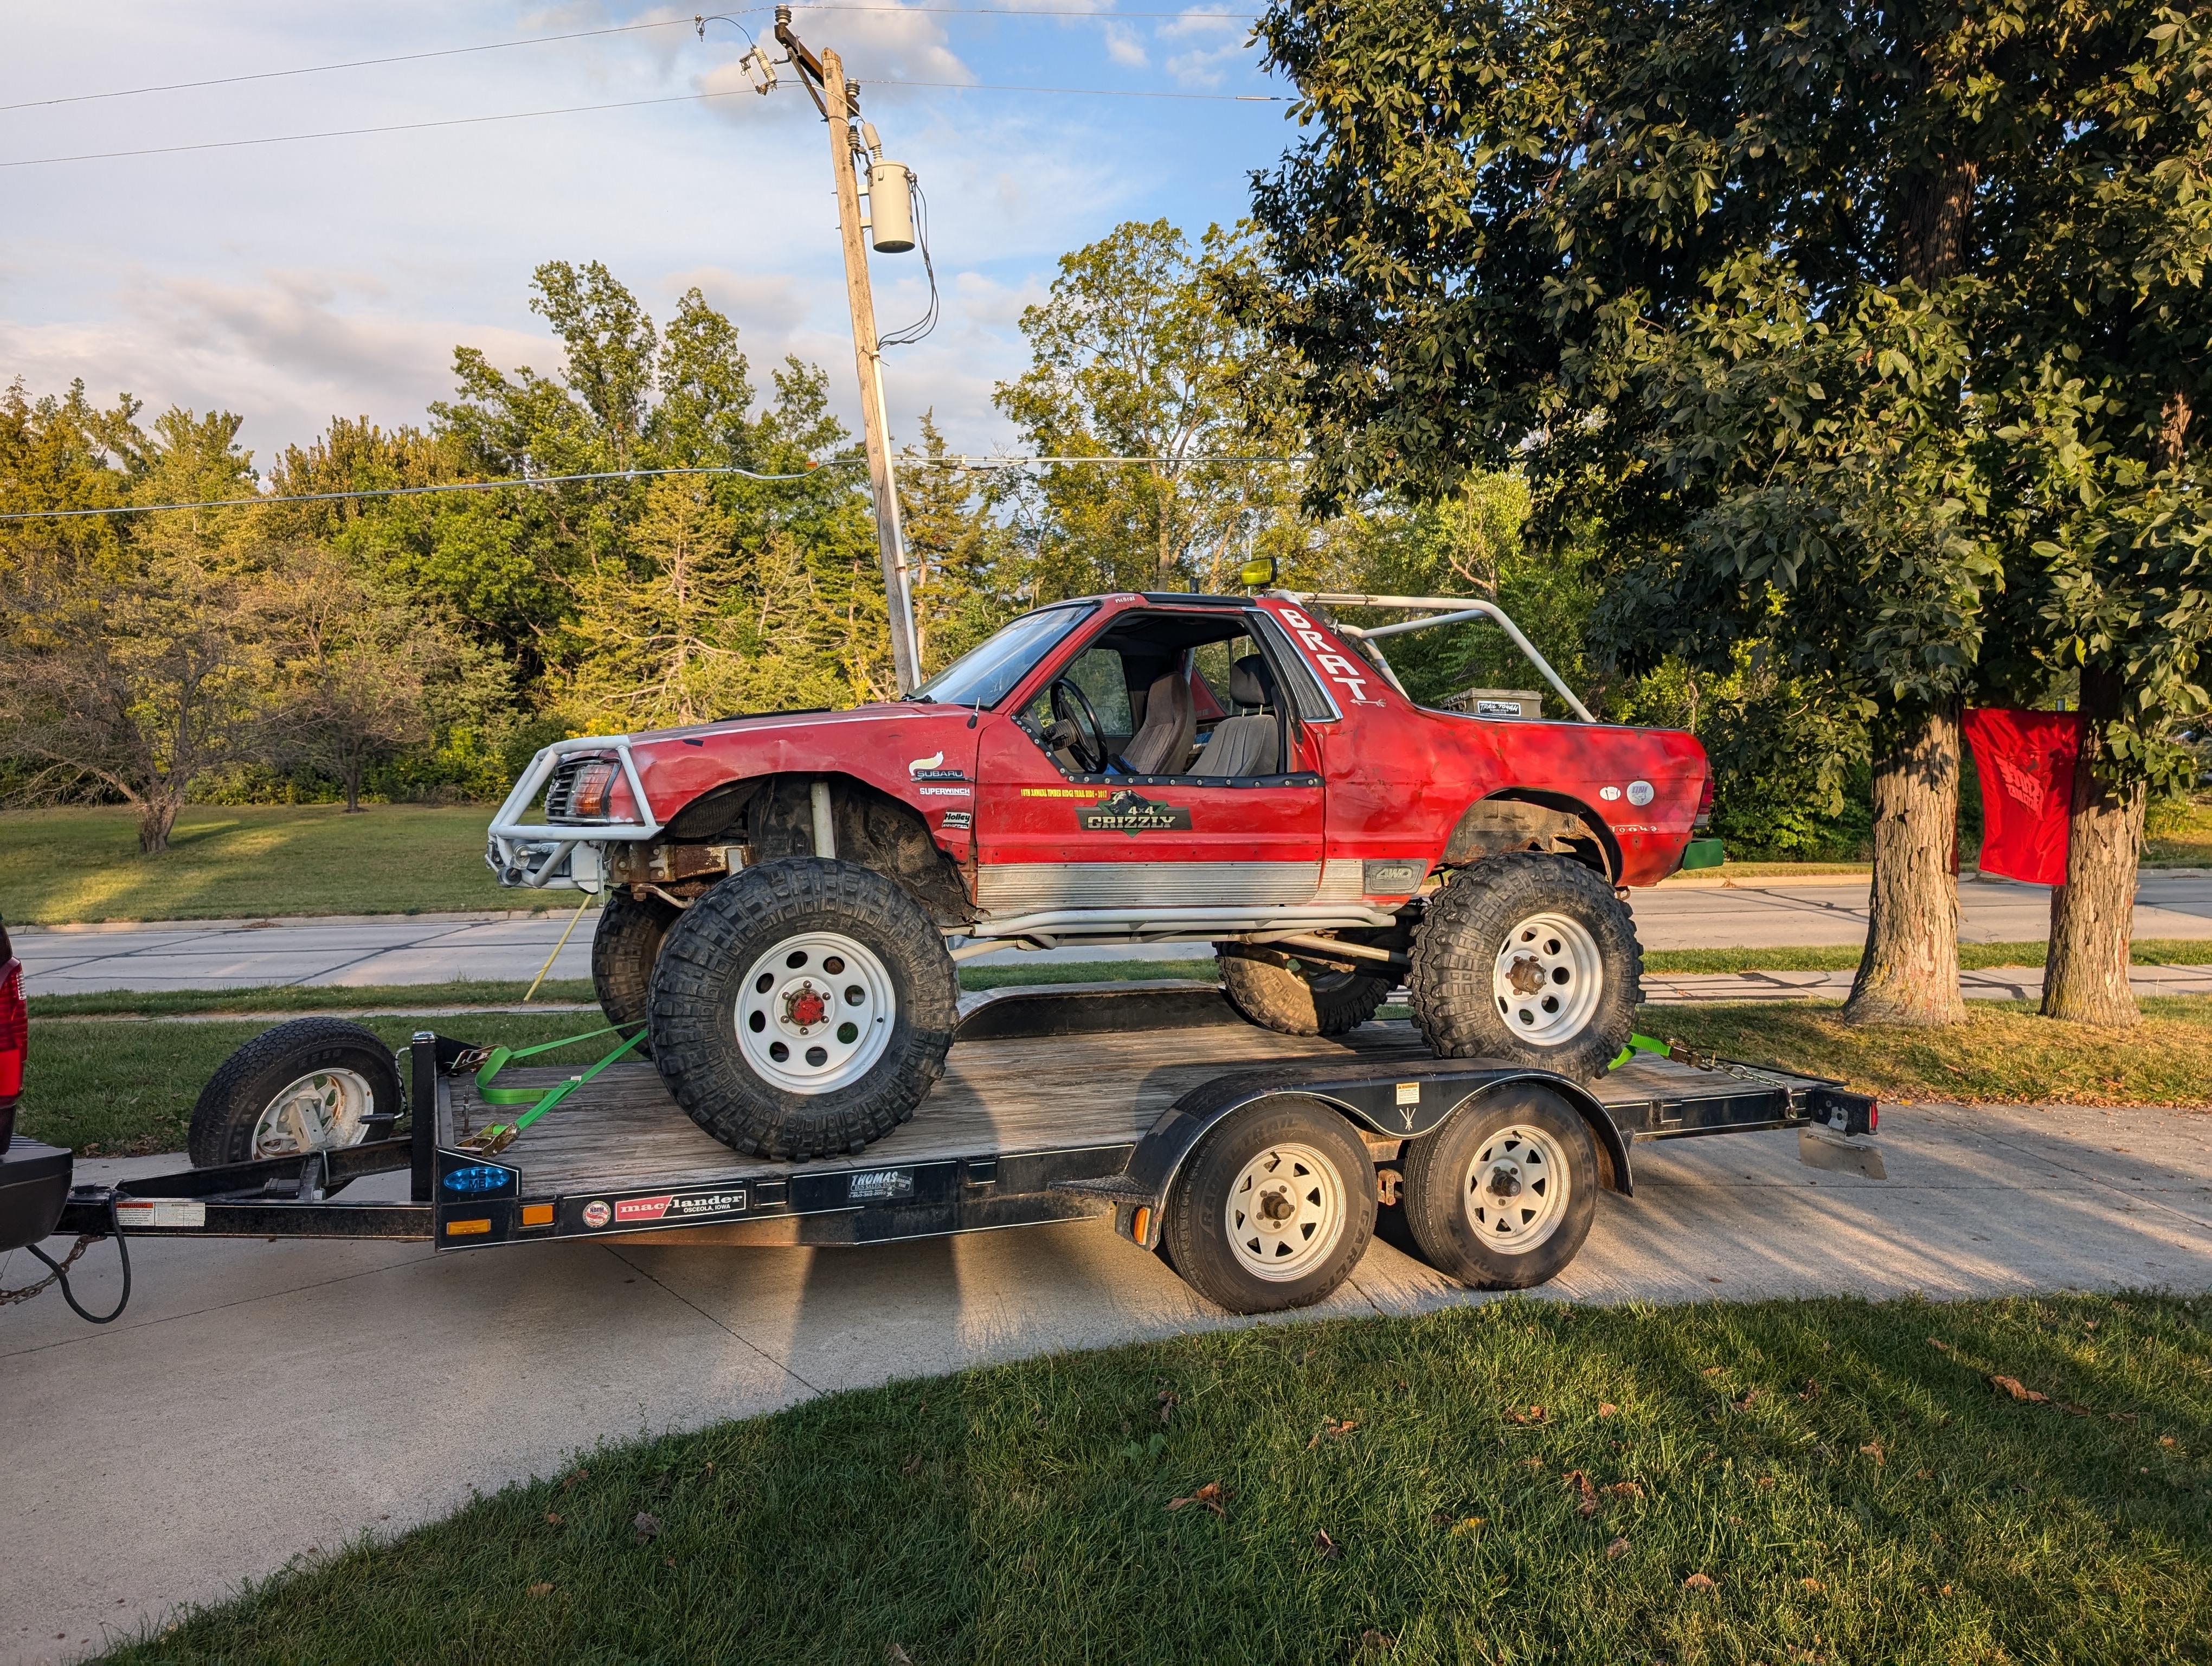
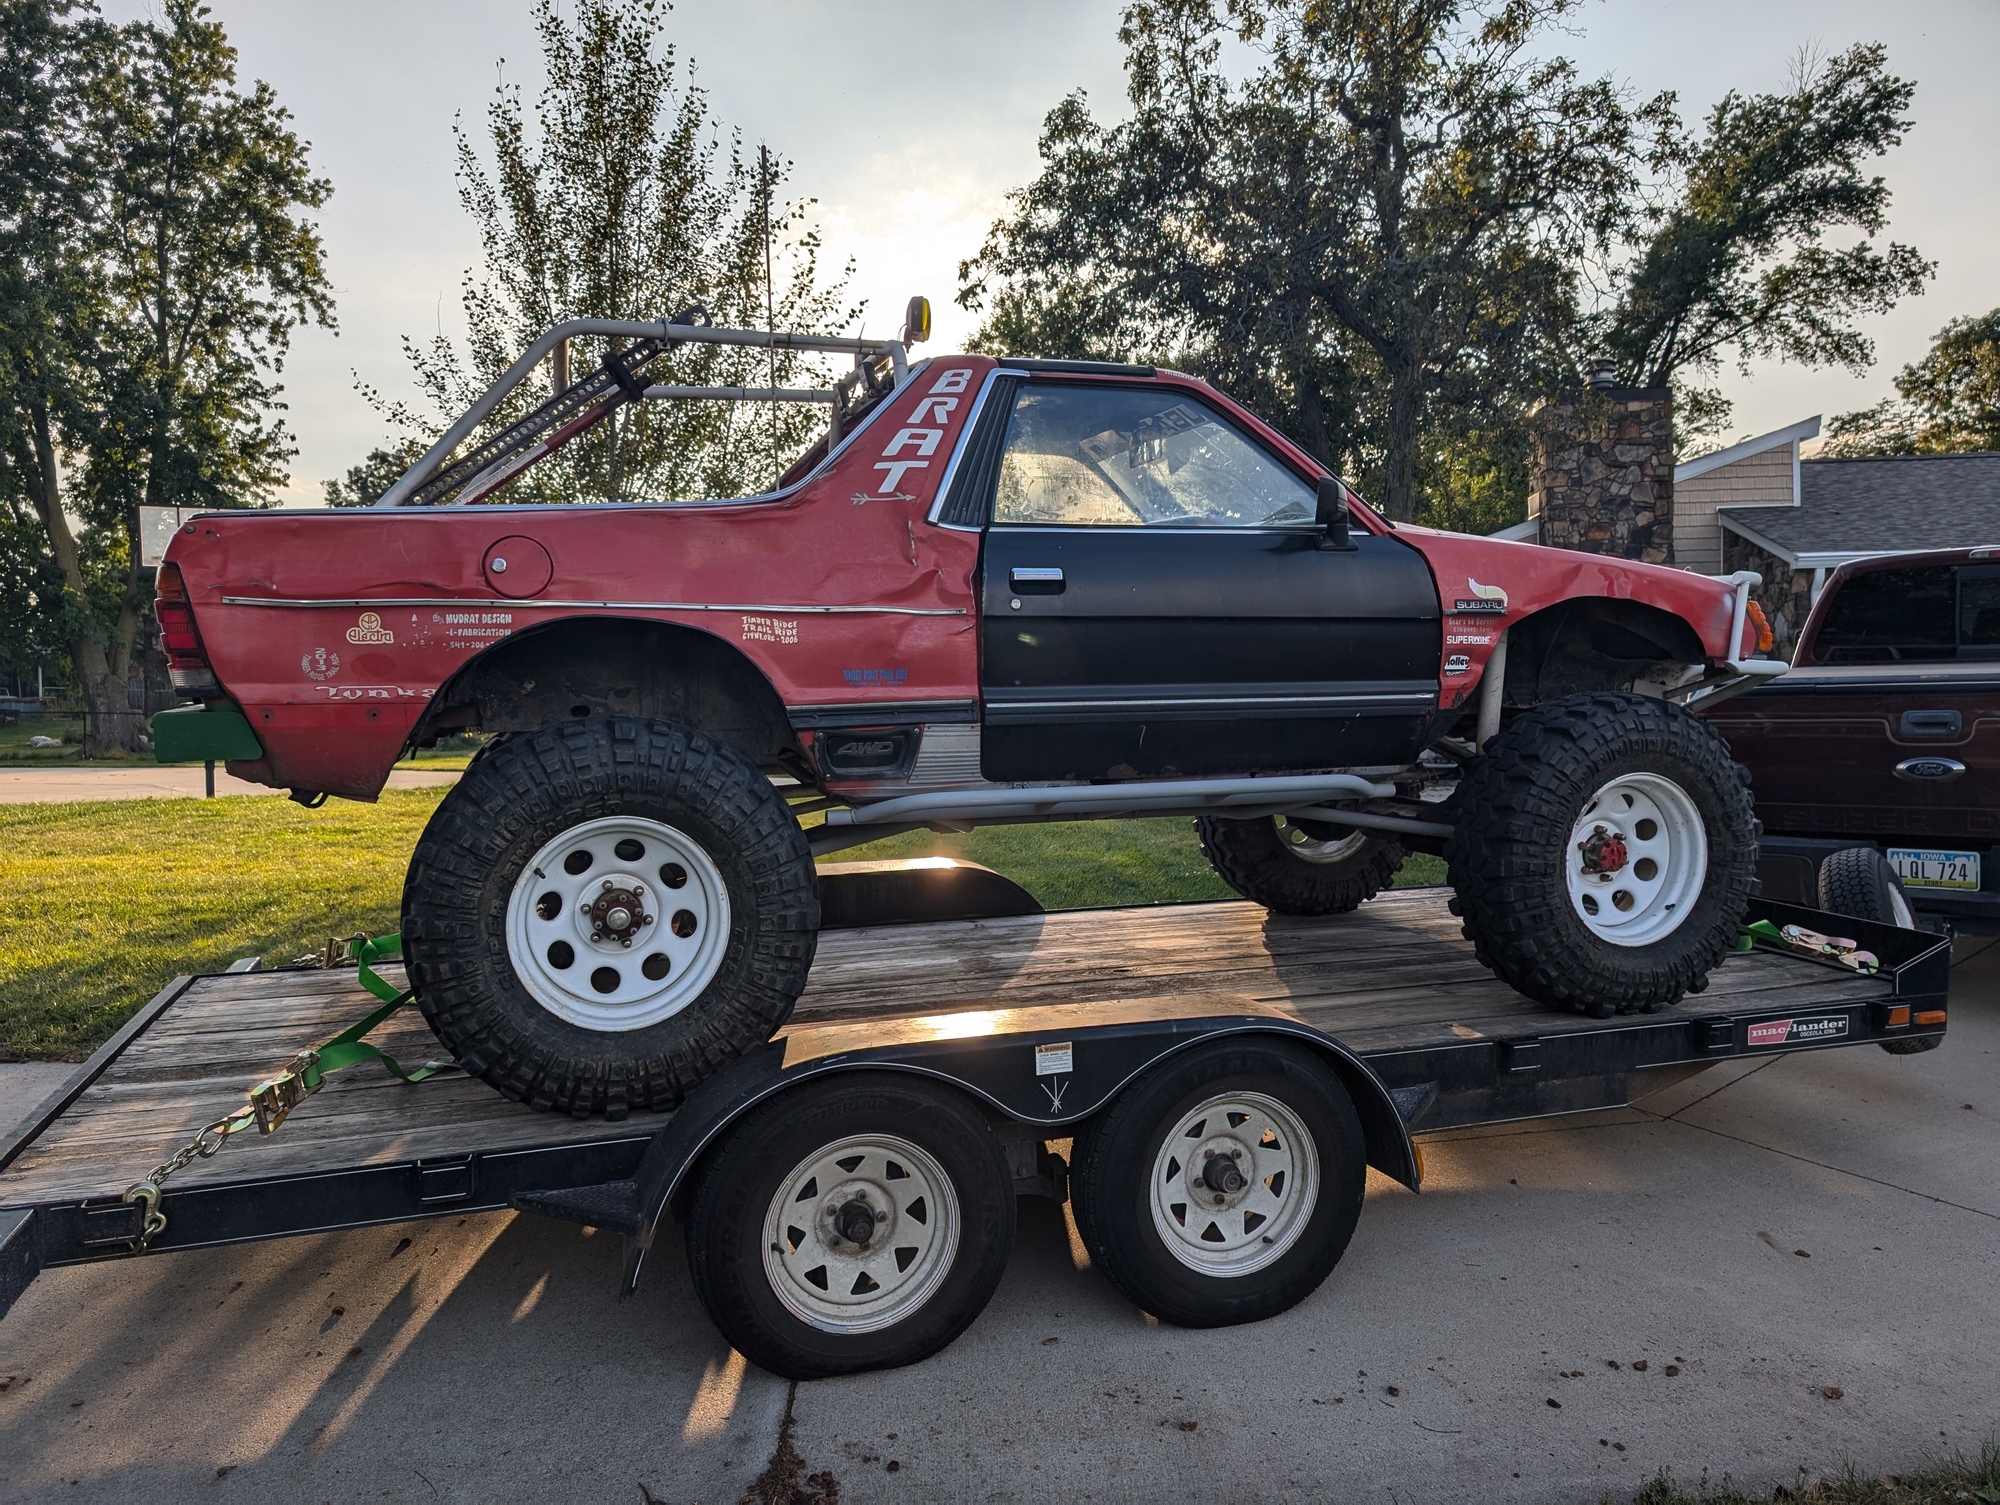
Brat is still alive and kicking.....

 6 points
 -
Y'all were right: it was the timing. When I got everything off the front of the engine, I could see that both cams were advanced about half dozen teeth relative to the crank. I have no idea how I did that. When we put it together the first time, we got the lines on the belt on the marks on the sprockets, and stood back and admired it, and looked twice...and somehow we got it wrong. So, we reinstalled the belt, and got the lines on the belt on the marks on the sprockets, and looked twice, and somehow we got it right, because this time it started right up. Thanks for your help!6 points
-
Class action lawsuit on the rod bearings. Rod bearing failure will cost generally about $10k on up. Piston ring lands are weak and can shear off. Cost to fix with forged pistons is on the order of $5-$6k. Broken firewalls due to weak pedal assembly mounts. Intercoolers are plastic junk. Fuel economy is honestly terrible for a daily. Fun factor is kinda meh in stock form. STi's are pretty fun but really they get pretty meh also after you drive one that's stock for a while. You'll quickly want more power. It's a slippery slope - almost no one ends up leaving them entirely stock. Then you have the CANBUS electrical mess. That's a whole different topic and applies to almost all vehicles ~2005+ or in the case of Subaru about 2008+. Personally I can't own anything from the last ~18 years on the consumer side. It's all plastic crap that's smothered in electronics that's all the "intellectual property" of Subaru and essentially that means you really don't own the car at all - Subaru just lets you use it for a fee and when they decide to no loner support it you will have a nice lawn ornament rather than the car you "paid" for. GD6 points
-
Thank you for your concern and good suggestions. I was told I am not the only idiot to do this, so I hope it might help someone else. Yes, copious amounts of water on my front leather seats and underneath, where the Eyesight Module was bolted down. After shop vaccing it, and towels, I did my best to dry it out with no garage and raining outside, again! I got creative and threw a big tarp over top, secured it not too tight and rolled the windows down a bit with a little airspace. Blew the heater full blast for an hour, checking on it. It actually seemed to do a decent job with the carpeting, but under the carpet was a different story. I realized I needed more help. Now I have great news!! Problem solved!! Best decision ever to get professional help. I found a local detailer who pulled out the seats and carpet and gave it a mold remediation treatment, just in case. He even took out the Eyesight module to see if it would dry overnight. He did an amazing job on a holiday weekend and even delivered the car! It is not only showroom clean and dry, with an enzyme treatment to prevent future mold issues, but the best part? No promises, but all the electronics work now!! Eyesight, airbags, everything! He had the right equipment and experience with a great, family attitude. He quoted between $300-400 and went the extra mile for only $350! I thought it would cost thousands to replace and pay a dealership. Now I can cancel my appointment. I feel very blessed and plan to pay him extra.6 points
-
Hi everyone! i'm a locksmith in NY and an older Subaru enthusiast, i've had 2 Loyales, a 91 and 92, in the past and a 98 Impreza (unfortunately none now, but i'll be back!). anyway, enough about me...i'm seeing if anyone needs keys made for their locks? or needs their locks rekeyed to match ignition or whatever...i know a lot of you probably have different keys for door/ignition/trunk/glovebox etc. after replacing broken parts. if you're sick of that, let me know. if you mail me a lock, i can rekey it to a specific key. you can send either door or ignition locks and a key that you want to work in that lock, and i will set it up for you and send it back. probably for about $35 including shipping. if it requires more, i will let you know ahead of time and give you the option to just send it back without working on it for free. i can also do the same for most other locks, not just Subaru. Glovebox locks will require another lock if you want them to match. the glovebox only has 4 tumblers in it. the other locks have 8 or 10, depending on year and model, so i can't make a working key for your other locks based on the glovebox. you can also send a lock that you don't have keys for, and i will make you a key and send it back. that will probably run about $25-35. turnaround is usually within 1 day after i receive it. just get in touch and we'll figure it out. i'll let you know what you need to send. Paypal, Money orders, Zelle, even checks are ok (but you will have to wait until the check clears) ADMINS: if this is in the wrong section, please feel free to move it or whatever needs doing6 points
-
Went out for some more desert adventures last weekend. This is a perfect car for the dirt roads in the Mojave. Most areas don’t require tons of ground clearance, and the independent suspension soaks up most of the smaller bumps with ease, especially with these larger tires.6 points
-
They were thinking they needed to alert you that the oil level was 2 quarts low. Which they did. Mission accomplished. GD6 points
-
WELP. I love when its a really dumb solution that I can only smack my own self for.... I accidentally swapped the return and feed fuel hoses underneath the fuel filter.... Was a great feeling and a slap once i figured that out. Ford fuel pump is very loud and my car has been driving so-so since its been up today. My battery is draining due to the new pump and probably just a failing battery (after being subjected to 30+ tries to start the car to no avail). Tonight ended with the GF and I stranded in the grocery store parking lot. Tried to jump the battery with my mobile jumper pack and also tried jumping from a car but the battery does not want to even keep a charge. Hopefully new battery tomorrow changes everything. Thank you to everyone who helped me figure out my issues. VERY quick and insightful responses. Now i know to take it slow and take pictures before I tear everything up.6 points
-
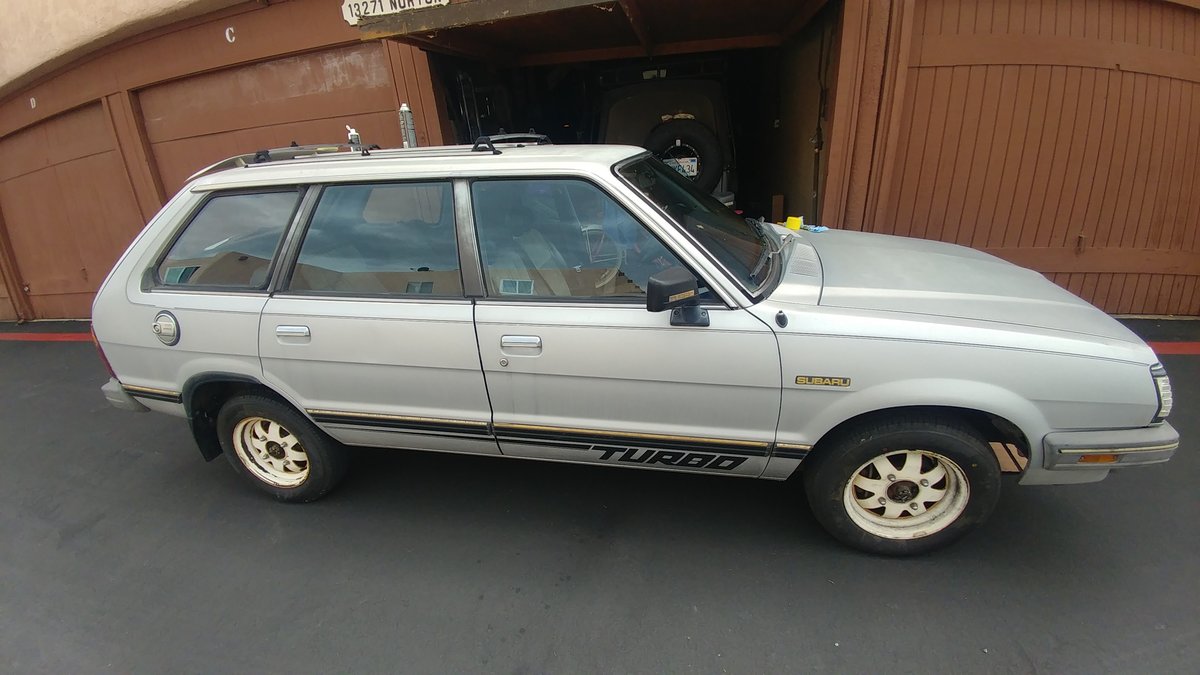
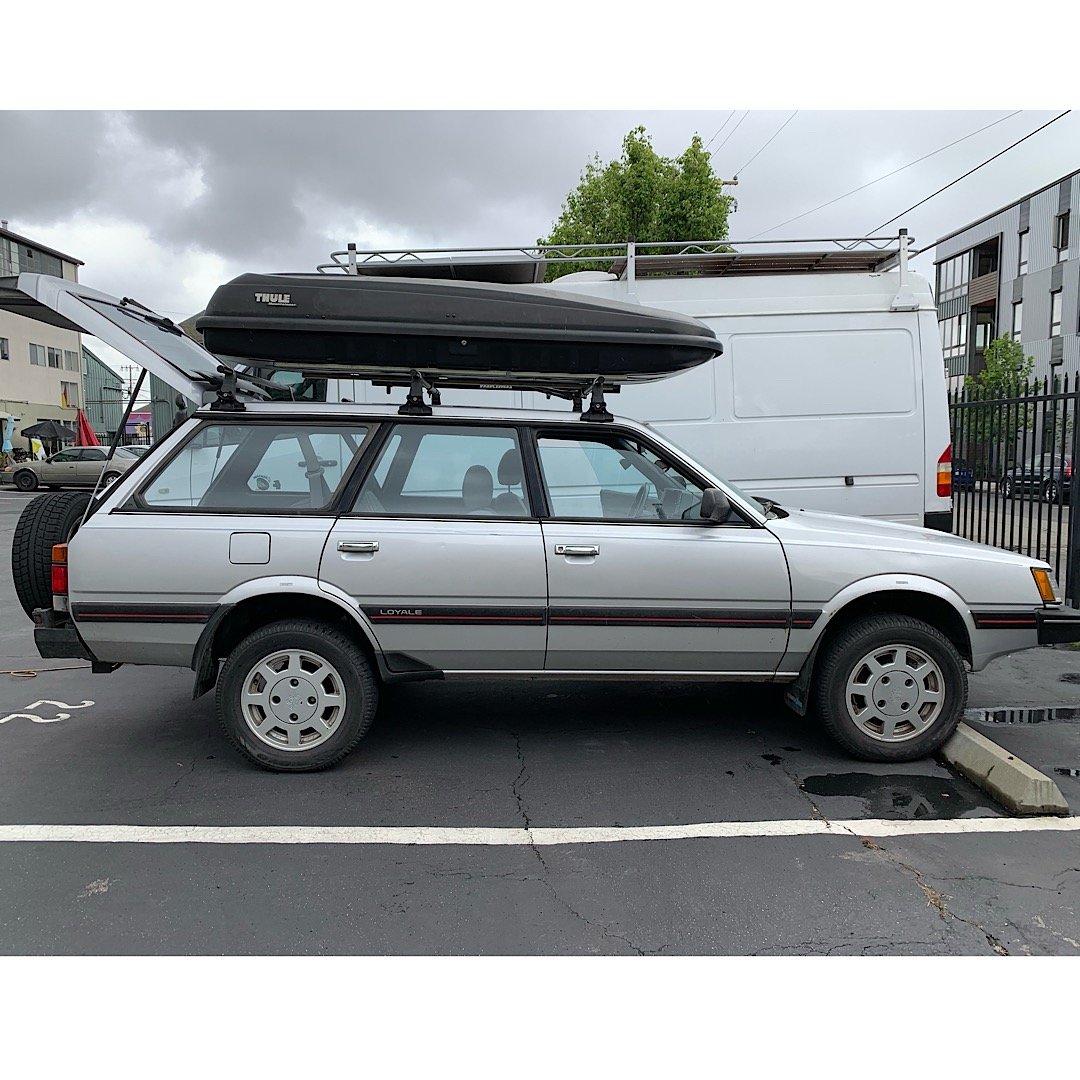
Here from Chino California introducing my new 1984 GL Turbo Wagon. I believe im the second owner after all the hassles I've been thru with DMV. I found the car on craigslist after just browsing thru the ad's, It was a barn find. The guy I got it from had it parked over ten years. What got me interested was the low mileage. I has 95236 original miles on the odemeter. The car is pretty much complete. Just a dent on the driver side door. What sold me was that it came with the complete factory service manual. And the car manual with the maintenance book with all the services done at its proper mileage.
 6 points
 -
Like a good friend, you miss the USMB when it's down.6 points
-
This was his last Facebook post on his personal page, from May 16th. Dear Friends, I don't know what is happening to the world, but there is something very Wrong, hiding underneath. I always believed that we come to this life with a heart, that is an empty Bag, which we should fill with precious moments, and wonderful memories; those are the only things that you will take with you, forever, even maybe to the other life; while everything else, material things, will never fill the emptiness of the bag on your heart. Trying to fill your heart's bag with material things, will only left you even more emtpy, not only on the spiritual plane... People seems to never realise that every day that they live, is a day less in their count of life; but it could be a day More, fulfilled with awesome memories, in their hearts. People forget that their little children will not be playing alone in that corner of your house, forever; waiting for you to finish seeing all your "friends" updates on social media, prior to dedicate a couple of minutes to play, before falling asleep. Believe me, social media is absurd and fake in many different ways; in real life no body cares if you ate bacon with honey in your pankakes for breakfast; but fake people will "Like" your empty and useless breakfast photo, like if they care; and so on... millions of people wasting time in a world full of hypocrisy. Not only time, but sometimes people also waste efforts, paying for travels, cars, etc, that really never wanted nor needed them, only to have the chance of taking the stupid "selfie" photo in order to gaining more "likes", they are living their lives like if they're in a high school's popularity contest; meanwhile what they really are "gaining" is only Emptiness, and the need to do a harder effort to pay for those unneeded "luxuries" to the system, that enslaves them more, and even more... Meanwhile, the little children grows, with an empty bag in their hearts, empty from the lack of precious moments, then they becomes men and women that goes from home, to start their own homes, leaving you even more empty... One day you might realize that you are really tired from being part of the system and being absorbed by social fakeness; and you might want to bow down and play with that little child that spent the childhood, alone, in a corner of your house, waiting for you to play; but you'll notice that nobody is there, and you are even more alone. Nothing worse than wasting such times. And sometimes parents fool themselves, sharing lots of photos from their children in different places, as if they really are playing or being with them; but they go from a place or another for the photos only; to display them in social media, but they have an empty background. Nothing is better in life than the Family; remember that your Wife / Husband \ Children, really needs you, and the best you can give to them, is the best part of your time, as long as you can; never give begrudgingly leftovers from your time, to them. I suggest you to try to fill your Heart bag with precious moments. The car, the money, The house, the job, the gym, the club, etc; everything will stay in earth. If you die, others will continue using them; the world continues and the other people, really don't care about you; only your mere family, if you dedicate quality time to them. You will reap what you sow. Every average day, can be turned onto two different things: it could be a hell, if you continue with selfish customs and being chained to the System, fighting for no real reason; or also the same day can be turned into an Awesome happy day, where all the family is surprised with a Pijama Party, a Family movie together, or simply by a dad or mom that decided to throw away the cell phone, shutting it off, to turn their lives on; and bow down to play with their children, or listening and paying attention to your spouse. You can make an average day, to be a Special day, every day, if you want to. Remember, Kids never care about the features of the car you drive; kids will remember if they went together with their parents in that car, to a nice sunny camp day on the mountains, or wherever their parents decided to go; those memories really fills the hearts of all the family and last forever, because the time that families spend together, is a priceless treasure for their hearts. I kindly suggest you to see less TV, less social media, drink less alcoholic beverages, smoke less; to avoid wasting your precious time and resources in empty things; and fill the hearts of every member of your family, with your presence, your warm heart, the things that you do together; you know... with spiritual things. Material things will never fill your immaterial soul. Sorry for this long letter, but I wanted to explain the reason why I am not visiting often my Facebook, nor the automotive web forums I used to... somehow I noticed that my daughter was growing too fast, and I decided to shut off my "Virtual Life" online, as much as I could; in order to spend all the quality time I can, with my Daughter, my wife, and the rest of my family. Still, I will check here from time to time. Sorry for any delays in answering. Kind Regards and Blessings. JesZeK (Loyale 2.7 Turbo)6 points
-
Thank you all you great guys out here on USMB - I couldn't have done it right with out you - probably would have messed it up. I wasn't ticking too bad, but now ZERO - and super quite overall! Also did water pump, hoses and seal on metal pipe that goes into pump. Sealed up some cracks in my air intake snorkel with RTV, fixed anything I found along the way and now it's super quite and smooth. No "bubbles and water fall" sounds coming out of coolant system. No scary stuff with the temperature almost going into danger before thermostat opens. Im pretty sure the last couple of days before the belt broke it had lost at least a tooth and jumped a tooth cause it was feeling out of balance when idling - that's the main reason I kind of why I thought it might be a waste doing this job - and I REALLY didn't want to tear it all the way down, I would have sold it or junked it. It really feels like I have a brand new rebuilt motor! To me it's amazing there is such a difference. AND NO OIL DRIPPING (yet) all over the bottom of the timing belts, which would spread into the exhaust pipe and start burning & smoking if on the freeway very long! It's almost like a dream... Thanks again6 points
-
This is How the Instrument Cluster ended up, after the Deep Cleansing and New LED Bulbs Retrofitted, just Before to put it Back in my BumbleBeast: Now to put everything Back together. To put Back the Four Vacuum Hoses for the A/C Control Buttons is Easy, because Subaru Marked each one with Numbers... #1, #2 and #4 ...No Number three! ... ... but the last one is unmarked, as the last Vacuum Plug, so No problem at all. The Problem is to Keep them in Place, because with Age, those becomes Loose and the Tiny metallic plate that goes in their back, attached to the side's screws, isn't enough to keep 'em Hooked. So, I Used four tiny Zip ties, one for each hose and cut their excessive longitude, with scissors: That shall be More than enough. Now Reassembly everything back together. Finally, this are the Results: Somehow I Believe that the Original Designers of this Instrument Cluster, desired that it looked with Great Contrast, white numbers over black background as it looks with daylight... but since the incandescent bulbs emits amber Light, they decided to paint the Numbers with a green tint in the Newer Models, that the newer clusters has. The White illumination gives to the car a Much Modern Feeling, and is not Blinding at all, but Camera Lens tend to exagerate the Glow... it does look as Sharp as a Modern car's LED instrument cluster. Final Notes: ► You can see that the only part that has Green Tint painted behind the numbers on the instrument Cluster, is the Kilometers per Hour numbers, under the Miles per Hour numbers. ► I managed to Fix the Oil Pressure Gauge, just by sliding it slowly with my Finger, 'till it reached the Real "Top" of the readings, then it sat on the right 0 Mark, not under it as it was. The Gauge reads low, but Low is Better than under-zero (Negative) Readings ► The Dimmer Control does work Fine with LED Bulbs. I Uploaded a Video and is in High Definition Let me Know what do you think about the LED instrument Cluster and this Writeup; you can post and comment in the Discussion thread exclusively for this Modification, Here: ~► http://www.ultimatesubaru.org/forum/topic/69467-ea82-dashboard-backlights-upgrade-to-hid-white-led's/ If you find this writeup, Useful, please let me know by hitting the "Like" Button below. I only ask this as a Motivation to continue Sharing my work with you. Kind Regards.6 points
-
Aquired this and plan to get back to original, might motor covert it later down the track....definatly want to track down a twin headlight front rather than the quad... but we will see what happens, have found a 2nd one, unsure if its for sale, need to do some digging on that still. Needs a fair bit of rust done, have started stripping it, currently have gutted the interior, and full loom etc, only have motor and glass to remove
 5 points
 -
Drove to a large old gold mine called gold hill, supposedly mined in the 1850s. We saw a few stacked stone walls a few feet tall sloping up to the mine. Took a trail that wound up going along one of them, it was there to hold the road up, still holding 170 years later. At first B was hesitant to drive up but when he saw me going up it without any issues and taking pictures he decided to follow. We made it to a little flat spot at the top and checked out the main mine pit on foot. Found some quarts crystals. Did some five point turn arounds in the little flat spot, hanging the bumpers over the edge of the cliff, but got down without incident and went to the pony express trail. Again, mainly gravel roads, but all kinds of roads/trails off of it and good scenery. We camped just off the route in Overland canyon. One of the most beautiful sights any human has ever witnessed reflecting a nice sunrise. By this point it was clear the electric fridge slammo gave me wasn't working. You could hear it running but the sound was different and it wasn't getting cold. Also had noticed a weird smell when I opened that door of the car so I'm guessing the refrigerant leaked out. Important ingredient for staying out of civilization for extended periods of time so I'm probably going to buy a better one. Saturday morning we finished the pony express trail. Over the last couple days B had mentioned some vibration in his car, at first he thought it was washboard on the road but mine was riding smooth. We swapped a few of his tires around, never made it better, the last one we switched seemed to make it worse. Then he said it got a lot worse. Driveshaft was missing three bolts on the diff flange and the remaining one was loose. We put in some spare bolts and continued on smoothly. Pony express route generally follows the southern edge of the salt lake basin. As we went farther east there was actually traffic on the road, which was unusual for the week. Not sure if it was because we were getting closer to the Salt Lake City metro area and pavement or because it was Saturday or both. Also I think this is where we saw the first UTVs on the trail all week. We'd become accustomed to seeing a few pickup trucks a day or maybe a Jeep if we stayed off pavement. When we got to the first vault toilets (at a campground entrance) there was almost steady traffic on and off the road for people using them. Continued east, not long after we got on pavement we saw a stunt area not too far off the highway so we started driving towards it. As we got closer there was a truck and trailer parked in the main trail, something we saw in Gold Hill the day before. In this case though the guy on the flatbed trailer was setting up to do some target practice. His buddy waved us by and we found the little hills and trails we'd seen from the pavement. Made some PB&Js and found a different way back to the highway. Along the way we saw a few other fairly large stunt areas with all kinds of trailers and dirt bikes, might have to check those out sometime, maybe during the week. Stopped at the closest gas station, filled up with gas, swapped out air filters, and aired up tires. B mentioned as we drove into SLC metro that we could probably see more cars at one time than we'd seen in the entire previous week. Drove back home without any other issues. Cruise is working pretty well in Impreza. AC works great but if I used it on long mountain grades the coolant temp gauge would start to climb. B said he did about 3900 miles, I'd guess around 1000 of that was off pavement. Need to figure out the cooling issues with the Impreza, after discussing it with slammo I'm thinking maybe thermostat. It's most often a problem at low speeds while climbing or driving on sand but will start to go up sometimes going up long grades at high speeds with the AC on. Impreza takes some cranking before it starts sometimes, usually after sitting overnight. Wondering if it takes a bit to build fuel pressure. A few times, sometimes after some hillclimb, we'd hear the fuel system make a gurgling noise after the car had been shutoff for a minute. We used our jerry cans twice and I rolled into gas stations on empty four times. And that was after cutting our trail riding short so we didn't run out. It would be great to have more fuel capacity so we can wander better. I discussed the propane spare tire well tanks with slammo and he found one for about $300US shipped with 10 gallon capacity that should easily fit. https://shop.vanmeenen.com/en/lpg_cng-tanks-&-valves-1/lpg-toroidal-tanks-42 I'm thinking a vent/overflow hose to the main tank and another line with reversible pump. Then it can just be filled by the stock fuel filler and when the stock tank runs low it can refill that. Definitely need to finish the rear bumper for the Impreza, would have made the recoveries easier. Super happy with the performance and reliability of the Impreza overall. Forester holds up well too but definitely needed the low range to do some hill climbs the Impreza could do in high range. Still a great way to explore the back country and hit some fun trails. It also seems like on our last few trips a lot more people than usual have been complimenting us or commenting on the cars. These turn of the century Subarus are getting more rare in general, and who doesn't love a first gen Impreza, but it's still a fun surprise. Over the winter I want to make the straight cut planetary low ranges and get caught up on editing youtube videos, we got some good footage this past week.5 points
-
I bought a set of the LED headlight bulbs that was deemed directly compatible with my OEM headlight bulbs. Big mistake. My digital dash went haywire and the engine began cutting out and otherwise ran poorly. Then the below dash relay switches were overheating and burning out. Finally, I realized that those LED's were screwing up my car big time, but only after I changed out my distributor, coil, cap and fusible links in a rain storm. Now I am back to the the OEM bulbs, have installed all new relay switches, and keep a handful of spare relay switches to pop in if I have any further problems. 524,000 miles on my 86 gl10 turbo.5 points
-
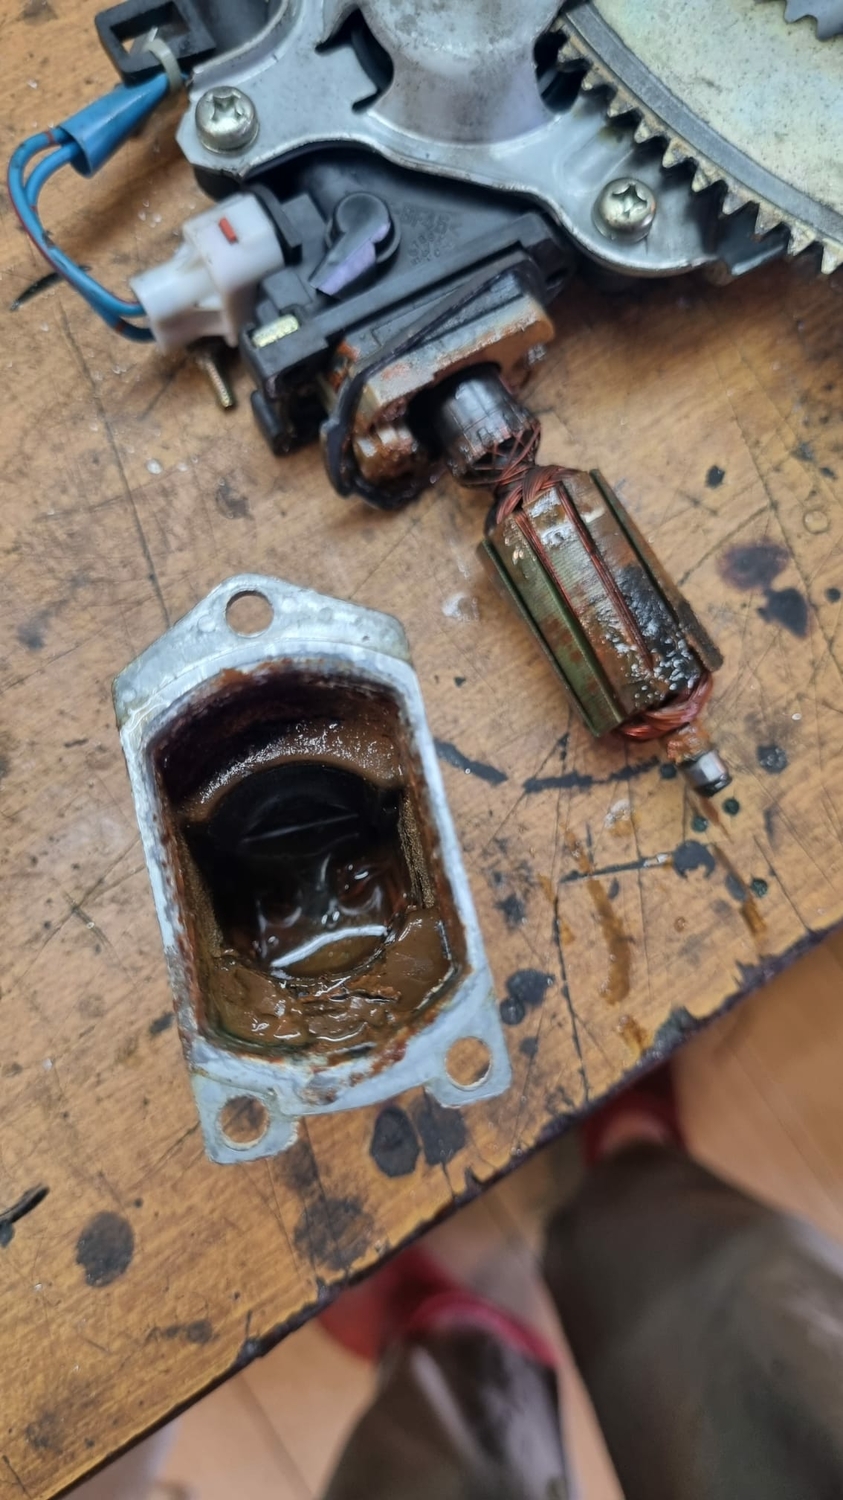
it was one of those rare cases where id say: easier done than said even with the window stuck on up. all done in 20 minutes. in the name of science, opened the old motor, all damage was due to water ingression, god knows how it got there
 5 points
 -
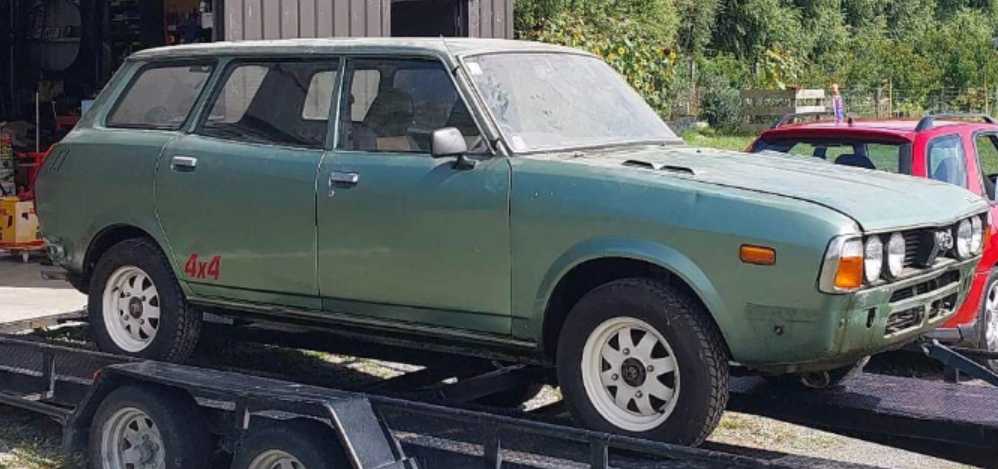
Well, I have just test driven, and agreed to purchase, this fine example of an early 1984 build 3ed gen JDM Leone sedan. It is the top spec trim, and has digital dash, trip meter, cruise control, air con, and was fitted with the height adjustable suspension (now removed). Trans is 3at auto with part time 4wd. It also has a sweet water to air intercooler setup fitted by the current owner. Drives very well. Pulls harder than my old turbo wagon, with the intercooler. All the electrics work. Best bit? Only 129,000 kms since new. Only issue is leaky sump gasket. Hopefully will collect next week once WOF and rego done. Here's a teaser pic... And yes, I will be keeping Gertie... Keep your eyes peeled for the next stage of her build (she's going up in the world!)5 points
-
I would be asking $10k. These are rare and someone will be wanting to turn it into a 22B clone. They will pay for the privilege of the chassis. You are looking for someone that's wanting to spend $50k building their dream. Price their canvas accordingly. Consider what it would cost in fuel alone to transport a rust free example from the west coast - not to mention your time to track one down. You have to pay to play. This isn't a vehicle you are selling based on it's value as a medium of transportation. This is a rare unmolested canvas upon which dreams will be painted. Price it accordingly. GD5 points
-
Just put a large straight slot screwdriver into the brake rotor and it will lock up the hub to break the nut. I usually stick them right down through the brake caliper.5 points
-
Any 2008+ STI will have the 11mm pump. We use them exclusively on all engine builds. That said - the horse has left the barn so-to-speak. All of the pumps are going to produce about 90 psi on cold start. An EJ engine with good clearances will be about 20 to 25 psi at hot idle. The idiot light comes on at a ridiculously low 4-6 psi. This is a common misconception - oil pumps produce FLOW and the size of the pump dictates VOLUME. PRESSURE is a function of resistance to flow. What you have is a lack of pressure and thus a lack of resistance to flow. In every case I have ever seen this is due to significant wear in the main and rod bearings of the engine. The rod bearings we all know about. The mains get "loose" over time - especially the #2, #3, and #4 mains due to crankshaft deflection and compression of the cast aluminum block. Replacing the pump will not likely do much good for long. You can try. I would also switch to 20w50 on this engine to increase the idle oil pressure. I have seen borderline engines bump up 10-15 psi from thicker oil. Keep it cool and be gentle with it. It may last a few more seasons. GD5 points
-
No - I wouldn't buy anything from GM either. But then I just won't buy new cars period. You take a bath on them in depreciation and they are designed with a planned lifespan of the lease period. I could buy any new car I want, pay cash for it, and write it off as a shop expense. Unfortunately there's just nothing out there that isn't a pile of proprietary intellectual property wrapped in plastic and bits of shiny. No thanks. I like cars too - one's I can actually modify without reverse engineering a dozen computers designed by teams of engineers with a specific mandate to make that process nigh impossible. I don't need that frustration and they can keep their overly engineered and under designed plastic crap. GD5 points
-
Wow, a 2006. Moosens enters the Space Age.5 points
-
I have 40+ years of experience as a certified advanced level Master Tech and I am still employed in the field full time. I own a 1989 GL10 Turbo wagon (EA82T / 4EAT) in good shape along with a pretty good stash of extra parts. I own 2 other EA wagons as well. One is a lifted 1983 GL wagon with an EJ22, custom built 3.9 full time dual range trans, and a clutch style LSD rear diff. The second one is an AWD 1992 Loyale with an EJ22, EJ 5MT transmission, and a 5 lug conversion. Both cars have 4 wheel disc brakes. According to some people I must be an idiot too. Do I care what other people think about me, my cars, or what I do? Don't think so. I do what makes ME happy. I still hang out here and enjoy the USMB a lot. In my opinion this is one of the best resources online for older Subarus. I still check in here almost every day but I rarely post here anymore. Some people that post here seem to have moved on from EA Subarus and are down on our old cars for some reason. People world wide are restoring cars every day that are way harder to get parts for than an old Subaru. I say do what YOU want and what makes YOU happy. Will you make mistakes? Yes. Will you learn from them? Yes, without a doubt. I know I have. I am following your thread and enjoying it. Please keep it updated5 points
-
Oil and Oil Filters Since New, my beloved subaru "BumbleBeast" has been using 20W~50 motor oil on its EA82 engine, (that SAE grade is for our warm caribbean climate) but in mineral form; mainly from Chevron and Motul; and I changed its oil and Filter at the proper interval, around 3,000 miles. When it became impossible to find an original Subaru oil filter on local stores anymore... ...I used the Recommended oil filter in Purolator brand, for the EA82 engine, which is the Purolator L-24457 Sometimes it wasn't easy to obtain it locally, so I used the Equivalent with slightly larger body, Purolator L-20064 However, larger body means less oil pressure on the system, so with time, I migrated to the Purolator L-10028 When newer oil technology came, with the development of Synthetic motor oils, I chose to use Valvoline's "MaxLife" motor oil, which is formulated to be used in Higher mileage vehicles; I adopted it since year 2012 (despite that I've read about it long years ago on magazines, it took some time to reach my Country and more time to lower its price on the local market) firstly I tried "MaxLife" in ATF form on my Wife's car with excellent results, then in Power Steering fluids on her car and mine; finally I switched to this "MaxLife" in Motor Oil also... ...circa 2014, which was a hard year (for me), with big decisions to take... one of them was to use this oil on extended periods of time, which I wasn't accustomed and I was afraid to try, but I gave it a go, and seems like the hardest part was to obtain a long life, synthetic oil filter to go with this oil. It doesn't make any sense to pour a long life motor oil, with a standard cardboard filter, isn't it? So, after searching, studying and analyzing my options; I found a small, synthetic oil filter with long lifespan, designed to be used extended times, and it had very Good opinions and reputation online, in web sites and forums dedicated to motor oils and filters; but this filter is much smaller than the oil filter recommended for the Subaru EA82 engine; which according to modern lubrication standards, is Better, as a smaller bodied filter aids to keep a higher oil pressure in the system, which is ideal for this engine and its exigent hydraulic lifters... you know. Here is the Oil Filter I chose, compared side to side with the older one which I used for long years: The Napa Platinum 41394 is made by Wix and is pretty small, but satisfies the requirements of the EA82 engine. Here are the Specs: here, you can see how this small oil filter, fits on the EA82's oil pump Base: And, believe it or not; I've been changing the Motor Oil on my Subie's EA82 on a Yearly basis, due to two reasons, money is tight and I am not using it so hard as it was used before 2014, since my small family and I, moved from the big city, to a small mountain high town, in the rural Honduras. I've been changing this synthetic "MaxLife" 20W~50 motor oil along the Napa 41394 synthetic oil filter, every December, since 2014, and the Subie runs flawlessly, no problems so far, despite it surpasses 400,000 miles; also the old used oil still comes out pretty good. Kind Regards. ________________________________________________ Extra info: if you can not see the Photos I shared from Photobucket, you can add to your web browser, an extension named "Photobucket embed fix" wich will let you see the photos, flawlessly. Greetings.5 points
-
I’ve been driving XTs since 1993 and have owned a couple dozen ER27s as daily drivers and worked on others. 250,000 mile engines, and more, if well taken care of. The blocks and heads are non issues. Though splitting and assembling one yourself is not ideal. Those heads (and other old generation Subaru heads) get superficial, benign cracks between the valve seats. very well known amongst old school Subaru folks but not anyone else. Ignore them and carry on, but they’ll freak you or a shop out if they’re not familiar with old school subarus. High mileage ones can get warn HLA seats. headgaskets no big deal. I don’t know if headgaskets are still available OEM but those would be best. Oil pumps don’t “fail” but can often cause incessant ticking by introducing air into the oil. (It’s often called TOD or Tick is Death, although it’s a misnomer since it doesn’t cause any problems). Engine runs fine and it’s benign but engine sounds like a diesel. Oil pumps are NLA and one of the most common needs that would be nice to have available. New OEM timing belts, pulleys and tensioners are good for the factory recommended 60k change interval. Some of those pulleys are no longer available and old pulleys are devoid of grease and will seize and break the belt if not addressed. how you address those timing pulleys and if you use nonOEM parts will dictate change interval. I regrease the bearings, use after market timing belts, and check the belt and bearings around 30k. The passenger side belt had an adjustment routine that’s suggested to do at routine intervals and there’s an access point through the belt cover for that process. A well maintained OEM water pump is good for the 60k timing belt interval. But you may not get OEM and the long shafts and general design lend themselves to replacing with every timing belt change. They don’t have any ominous or outlandish failure modes, just wear and age. Electrical issues - these are only an issue now with age and brittle/corroded connectors. The CTS wiring is so common I have no idea how many of those I’ve fixed and I’ve done them Preventatively before. There’s an injector harness thats the same and can be bought new and sometimes the wire a few inches back needs replaced. Very easy, you would just address it as soon as you were building the engine. Plastic alternator connector - same thing. Brittle, but they’re obvious and easy to diagnose because you’ll loose charging. There’s a new connector available, easy and you’ll do this from the beginning unless you get a rare perfect connector. IAC - idle control sticks very commonly. Clean them out liberally internally, preferably while activating the valve so it’s cleaning through the whole range of motion and getting all parts. They can also fail and need replaced. knock sensors don’t fail often during nominal use but are so fragile with age they can break during removal or work. convert to an EJ alternator so you have more modern availability. that’s it - lots of parts are NLA and not a huge supply and it’s only going to get worse. Why not use an EJ22 engine?5 points
-
It can be done, but I would recommend cutting in the middle, turning the OD down to match some seamless heavy-wall tubing with some plug-welding holes pre-drilled in it. Press it into the sleeve with a .001" interference fit then weld up the ends and all the plugs. You should keep the splined ends wrapped in a wet rag to prevent them from losing their heat treat. GD5 points
-
Update! Today I soldered in a used connector I got from the wreckers. I did a test of wiggling the wires near the connector when the car was running and sure enough it was near the connector - the engine shut off I soldered in new cable and connector, and my car runs like a dream now. The idle is no longer as rough and there is no stalling. More power and response from the engine which is great! Thanks so much for all your help and expertise. Project successful! (So far) I will post an image later Edit: Not sure if i didnt notice before, but now on a warm start the revs of the car go straight to 650-800/ the revs that the car usually has when running. its very smooth, but I'm used to the 1200 revs on startup that slows to 650-800 after 20-30 secs. Im guessing its something to do with a proper connection now? unsure as to why the crank angle sensor would change the idle speed but anywho... Feels great5 points
-
Don't. You'll just look like a tool in a lowered 96 Outback. GD5 points
-
PM me I do OBD II for $180 + shipping Will come with heat shrunk, weather proof Fusible link for main battery connection. All other wires will be labeled and long enough for you to route as you wish to IG., Fuel Pump, tach, speedo, CEL, Etc. * stripping harness only. If you can bring the car to Corvallis I can install harness for labor time rates.5 points
-
FOUND! Self recovery from the crack heads that were driving it around Oakland. No damage beside stereo to torn apart and the smell of crack head... Having a gps locator onboard was the saving grace. Thanks for all the support USMB! Im adding in a secret ignition kill switch. FYI -I’m pretty sure my ignition lock is so old. any worn down Subaru “skeleton” key would have work. Doesn’t look like they hot wire bypassed.. we won’t discuss that to much online but you may want to check it out for yourself. Luke
 5 points
 -
Este es mi Oldschool
 5 points
 -
Hey that's my SWAP! I did that swap for my Ex-girlfriend back in '14 or so. She sold it back in late '15. They gal who bought it called me once (from Lebanon, OR) So the story has gotten mixed up, cause I built it for my GF and then she sold it presumably to the gal you got it from. It's an EJ18 from an 93 Impreza. I did do a custom low line for the AC. Someones screwed with my wiring a bit. but all in all the A/C worked fine. The large bundle across the engine is Headlamp relay setup. No need for conduit. It's been that way for 5 years, it's fine. It has the Stock 5spd 4wd S/R, but it's in EJ cases so no adapter plate. If you need a clutch use a clutch for an Impreza5 points
-
Good to know the EJs are not going anywhere. Why EA? in no particular order, and not complete... Now that I have passed the 25 year mark, I will not deal with another car newer than 25 years old, just to avoid emissions hassles. For whatever reason, I just always have those crop up when I am already crazy busy. SO done with that. I never had an older / original Legacy, but we did have an 01 Forester for my wife. I could out maneuver it with my EA wagons, and all the newer versions are even bigger. Ok, didn't have to do the timing belts as often, but the DIY cost was nearly 5 times higher. Both of us can tell where the EA is on the road & parking a lot better than with the newer rounded cars. I can get bigger things into the back of my EA wagon than any of the newer models I've checked. Not by a lot, but a few items, it mattered. Do not want AWD forcing me to always run 4 identically worn tires. Bigger tires are more $ also, so not interested. I've also added lighting to my wife's Foresters, and now Impreza. [We replaced her 09Forester with an 09 Impreza recently, as she could not get used to the bigger rounder shape. Horrible time parking, etc.] What a PITA! all the wiring is hidden, even under the hood. Even though I am an electronics engineer [or maybe because I am one...] I don't want MORE computers to maintain and deal with in my vehicles. One for the ECU is ok, but that's enough. I don't drive tons of miles a year. I know the EA and have acquired or made all the tools I need to do nearly everything with them. Don't need to start over. It's now also just one of my hobby things - see how long I can keep running them. Because I can.5 points
-
OEM Subaru clutch and throttle cables.5 points
-
I see value in GDs comments. He had the Loyale/GL platform at one time and he decided to move away from it for the reasons he states. His reasons are valid. But they are equally valid reasons to not buy and maintain any old machine. With a car that ceased production in 1994 the lack of specific parts may be a good reason to stay away. But, as to the value, the market is the market. It seems like many of these are coming in under $1,000 but ones that are not rotten and seem to have been well maintained are going for higher prices. Some people are sticking with this GL/Loyale and keeping them running. I liked driving the one I did. My sense from talking with the owner was that he was able to find parts when he needed them or make due with substitutes. There are many aspects of the simplicity of the GL/Loyale that appeals to me. I do need to admit that I fly a 1946 Piper J-3. Low power, slow, uncomfortable, etc. Sometimes tricky to find parts for and maintain. Sometimes when flying about 1000 ft AGL I fly along a freeway so the movement of my shadow can be compared to the speed of the traffic. I need a tailwind to move faster then the cars. So why maintain and fly this plane? In the past I have owned a 59 MGA, a 64 Porsche, a 65 Beetle and a 64 Corvair and a 73 Austin Mini. I rode a Yamaha XS650. All quirky rides. My daily drive today is a Toyota. There are members on the forum who like the GL/Loyale and are driving and maintaining them.5 points
-
Tone ring... that's what that's called? Yes, the screws came threw the spindle into the ring. There is no way to rebuild it. It's too beat up. I'll be pulling the assembly from another car. I'll do a complete brake job on this before it's done. The car is going to a lady I know who lives on Social security, and has trouble walking. This ride will give independence and make doctor appointment much easier. So ya, good brakes equals piece of mind. As for the previous owner, I can't say anything bad. He's a nice guy overall. Just a bit clueless. While marijuana is legal in Washington, it doesn't mean everybody should partake.5 points
-
Old lug nut, fender washer, and some grease is the easiest DIY way. Or pull the hub off and hammer it in with a socket supporting the hub on the threaded side. GD5 points
-
I talked to the guy that I see all the time at the local burger joint who has a Subaru. Right off the bat he gave me the name of a guy who works on Subarus (who was also recommended by a local garage that has a good reputation). I found this man (he has a junkyard/body shop) and he has 4 Subs (that I saw) in various stages of repair at the moment. It was raining on us and I was on my way home from the vet with my cat, so I didn't talk to him long, but he sounds like Montana Tom upthread. He had a beautiful silver OB in the repair bay he's asking 3500 for right now - so assuming he can keep Subs in stock, I should be good to go once I have the money saved up. My neighbors had bought a fixed up non-Subaru from this guy and it's been a jewel of a car - I have to borrow it sometimes when my#$^*% truck tears up. I had been peeking at this guy's place when I would drive by, but I didn't see any Subies on his lot. Thank you all for the push to go up to people and ask...who knew I'd find someone this close by and so easily? Of course I will carefully check over any car he has for sale...but I have faith in the 'hillbilly grapevine" especially when it comes to the guys at the burger joint...I've been talking to them off and on for the last year or so; they strike me as the kind of fellas that would look out for a woman in need of help and not lie to me about stuff. If they say he's good, I believe them.5 points
-
So the clutch, flywheel and clutch cable were replaced after 32 years of great service. Replaced with OEM parts. Exedy clutch kit (Amazon) LUK flywheel (RockAuto) Subaru OEM clutch cable (Lithia Subaru of Oregon) I've had a Weber carb on it for years and now the clutch & shifting feel like when I drove it off the dealer's lot all those years ago. A few other things to attend to but nothing that affects how it runs.5 points
-
After all that, the engine Runs Flawlessly, Stable and Reliable! As I explained at post Nº 3 above, I obtained another Weber 32/36 carburetor: So I changed it after a Decade, to test the Choke and Anti-Dieseling Fuel Cutoff solenoid: Photo of the finished install: Here is how the new Weber looks, already installed and Running smoothly: And This is How my 1985 Weberized EA82 Subaru Wagon Looks Now: Named: The "BumbleBeast" Here's the Build Thread: ~► http://www.ultimatesubaru.org/forum/topic/122276-the-bumble-beast/ This is a Video of the Weber Carburetor, Working on my "BumbleBeast" Subaru: Feel free to ask Any questions regarding the Weber Carb Swap, on its Discussion Thread, which is Here: ~► http://www.ultimatesubaru.org/forum/topic/148641-to-27-loyale/ I Hope This Write-up will be Helpful. There are interesting comments regarding this writeup, on Facebook, like this one: If you find this writeup, Useful, please let me know by hitting the "Like" Button below. I only ask this as a Motivation to continue Sharing my work with you. Kind Regards.5 points