Search the Community
Showing results for tags 'EA82'.
-
 So I got an 86 GL that has terribly blown head gasket or cracked head (quart of water mixed in oil), and I want to put my good Block from my 88 DL parts car into it and just put all the carb'd stuff off the blown engine and put in all onto the good shortblock. Is there any difference between an SPFI block and heads and a Carburated block and heads? -They're both Manual and both non-power steering Thanks everyone for any input!
 -
Test light success. It turns out that the 1993 model quietly had it's wiring changed around. Many sources online I have found claim for the constant 12V to be on the red/green pins and the illumination on solid red (which consequently, also attach to two pin connector with the same colored wires). This is WRONG. Test lighting the supposed red/green and red wires at the connector will show there is no power through these wires, despite them being connected to both the stock head unit's harness and the two pin connector coming off it and back to the car, regardless of key state (off, accessory, on). The blue yellow wire (pin one) will only power in accessory and on positions. Thus, 12V switched (or ignition as it can be labeled on aftermarket diagrams) has been located. Last, but certainly not least, is the mystery one pin connector with a white clip. It is ORANGE from the stock unit, and at the car side, changes to GREEN. Putting a test light to it in off will show power, as well as all other key states EXCEPT start (engine crank, this is normal). This is the constant 12V (or battery connection) that is SUPPOSED to be the red/green wire (or perhaps, only applies to years prior; I can only speculate why Subaru did this and won't begin to). So, let's recap. Constant 12V - Orange from stock unit, green after single pin connector (aftermarket manuals may call this 'battery') Switched 12V - Blue on stock unit, blue/yellow after eleven pin connector (aftermarket manuals may call this 'ignition') Ground - Black on both sides of eleven pin connector Wires in question: http://i1078.photobucket.com/albums/w482/tincan93/Mobile%20Uploads/20141116_070451.jpg - Constant 12V http://i1078.photobucket.com/albums/w482/tincan93/Mobile%20Uploads/20141116_070352.jpg - Switched 12V http://i1078.photobucket.com/albums/w482/tincan93/Mobile%20Uploads/20141116_070410.jpg - Ground Of course, the result will become clear when you jam it all in the dashboard and turn the key on: There is no illumination, nor remote power on lead for the amplifier (unless you installed one), and the power antenna wire is also unused (again, unless you installed one). Again, I used a test light and checked everything in each state of ignition. I know this gets searched up a lot online, but I'm not responsible for what you do to your vehicle, nor can I confirm if this will work in your scenario. That being said, use caution and common sense. Hopefully you can make use of this information if you decide to install an aftermarket stereo.
-
 Does anyone have instructions or know of a how-to describing the ins and outs of rebuilding an EA82 rear LSD? I think it's about time to give mine a refresh, but I'm not sure which clutch plates to order and a rebuilding guide would be very helpful. I have already tried searching for Datsun-based guides, but didn't find what I was looking for.
 -
Does anyone have instructions or know of a how-to describing the ins and outs of rebuilding an EA82 rear LSD? I think it's about time to give mine a refresh, but I'm not sure which clutch plates to order and a rebuilding guide would be very helpful. I have already tried searching for Datsun-based guides, but didn't find what I was looking for.
-
Hey folks, I'm trying to get some ideas to help diagnose my shifting woes. About ten years ago I swapped in an EA82 D/R 5 speed into my EA81T wagon using EA82 clutch parts and EA81 pedal parts. It shifted decently, but shifting into reverse was usually a little grindey if you were too quick. The clutch cable clevis and clevis pin were SEVERLY worn, and I thought that replacing these parts could help alleviate my shifting troubles. Fast forward to August 2014. I've refurbished the wagon to use in my wedding and have installed the following parts: Lightened EA82 flywheel (with shims for the bolts), XT6 clutch kit, a NOS EA81 MT pedal bracket, NOS clutch pedal & clevis pin, NOS EA81 clutch cable. Unfortunately, the shifting/clutching has become even worse. I have almost ALL the free play adjusted out of the clutch system (I left maybe 1-2mm for thermal expansion) and yet, I can barely get the shifter into gear. If the car is at a dead stop, I have to shut off the engine before shifting into first gear or reverse, or heel-toe into first coming up to a stop sign (Accompanied by a bang and judder as the shifter is forced into gear). I'm worried that my lightened flywheel may now be too thin, or my clutch release fork might be bent/damaged. Does anyone have any ideas to help fix this?
-
Thank you all so much! I have been lurking around these forums for some time, and just recently made an account. I have very basic car knowledge, but between this forum and Miles Fox's youtube videos I was able to do a head gasket on my '92 Loyale. Basically everything that could have gone wrong did, from the head gasket being cracked to the lifters being stuck in the old block andthe rockers slipping all over the place then slapping like crazy afterwards Afterwards i put in some light oil, let it burn through a half a tank of gas with half a bottle of Seafoam in the tank and the other half in the oil. I drained the filth from it and gave it a full tune up, and put in the proper oil for the oncoming winter. My Loyale hit 80 on the freeway for the first time, and peeled rubber when i punched the gas. I never knew it could do either of these things, and all the thanks goes to you. It runs super smooth, there is no more knocking and the gas mileage has improved. It just hit 150,000 miles, and I'm hoping to get another 150k out of it. Many, many thanks, - Blusc13
-
I'm sure its somewhere, but I can't really find anything on the effects of having no backpressure on an ea82 turbo engine My front cat on my 87 GL Turbo recently fell off, so I put a small section of pipe on it to keep exhaust off the CV axle. It seems to be running smoother and a little more powerful, but I keep thinking it could damage something internally driving it like that. Anyone have first hand experience with this?? Haha
-
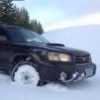
"Could the legends be true?" "Legends dont burn down villages..." Elder Scrolls VI: Pleiades I've got a 1986 Subaru GL-10, I traded an MR2 i got for $500 and $1000 on top of it, This may very well be the only rust free GL-10 in Minnesota, and may be the ONLY GL-10 in MN, there is a red one to be rumored to be in existence here but the rumors are few and far between. Options i have on this car are: Digital Dashboard, Active Ride Height, Trip Computer/Range computer, power windows and locks, sunroof, every option available except leather seats if they were offered. Mechanically it is an EA82T, One of Subaru's first turboed engines. It is unintercooled and the slowest engine ive ever had in my life (runner up is a D15B running on 3cylinders). The transmission is an Automatic 3 speed, which when coupled with the motor makes for a very long trip to 60 mph (16 seconds at 65 degrees going downhill) It sits high but its because this spoob is a massive pain in the wongleflute to lower. I lowered the front 2 inches with Subaru XT struts, which did seem to help the look. The back is dropping 2" on some Eibach replacement coilover struts sized at 9"x2.5" (stock is 11"x2.5") Then i hit the wheels with some 150 grit sandpaper to clean them up, i still have a ways to go. But so far that's where I am now, final product will be 5x100 swapped (GC impreza front suspension, XT6 rear suspension) lowered another 2" on subaru impreza coilovers up front and legacy coils in back. Power will probably come from an EJ family engine, most likely an EJ205 with a STI turbo kit/intake manifold mated to a first gen Legacy 5 speed transmission. So stay tuned guys...
-
Andersondesign-fab.com Well guys I’ve started building lift kits. All my kits are reinforced and built stronger than they need to be, providing a safe and reliable means of lifting your Subaru. I’m keeping the cost as low as possible to make my customers happy and see them wheeling there Subaru’s! Little bit about myself, I have an AA in Architecture, AA in Mechanical Engineering, my year certificate in machining and almost done with my bachelor’s degree in Architecture. I being working/loving on Subaru’s for over 6 years. Been working under one of the best Subaru mechanics, non-other than GD for over 2 year. On to the Lift Kits! This is what i have currently, I will warranty all my kits and parts them self, as i feel i will never have to, due to the over kill of strength. All hardware is included Kits will take up to a week to fabricate, depending on what i have on hand. And yes this is my original design and my fabrication. LIFT SPECS: All hardware is grade 8 strandard, all metric bolts are 10.9 grade. Top and Bottem hats on the front lift blocks are 3/16" steel, sandwiching 1/4" tube walls. Rear brackets are 1/4" steel with 1/4" gussets. All subframe blocks are 1/4" thickness. When any lift kit is purchased, installation instructions in PDF, along with your Invoice, are included. EA81 2" lift $320 Shipped EA81 4" lift $450 Shipped EA82 2" lift kit $180 Shipped EA82 2" lift kit W/ 1.5" Full sub frame drop $275 Shipped EA82 4" Reinforced rear brackets 70$ shipped EJ 1" Solid steel strut spacers. $200 a set Shipped. The spacers are tapped to allow the spacer to be bolted to the top hat of the strut, for a stronger bond. 98-08 Foresters 95-99 Legacys and Outbacks 02-07 Imprezas EJ 2" Strut spacers. $300 a set Shipped. I also have the 2 Bolt rear for the newer Subarus as well. 2" kits are off set for near perfect caber correction. Forester, Legacy, Impreza EJ trailing arm spacer $110 a set Shipped New Gen EJ $300 a set Shipped 2" SH Forester lift kit with rear trailing arm spacers $500 Shipped FIRST ON THE MARKET!! EJ-EA Adapter plate, 6061 Aluminum wet jet cut. Dowel pins line up perfect and have a snug fit.145$ Tapped,shipped in the US. EJ-EA harness Stripping OBD-1 $250, OBD-2 $200. Before: AFTER: Notes: -All EA82 lift kits keep the camber near stock, if not completely stock. -Wheel at your own risk. -Not liable for any damages not under warranty of ADF. More coming soon! Like me on Facebook and keep posted! https://www.facebook.com/ADNFAB Pm me or contact me at ADNFAB@gmail.com for questions and inquiries!
-
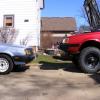
hey guys, I've just bought a 93 DL 4WD D/R and I'm looking to lift it. now i know there is probably 1000 topics on this but they are all over the place and you only get half the story in each one! what I want to do is 3" suspension lift with a 2 or 3" body lift. I have done the homework on strut spacing and any more than 2", bigger wheels blah blah blah. But i would like is a list of all parts and potentially drawings if you have any. To start i would like to know if I can use 3x2x1/2 (I'm not used to using imperial measurements so if i make a mistake or 2 just bare with me) RHS or if ill need to make a more sturdy unit, dropping the cross members what is a the best rule of thumb for working out how much to drop. As for body lift should the blocks be solid is the 1/2 RHS good for that. Nuts and bolts, what are the best grade for all this, general purpose, high tensile, building. These are all things i just cannot find answers to on any post. If you can think of anything else i have forgotten please feel free to add it, I am looking to do this right and not too dodgy or bodged together. if that made no sense just let me know and I'll try to get it right for you that time. cheers guys!
-
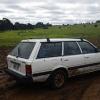
I'm wanting to go with a more aggressive wheel and tire on my 92 Loyale, any recommendations? It's 4 lug and I didn't want to have to mess with modifying the hubs, are there any styles that will bolt right on?
-
I hear talk of many 'how to' threads for a EA82 5 speed tranny to D/R 5 speed swap but I can't find them. I find random htreads asking questions but never any how to's. Where might they be located? Link? Thanks
- 8 replies
-
- 1
-

-
- D/R
- Dual range
- (and 4 more)
-
 I just want some opinions here, my concern is through the roof. I am considering taking my 1990 Loyale wagon on a trip from Portland, Oregon to Gallipolis, Ohio, which is on the eastern side of the state. The trip is about 2600 miles, beginning on I-84, then moving onto I-80 and I-74. I'm a stranger to drives this far but if I do it, i'm not worried about lack of driving skill or anything like that. I'd maybe cruise a bit less than 500 miles a day until i got there. Who knows. What I AM worried about is ye olde ea82. Its a tough old gal, but it has given me trouble here and there, no surprises. I have a bit of an oil leak on the passenger side cam tower, which became pretty noticeable after cleaning the block. It's not enough so that I need to dump more oil in, in fact, I haven't noticed any oil loss whatsoever. What DOES go down the drain is some coolant, and I dont really know where it goes. Its not an absurd amount but, like i say, noticeable. The car drives like a champ for what it is, a yellow bellied ea82. However, I would kinda be up spoob creek with half a paddle if it blew up on the drive. I know my way around the engine bay no doubt, but thats not gonna save me if i throw a rod bearing or really cream the cam tower/head. Does anyone have experience with a trip like this in a "seasoned" ea82, or some insight they can give me? I would appreciate it greatly. I dont have much cash to save myself in the event of a mass failure. Is it worth trying? Car is a '90 Loyale wagon, optional 4wd, 5spd tranny. Thanks in advance guys. The car has been running pretty solid lately, it has had an electrical problem before but its fixed now. If spoob hits the fan, what kind of costs(jagged, rough estimates) can i expect to get this thing rebuilt? Any parts you see as impending doom-bringers?
 -
 So i have an extra EA82 that has about 90k on it, it was running well until the head gasket went. When i took it apart i noticed one of the cylinders had a pitted rust spot about a quarter of an inch square near the end of the piston stroke. I dont remember it smoking, but it probably was to some extent. Would it be worth boring and getting enlarged pistons if i could do the boring myself? I'm currently going to school as a machinist and may have the correct machines to do it at home. But ive read that the EA82 is not worth boring for cost reasons. Has anyone had a bore job done on their EA82? how did it work out for you? Any and all discussion on this topic is welcome and appreciated.
 -
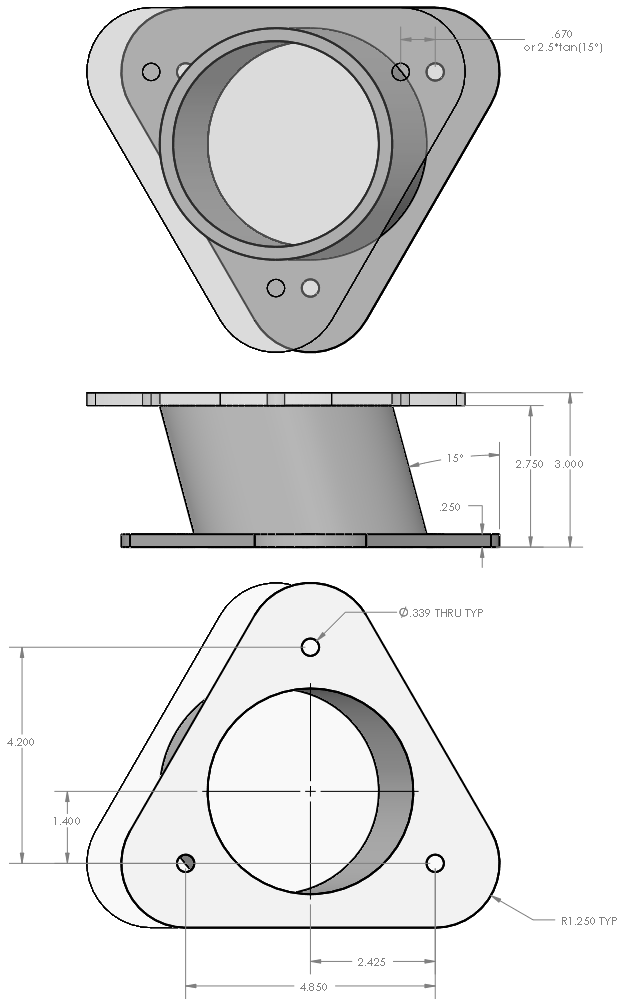
 Good afternoon All, I have been looking around for specific dimensions of strut towers for a lift (3"). I haven't found much, and I have asked a few people which went no where. So here it is, I did some measuring, modeling, and drafting and this is what I came up with. Please let me know how I did? If I need to make changes let me know... Best, Lewis
-
 August 9th, 2014 Rosland Park Edina, MN 4300 W 66th St, Edina, MN 55435 What: This meet is open to anyone in the group, feel free to bring friends and family along. This is being held in conjunction with Japanese Nostalgic Car and is open to anyone with a classic Japanese car or interest in classic Japanese cars. We are trying to grow the community here by intermingling between each other and meeting other people with classic Japanese cars, hard to believe that Legacys and SVXs are considered that. Officially a Japanese Nostalgic Car is any Japanese car made 25 years ago, for this purpose it is anything made prior to 1994, so feel free to come visit and show off your classic Japanese machine. Any car will be accepted but if the lot gets overfilled and you have a newer car you will be asked to make room for cars that qualify for collector plates in the state of MN (20 years or older). Location: The meet will be held at the back lot of Rosland park in Edina, Minnesota on Saturday, August, 9th. The meet will officially start at 11 am and end around 4 pm, there are grills for people to grill food, feel free to bring drinks and snacks. This is the same park as the Edina aquatic center, we are meeting in the back lot which is large enough to support 30 cars or so. There is also parking on the street near by and in the main lot, however I doubt it will get that busy. As this is a public park and will be open to the public please arrive on time or even early to guarantee a spot. Please set a good example of how car enthusiasts act, that being said... Now time for the rules: -THERE WILL BE ABSOLUTELY 100% NO TOLERANCE FOR HOONING, REVVING OR BURN OUTS. You will be removed from the event and the Minnesota EF Owners Club if you are a member, If you are on JNC or USMB I will ask the mods to block you. -Listen to the Admins of the show(the list will be growing soon). If we tell you not to do something don't make us tell you again. -No loud music, Edina is known as being nazis about this kind of thing, please set a good example of how car enthusiasts act. -Be respectful. Acting like a jack rump roast will get you kicked out in a hurry. I feel like I don't need to list off what disrespectful activity is but the short list is: parking like an idiot, being rude to others, leaving trash around, etc. -Have fun. This is an event to instigate comradery in our community and bring together people who wouldn't normally talk to each other. Please feel free the comment or PM me about this meet if you have questions. Below in a link to the Facebook event page https://www.facebook.com/events/797013693672574/?ref=notif¬if_t=plan_user_joined
 -
My EA82 wagon has a slight, random misfire. Recently, I've been pretty determined to find the solution. About 20,000 miles ago, I swapped the long block. Used my old distributor, but got new spark plugs (NGK BPR6ES-11), new spark plug wires (Import Direct 40975), new distributor cap (Import Direct 10-0199), and distributor rotor (Import Direct 12-0186). All parts I got from O'Reilly Auto Parts. Before starting the engine when I installed it, I accidentally hydrolocked it with coolant. I pulled the plugs and cleaned out the coolant. I also accidentally had two of the spark plug wires mixed up. But once I got it all sorted out, I was driving fine. This is when I first noticed the slight misfire. Flash forward to today: I've currently got new plugs (NGK BPR6EY-11) and new wires (NGK 9350) coming in the mail. My current spark plugs don't look abnormal. I think having NGK wires will make a big difference, but I have another issue. My distributor rotor seems to be making serious contact with the cap. There's virtually no up-and-down play in the shaft, nor side-to-side. There's some rotational play, but since it's supposed to be spinning, I don't see how that could cause it to do this. Could it be the wrong parts? What have you guys used for your cap & rotor? I figure what I'll do is grab another distributor from the junkyard. Get a new cap and rotor as well. Besides shaft play, how can I tell how good the distributor is? Is there a way to clean it once I get it home? I have a good feeling that this is what's causing my misfire, since my misfire seems to be very random. It's not necessarily on one cylinder, and it misfires at random times (once every 1-5 seconds).
-
 This is a write-up on using the Rear Wiper Arm from a '09-14 Honda Fit. This is a direct bolt on upgrade! Parts Needed: Honda Fit Wiper Arm Part Number: 76720-TF0-003 Wiper Blade: Trico Exact Fit 16B Install Duration: 5 Minutes _____________________________________________________________________________________ First off a new genuine Wiper Arm assembly can be found on Ebay for $23 or less, usually free shipping! Most don't come with a Wiper blade as shown, but most parts houses will have the Trico Exact-Fit 16B which is no longer the J-hook style clip. Now once you have the Wiper Arm, remove your original one by removing the one 10mm nut behind the plastic cover, pull off the old Wiper arm (May need to jiggle as they tend to get stuck on the motor shaft) once off, remove the round plastic dust cover which covers the motor shaft and nut, this part will no longer be needed as the new Wiper arm covers that. You will then want to position the new Wiper arm so the Wiper blade will be Level with the Window Trim/Seal, once adjusted, apply the original 10mm nut and tighten down with mild force, the Shaft will press into the Beveled washer inside the new wiper arm and it will not slip under operation! Install the new Plastic nut cover provided with the Wiper arm and you're finished! The new wiper arm will press harder on the window for a cleaner, consistent wiping path. One of the best upgrades you can do for visibly. Enjoy, -Tom Note: This setup may also work on the EA81 Wagon and Hatchback.
 -
I have been chasing the cause of extreme surging with this car. It was a bad O2 sensor. So as a quick heads up, most people will tell you its not possible for that to be the cause, but trust me it was. With the new O2 sensor it was running much better (solved the extreme surging) but with some slight hesitation and almost a miss. Later in the day I am pretty sure I found the source of the hesitation/miss... Timing belt that decided to break on my way to show off the car to a buddy. Hopefully the new timing belt will take care of the last remaining problems. But let me digress, I had a fun time changing the O2 sensor on the newly purchased 1993 Subaru Loyale. After many trips to the store to grab different tools and things I ended up getting the O2 sensor out. At first I spent some time attempting to use a harbor freight O2 sensor removal tool but just managed to figure out that its a bit tight to make that tool work and once you have figured out a way to make it work... its a 22mm O2 sensor and not a 7/8 like the harbor freight tool. Ok run to the local autozone and rent there O2 tool kit (25.99). Throw on the 22mm O2 sensor tool and manage to fight the sensor for another 30+ minutes before saying screw it and removing the whole y-pipe. Once the y-pipe was out I managed to finish rounding off most the existing O2 sensor and was ready to take to my friends metal shop to just drill it out. Then I had one last idea, remove the heat shield and see if I could fit a box end on the O2 sensor that way. Magically it worked. I could fit a 22mm box wrench on the O2 sensor and with some help of a rubber mallet I was able to break free the O2 sensor from the exhaust. It was a bitch but I am pretty sure this was the only way I would have been able to remove the O2 sensor and also the most simple fool proof way to do it. tl;dr Remove the y-pipe. Once thats free remove the heat shield around the cat. Use a 22mm wrench and a rubber mallet to beat the O2 sensor out of the cat. Tools Needed: 12mm, 14mm, 22mm, rubber mallet, PB blaster (or something of the sort), rags. Hope my pain is another mans gain.
-
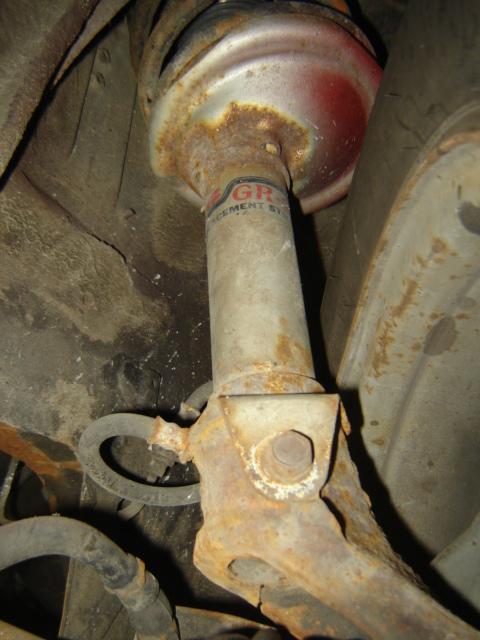
My 85 4wd wagon has a bit more rake than I'd like with the 2" lift -when it rains and I brake, it floods the windshield. If I could get it up in front an inch, it would help. Everywhere including the owners manual says there are adjustment nuts, but I don't see them. Forum searches are coming up vague as well. Don't see any plug for the rear torsion adjustment either. Mfg date is 12/84. I think the PO said the d-side strut was newer-the label there is readable,"KYB gas Replacement" -both sides look identical. Could the replacement strut be missing this? Am I not seeing something here?
-
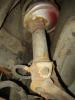
Hey guys, just wanted to see if anyone had input or experience regarding this bearing/washer combo I came across whilst googling. I have a car with cheap coil sleeves installed on stock struts, and I'm doing a bit of troubleshooting. By the way, I am aware that that last sentence contains atrocious words(cheap coil sleeves, stock struts).. Words that only a young man with a microscopic budget would utter. Try to get past that before you bust the flamethrower out. SO, the car in question has a pretty bad case of "coil-bind" or "spring bind." That's not really a common term, so if you haven't heard of it, here's what I know: we're obviously talking about a macpherson strut setup here, so the strut and spring turn when the steering wheel turns. My springs get hung up somehow, if you get what I mean. There is tension in the steering wheel, particularly when stopped and turning the wheel. The tension builds and "pops," which is audible both inside and outside the car, and can be felt in the steering wheel. The "binding" doesn't just happen when stopped, so say you come to a stop and turn the car 90 degrees to the right. The springs don't want to rotate smoothly, and they make a little pop noise as you crank the wheel. The car now pulls to the right, as the spring doesn't want to rotate back to it's normal position after the turn is complete. They are square end springs, I feel as if the issue is pretty clear(in my head) and the base of the spring is just not rotating properly, particularly since it's under so much pressure. These roller thrust bearings I came across seem like they could be a solution. If not a complete fix, maybe they would "reduce the symptoms" a bit. Has anyone seen this in action on a car, or really anything in real life? I think the consensus will be that I should buy some and try it out, but I just wondered if any of you physics-inclined folks would have valuable input. I would appreciate it, and do flame on if you feel it is necessary. Here are two links that are relevant: Eibach Torsion Release Bearings TRB250 - Free Shipping on Orders Over $99 at Summit Racing QA1 Coil-Over Shock Thrust Bearing Kits 7888-109 - Free Shipping on Orders Over $99 at Summit Racing Thanks in advance, Subaru Gods.
-
So my *$%#@ timing belt on the pass. side went mia, leaving me stranded. Went ahead and ordered the kit but it won't be here for a couple days, and I'd like to get the car back home where it's secure & easier to work on. Thought if I could get that belt off the motor on my bench, I could slap that on and drive it here. Trouble is the benched motor has timing belt covers, necessitating the removal of the crank pulley -which is tricky with the motor sitting on a milk crate with no flywheel. Anyone have a trick to get that off?
-
Calling A/C techs... I had a theory about the problem, but I'd like to confer before proceeding. A/C system was working last 2 years, but now it only cycles for ~10 seconds, then shuts off until I cycle the A/C (or defrost) off/on. Does this every time, no matter how long I wait between A/C cycles. Belts are tight, no clutch slippage (that I can observe) and the engine DOES idle up when running (pulser is gapped to spec) Hooked up the R-12 gauge and there were the readings: Engine at EOT, system off: Low side: ~50 psi HIgh side: 55 psi System cycling: Low: drops to ~0 psi quickly High: raises to ~75-85 and holds After cycle: Low: raises to ~55-60 psi High: drops to ~60 psi I added less than 5oz of R12, but same result, only the high side raises slightly, but the low raises when the system is not cycling. Before I add (or maybe waste if the receiver/drier needs replaced) any more, I just wanted to confirm that it just might be low on R12 and the trinary switch is deactiviating due to low pressure.
-
So today I decided to replace the shoes on my rear drum brakes on my Loyale. I've been looking for rear discs for about a year, but not had any luck. Either I don't have the money, there are no junkyard cars, or a list of other reasons. I just spent the $20 and got new drum shoes. Installation went fine (surprising). Wasn't too difficult, even for my first time doing drum brakes. What I have a question about is the old shoes. One thing that caught my eye was the Fuji Heavy Industries logo on two of the shoes. Could these be the original brake shoes that came with car in 1990? The new shoes didn't have the Fuji logo (obviously). The odometer is at 278,300 miles. I doubt these are the original shoes. I'd imagine they've been replaced once before. If they were replaced at the dealership, could they have use Fuji brake shoes? I'm just curious about this. Knowing some of the car's history, I'd say it was probably a 60/40 highway/city driving car. So there's no way the shoes are original, right? They're really worn down, but they still worked. Lift the back of the car, step on the brake, and you can't turn the wheels. Second thing I wanted to ask about is the wear. The leading edge shoe (towards the front of the car) had less material than the trailing edge. Is this normal for EA82s? Both sides were exactly the same, no marks on the drums themselves, and the material on the pads seems pretty normal (no cracks or whatever). I just wanted to ask about this. I kinda have a feeling it's normal, but wanted to check. Thanks for any help. I know a lot of people do rear disc swaps, so not sure how abundant the information on drums is. But all I can say is, the new shoes made a HUGE difference. My brake pedal is a lot stiffer and doesn't have a deadzone in it anymore. I presume the front brakes won't overheat easily anymore. I'll be happy if I can get at least 100K out of these shoes. Thanks!
-
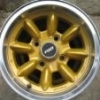
Good afternoon all, I have a 1989 Subaru GL wagon (EA82) that I will be lifting 2". I am looking for recommendations for rims & tires. I will also be drilling out my hubs to the toyota 6 bolt pattern. Any favorites for big tires and rims (size, brand, etc) that have the off-road look and feel without sacrificing street handling. I will most likely be driving to work (20 mi) with this car. Any input/suggestions are greatly appreciated. Cost is always king I am not looking to sell my kidneys to fund this build but I understand it will take some coin. Thanks, Lewis